Pages

Monday, December 22, 2014

Merry Christmas!


Best Wishes for A Very Merry Christmas 
and a Wonderful New Year!!!

Happily, I'm taking a little break to visit with family, but I'm greatly looking forward to catching up with all my favourite blogs and stitchers in 2015!

Don't forget to visit The 2014 Online Advent Calendar at Serendipitous Stitching to see some stitchy holiday goodness! There's still two days left to go.

I participated for the first time last year, and I made a free Blackwor Poinsettia Ornament with Finishing Tutorial that is perfect for some last minute stitching:


Click on the photo to go to the post and download the pattern :)

Important: I just noticed that the Dropbox site that hosts the file now comes up with a pop-up window asking you to sign it - you do not have to sign in to view or download the pattern - just click the "x" in the corner! Sorry for any confusion.


If you don't have the time to stitch both sides, either design would be nice on its own!

Exciting News: Jo is also hosting a new SAL this year called Gifted Gorgeousness:


Just click on the button to read all about it and sign-up if you wish! I think this is a wonderful incentive to stitch all that Very Special Stash that has been gifted to you. I've joined in myself with the great casual monthly drop-in option! I've been very fortunate to have received some lovely stitchy gifts over the last few years, and I'm hoping to squeeze in at least one or two among the Sampler of Samplers next year :)


Happy Holidays!!! Hope Santa is Good To You ;)

Sunday, December 14, 2014

Blogger Glitch: Comment Verification

This is just a really quick post to share some information for other Bloggers. While trying to catch up with my blog reading today, I noticed a new Number Verification screen, even on blogs that did not usually use Word Verification. Then I replied to the comments on my last post and found this new CAPTCHA on my very own blog!

So I did a little investigating :) And it turns out that it's a known Blogger glitch.

A CAPTCHA is a security setting that requires the commenter to "Please prove you're not a robot" by keying in the sequence of letters and numbers displayed in the image above the textbox. This is called "Word Verification", and can be turned on or off by the blog administrator, according to preference. The idea is to cut down on spammy comments. A typical Word Verification box looks like this:


There is a block of distorted letters on the left, and a box with numbers on the right. To leave a comment, you have to translate both the letters AND numbers correctly. I've never understood why the distorted letters can't be actual words or phrases that would be easier to understand, and I often have an embrassingly hard time figuring them out, even though most people can evidently get the right combination quickly.

In this particular CAPTCHA, which I saved a few months ago, I couldn't read the number part at ALL, hence the question marks :) Thankfully you can reload the images (just click on the Refresh circle arrow to the right of the box), but to me they seem to be getting harder to read! The new Number Verification looks like this:


It's only a short number combination, with no letters at all, and is so much easier to read! I'd actually be really happy if they replaced Word Verification with this :)

However, the problem is that it is the result of a glitch in the Blogger Code from a recent Update. The full discussion in the Blogger Help Forum is here, and Chuck Croll, who advises in the Forum as "Nitecruzer", has written a must-read post about it here on his blog, The Real Blogger Status, which will be updated with new info ASAP.

Basically, if you have your comments set to pop up in a new window - like I do - instead of embedded at the bottom of your post AND do not moderate your comments (I do not allow anonymous comments, but otherwise I don't moderate), this new CAPTCHA is automatically added to your Comments form and turning OFF "Word Verifcation" will not remove it.

Unfortunately, the Number Verification CAPTCHA is a fake - you may be able to ignore it entirely and publish as normal, so it's not actually a functioning security feature! You can change to embedded comments to make it go away for now, or check your Cookies following the steps suggested in the posts linked above.

This is a minor change, and Google is always busy, so I wouldn't expect a fix anytime soon. My issue is not with the glitch itself, it's with the lack of communication from Google about it. It's scary to open your Dashboard and find a new feature you didn't add - especially when it doesn't even work! - and it can cause real panic when you discover that you cannot remove it. That's one of the signs of a hacked blog, after all!

It may also be confusing to readers trying to leave a comment! And if you're trying to comment on multiple posts (like, say, catching up with your blog reading) it may be a little bit tedious to keep typing numbers, although at least they aren't letters LOL ;)

So please share this information with other Bloggers you know, in hopes that any misunderstanding or frustration can be avoided :)

Thursday, November 27, 2014

SFS #11 - The End!!! + A Little Finish:)


Please feel free to borrow this banner, or have fun and make your own!

WOWZERS!!! I really can't believe that the year has flown by so fast :) 2014 is nearly at an end (eek!). As I had planned on from the beginning, I'll be taking my SFS Skip Month in December (for the joy of Gift Stitching!), so this is my very last SAL post!!!

First, I just want to thank everyone for all the really wonderful comments on my last entry for October! I'm so sorry that I haven't responded yet, but I've been out of town visiting family and I haven't been online! Without all of your encouragement, I wouldn't have been able to keep writing this year and I can't thank you enough for reading :) I'm really looking forward to catching up with other blogs soon too!

Wonderful News: Mel @ Epic Stitching will be running a SFS SAL in 2015, but it will be structured quite a bit differently. The first sign-up opportunities will go to participants from 2014, but it may be opened up to other active bloggers so if you're interested, please keep a close eye on Mel's blog so as to not miss out!

I'm not sure if I will be joining in 2015, since I really want to focus on my Sampler of Samples. I've got a long list of new techniques I'd like to try, and I'm going to aim for doing one sample per month so that at the end of the year I'll have at least 12 to put together :) Although I'm planning on using as much stash materials as possible, most of these techniques (like Crazy Quilting) involve embroidery or other methods.

The new structure of SFS focuses exclusively on counted thread work (cross-stitch and specialty stitches) with new bonuses for finishes, which is a really great idea and an exciting new challenge, but I think most of my work will fall outside those lines. I'm still in the planning stages, and haven't made my mind up yet, so I'll let you know!

Stitch From Stash (SFS) 2014 - The Year in Review

I thought it would be really fun to have a quick look back at my posts:

New Stash!


I started off the year Stashing instead of Stitching! Thankfully, The Great Stitchy Karma Guides smiled upon me, and I found supplies that were all special to me in some way :) In January (Month #1), I picked up all kinds of dollar store goodies and my very first Evenweave fabric! February (Month #2) saw the miraculous discovery of one of my very favourite designs EVER, and the purchase of supplies to stitch it.

May (Month #5) was a Treasure Hunting bonanza, and I was lucky enough to find my very first Stitch Dictionary ("Creative Needlecraft", which I will review in future!) along with a veritable rainbow of stitchy goodies :) I also shared some thrifty tips!

Finally, in June (Month #6), I bought some finishing supplies and found a lovely pattern book with a gorgeous vintage design that I am still intending to stitch soon ;)

(I also bought some finishing supplies in April (Month #4) that are not pictured)

Final Finishes


This year I stitched a lot of small seasonal ornaments, which has been really fun :)

In July (Month #7) I worked a little Forget-Me-Not Bouquet in Fine Crochet, and this was the start of my Sampler of Samples project that I'm going to continue next year!

August (Month #8) saw the Final Finish of my Spring Variation of Just Nan's lovely "Christmas Hearts" freebie, which I stitched for the JN SAL in March. September's finish (Month #9) was another Just Nan design, my Variation of the "Autumn" section of the "Harmony" Sampler! I made so many silly mistakes stitching this that it almost didn't get finished, but with some encouragement I managed to persevere and I'm so happy that I did :) In fact, I'd like to stitch a little something for the other three seasons (although not necessarily from "Harmony") sometime in the future!

Speaking of Seasonal Stitching, I finished my very first cute Hallowe'en stitchery in October (Month #10)! I had some really amazing comments on these two Happy Hallowe'en Friends, and the Two-Tone Whipped Backstitch Border is something I'm looking forward to trying in festive colours for Christmas!

In March (Month #3), I made a Chicken Scratch Easter Egg and shared the pattern:


But I think that my favourite project this year was my very Special Easter Variation of "Christmas My Way" by Keslyn's Designs! I stitched my version of the egg in April (Month #4), but unfortunately wasn't able to finish the ornament in time for Easter, although I did final-finish it in May (Month #5):


This is the first time I had stitched "Over 1" on Evenweave, and I miscounted a lot at first LOL! The specialty stitches were challenging but beautiful, and I really love the bright colour palette I chose. I made a few changes to the design, and added lots of sparkle with crystal beads! I love the way the bow/hanger turned out too :)

Stitching Finishes


Surprisingly (for me, LOL!) the only project I didn't Final Finish this year was my first entry for the JN SAL in January (Month #1): Just Nan's "Rosebuds". I'm hoping to finish this as a small padded ornament too, for my Stitchy Guru Mother ;)

Amazingly, the only month I didn't Stash or Stitch was March (Month #3)!

(I also reviewed Thomasina Beck's great book "The Embroiderer's Story" in June!)

My Final SFS Finish! - Berlin Woolwork Key & Ribbon:


As a little experiment, I tried stitching up a little vintage Berlin Woolwork motif (found online, as part of the large chart shared here) on 28 count Evenweave, "Over 1", using a single strand of DMC. You see, I'd really like to include a Berlin Woolwork flower bouquet or wreath in my Sampler of Samples, but most of the best patterns are VERY LARGE and so I thought this might be a good way to make them more manageable :) Overall, this worked out pretty well.

I did try using two strands of floss in a half-cross-stitch, which is much more like the original needlepoint Continental (or Tent) Stitch, but I think the cross-stitches give better definition. It's a little tedious though, since a single strand of floss is very fragile, so it requires more patience than I'd thought LOL ;)


I changed the original motif by making the Key gold and brightening the pinks in the Ribbon Bow, and I added a few extra stitches on the left bottom edge of the Bow's "ear" to give a little more shading. It's a teeny tiny little design, as you can see:


Happily, The Great Stitchy Karma Gods came through for me again, and I thrifted this cute little frame for $1.00 that just happened to fit the Key perfectly! It's plastic, but it's pretty :) I just folded the excess fabric to the back and wedged the back on (with a bit of difficultly, admittedly, but so far it's held up just fine!).

I added a layer of quilt batting on the cardboard insert I made to pad out the stitching a little bit and I really like the way it made the motif stand out:


Hopefully this little Key will lead the way to a New Year filled with lots of Stitchy Fun! If you'd like to stitch your own Key, you can download the free .PDF chart and colourway from my Dropbox right here. I think it would make a nice Christmas ornament too, with a red or green bow :) And as usual, if you stitch it, I'd love to see!

My SFS Spending This Year:

So, this month I spent $1.00 on my tiny frame, leaving $24.00 of the monthly $25.00 budget free. When I was just adding everything up, I realized that I made a little mistake - an 86 cent mistake, to be correct LOL. So here are my new numbers:

Month #1 - January: $15.02 (Banked: $9.98)
Month #2 - February: $19.89 (B: $15.09)
Month #3 - March: $0.00 (B:$40.09)
Month #4 - April: $6.57 (B: $58.52)
Month #5 - May: $28.09 (B: $55.63 - $55.43)
Month #6 - June: $8.99 (B: $72.30 - $71.44)
Month #7 - July: $0.00 (B: $97.03 - $96.44)
Month # 8 - August: $0.00 (B: $122.03 - $122.44)
Month #9 - September: $0.00 (B: $147.03 - $146.44)
Month #10 - October: $0.00 (B: $172.03 - $171.44)
Month #11 - November (this post): $1.00 (B: $195.44)
Month #12 - December - SKIP MONTH (forfeited monthly amount of $25.00).

In total, I spent $79.56, and I Banked $195.44, for a total of $275.00. So with the $25.00 I forfeited, that means everything adds up to exactly $300.00, just like it should (hopefully!). So I "saved" nearly $200, which is really amazing and feels like a major accomplishment, even though it's all imaginary money LOL ;)

This is the first year-long major SAL I've ever been a part of, and I'm so happy to say that I completed it!! I'd like to say a HUGE Congratulations to all the many stitchers that are a part of this SAL, as it's been so inspiring to see how other people Stash ;)

Happy Stitching, Happy Stashing, and Happy Stitching From Stash!!!

The SFS SAL is Hosted by Mel @ Epic Stitching, and will continue in 2015!

Thursday, October 23, 2014

SFS #10: Happy Hallowe'en Haunting!!


I'm so happy to be able to share my very first Hallowe'en stitchery ever with you today!!! But before we get there, I'd thought I'd better do a little explaining:

In the past, the only season I stitched for was Christmas :) Although it's still my favourite, over the last year or so I've come to really enjoy having a small seasonal ornament or two to hang on my wall to cheerfully remind me of the time of the year.

I know it sounds a little bit frivolous, but I really enjoy making these small projects that come together more quickly ;) One of my favourite things to do for any holiday is to decorate, and making these stitcheries into ornaments means that I can easily pack them away once the season is over and change them out for something new.

Which is also an excellent reason to start a new project LOL! My Autumn "Harmony" Variation definitely has a spooky feel - with the owls and grinning jack-o-lanterns and all - that's totally in tune with Hallowe'en, but I felt like I was missing something.

And then, suddenly, it struck me one day - I was missing the Hallowe'en Cuteness!!!


This kind of Hallowe'en Cuteness :) As long as I can remember until well into my teens, every Hallowe'en began for my family when the air got chill, the nights started to grow long, the leaves began falling - and the window decorations went up ;)

This Witch and her Kitty was one of the ones we had (I was so excited to find a picture online!), and all were this kind of heavy paper, flocked with velvet powder on one side (the vivid black and pink on the left) and unadorned on the other (the right). The plain side lay flat against the glass, with the velvet side facing into the room.

Most of our decorations featured a black Kitty, and the flocking powder made it feel like she had real fur :) They were all designed in the same style, and now that I think of it, each one featured a pair of characters - the Scarecrow with a Raven, the green-skinned Witch in the purple hat and her Bat, the Ghost with the Jack-O-Lantern.

This is rather a remarkable coincidence given that I stitched a pair of friends too:


This is my version of "Happy Halloween Friends"...


...from "Pat Olson's Spooky Stuff", Leisure Arts Leaflet #2730:


I was fortunate to thrift this booklet a few years ago, but some of the designs are still available as divided digital downloads from Leisure Arts - from top to bottom at the right: "Happy Halloween","Boo To You!" and "No Tricks, Just Treats". I've always enjoyed the Pat Olson line of designs - especially the Christmas ornaments - because her graphics are cute and cartoony but have some shading to them for depth.

As you've probably noticed, I made a few changes :) I loved the Pumpkin and Ghost, but wasn't sure about the Bat or the Wonky Stars at first, and I really didn't like the way the lettering crowded everything together on the left side. So I used graph paper to plan out new lettering - adding the apostrophe in "Hallowe'en" because I've always preferred it like that - based on the original. I also darkened the purples, to make them look a little spookier, and I decided to leave out the Bat altogether in the end.

So I started stitching the parts I was sure about first, and added in the rest:


Starting with the Friends (I made a few changes to the face of the Pumpkin and added the Surprised Eyebrows for extra Cuteness), I then stitched the lettering (with added Exclamation Mark!), and finally the Wonky Stars. I really wasn't sure about those, and had major doubts even as I was stitching, but the more I put in, the more I liked them until the real problem was finding somewhere to stop LOL!

It was in part to distract myself from squeezing in more small stars that I decided to add a border :) On my graph, I had drawn it in as the sewing line for my ornament. I knew that it would be a big ornament from the start, when I decided to use 14 count Aida instead of something smaller (I used three strands of floss for the cross-stitch by the way, which is my usual on 14), but after I added the striped border I knew I would have to finish it another way, which worked out even better than I had hoped!

Here are some directions if you want to try the Whipped Backstitch Border yourself:


Please click on the photo to view it larger in another window :)

This border was so easy and quick to do once I got the hang of it!!! And I really love the look - in this case, the extra orange and black was just what I needed to add a bit more Spooky Cuteness and rein in all those free-floating Wonky Stars LOL. This is definitely a technique I want to try again, especially with white and red for Candy Cane stripes at Christmas ;) If the instructions aren't clear, please let me know!


These two make me go "Awwww!" whenever I look at them LOL!

My SFS Spending for October, Month #10:

Um, would you believe nothing? For the fourth month in a row?! I know, it's some kind of miracle. The frame is an inexpensive one (seriously, $1.00) from the dollar store that I've had lying around for ages. It's only plastic, but the black and the clean lines were just what I needed, and I didn't have to feel bad about hot-gluing a bit of quilt batting to the back of the frame to keep the the stitching in place :)

This was a quick-and-dirty framing job, not an heirloom affair, so I just folded the edges of the Aida (which were nice and stiff) and finger-creased them in place, laid it on the quilt-batting-bedecked back and sandwiched the whole thing together. Snap!

So I have the entire monthly total of $25.00 to add to my Bank, for a grand total of $172.03 Banked :) So I did manage to make it over the $150 saved mark!

Granted, this is entirely because I *still* haven't got my Christmas Gift Stitching sorted out yet (eek!) so I need to hustle on that that, double-quick. Christmas is coming closer everyday after all...now, how's that for scary?! LOL :)

And finally, I just can't resist sharing this Super Spooky Cute vintage card that popped up during that search for my old window decorations -


Wherever and Whoever you Haunt this Hallowe'en, be Happy! ;)

Saturday, September 27, 2014

SFS #9: Autumn "Harmony" Variation!


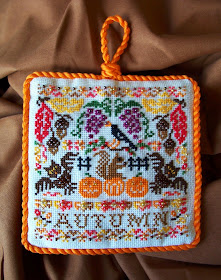
Have you ever had a project that Almost Never Was? That seemed to take FOREVER and a day?! That frustrated you to no end?!! That you made so many silly mistakes on that you took out more stitches than you put in?!!! For me, this was that project:


Stitched on 18 count Charles Craft Silver Standard Aida in Ecru, using 2 strands of DMC Floss for cross-stitch and 1 strand for Mill Hill seed bead attachment

This is my variation on the "Autumn" section of the "Harmony" Sampler from Just Nan. As you may remember, I won the pattern from Meggie's Great Giveaway, and the original colourway called for special overdyed silks that were released with the limited-edition kit. You can see a beautiful kit finish of the entire design here.


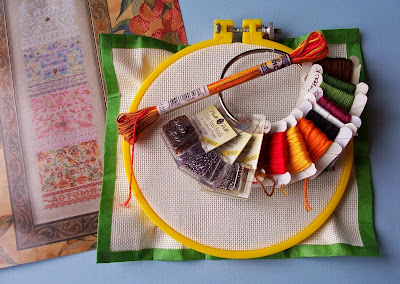
Since Meggie also sent along some lovely DMC Colour Variations overdyed threads - including a beautiful Autumn Mix - I thought I'd substitute that for the overdyed silk. That's the skein on top of the hoop at the top (#4122), with the original colourway on the pattern at the bottom left, and both of them at the top of the photo below:


But when I started to really look at the pattern before I started stitching last Fall (!), I noticed that all these cute motifs just got lost in the variegated thread. Now, I do realize that monochrome patterns meant to be stitched with overdyed threads are designed for a certain look, and I can appreciate the appeal of that style.

However, what happened is that I fell completely in love with this handsome little Squirrel and his floomphy tail, and I wanted to stitch him in a squirrelly colour:


And then it was only a short hop up to his friend Mr. Crow, the Grape Thief...


...and it all took off from there :)

Pulling the colours was the easiest part of this project, and they make a very pretty palette :) I've made a list of the numbers for the floss and beads for easy reference, because these colours could be adapted to any Autumn project, not just this design:


The bead names and finishes are my own that I added for some description. The same colour in another finish - like the three golds - can look completely different!

At first, I only intended to use three colours of beads, but as I added some details (like the red berries on Mr. Crow's branch) I just pulled beads from my Mill Hill stash and started stitching them on. I've never used so many different colours and finishes together in one project, but it was so fun that I'll definitely try to mix it up again!!!


It is honestly RIDICULOUS how much trouble I had while stitching this, and it would take days to detail so I'll spare you the pain :) Sufficient to say if it's a stupid stitchy mistake, I made it! I miscounted, I miscoloured, I misplaced, I miscalculated...there was so many miseverythings going on that it was miserable going at times LOL ;)


These oak leaves? I stitched them THREE TIMES because I was one stitch out :(

I truly came close to completely abandoning this project. As you know, I'm not a rotation stitcher and I like to finish one project before going on to another. I was so frustrated with this at one point that I thought about throwing it out!!! I've never done that in my entire life and am not about to start but that tells you how upset I was. I think it's because I had this vision in my head but I just couldn't trust that it would happen that way. I was plagued by the Demon of Doubt.

And then, suddenly, Hallowe'en came and went and Autumn was officially over, so I put it away nearly done. I just had the lettering and some minor details left to do, but there were still a few things to figure out and I just wasn't in the mood. But when I put it away, I had intentions of finishing it this year, which was a major victory by then.

Thankfully, I stuck it out with some help and good advice :) Karen very generously encouraged this project from the very beginning, when all I had was a few stitched motifs and a lot of angst about how it was all going to work out. Her enthusiasm is what actually led me to dig out the design this year and finally Final-Finish it off!

My Stitchy Guru Mother couldn't understand my vision, since I was hard pressed to put it into words other than "falling leaves and lots of beads!". This is the closest to Primitive I've ever gotten, and that style doesn't lend itself well to embellishment. But she was super supportive of my stitching as always. As she often says, it's only fabric and thread, and if you don't like it you can take it out and try again!


Which is exactly what I did do for several elements, including the fence behind the Squirrel. I worked it in white, cream, super bright white (B5200) and several grays (which looked like tombstones) before settling on black for a wrought-iron look. And adding a few extra stitches between the crosses at the tops of the posts really helped.


And I'm especially happy with the Owls! Although there was a slit pupil in the design, I filled in the eyes with yellow, and added some orange to make little beaks.


The swoosh accent on each side of the lettering seemed a little plain, so I sketched out at least half a dozen variations before deciding to bring in the leaves from the sides and put them on a branch. If I ever want to do one of the other Harmony Seasons in the future, I think this motif could easily be adapted to coordinate - berries on the branch for Winter, green leaves for Spring, blossoms for Summer ;)

As for the Final Finishing, I made my usual padded ornament with corded trim. Because it's larger than usual, I used three layers of quilt batting for the insert this time. I forgot to take a photo of the back, but you can see the fabric here:


It's some sort of cotton blend that my Stitchy Guru Mother had in her stash that just happened to match the Squirrel perfectly! Thank You, Stitchy Karma Gods :)


For the cording, I used two skeins of orange (740) doubled together for width and twisted it by hand. The double thickness works with the larger size of the ornament, but I only had just enough - less than half an inch at the end! - for the edging and the loop (which I made together, in the way I explained for the ornament in the last SFS).

Although I love the look, I had a LOT of trouble trying to sink the end of the double-thick cording under the knot. Eventually I tied the ends together with a length of floss, threaded that through a darning needle, and took the end down into the ornament and out the front, underneath one of the grape leaves. It stretched the Aida and took some finangling, but I was able to nudge the fabric back into shape.

Overall, I think my "Autumn" was worth all the trials and tribulations I experienced! It's so easy to get wrapped up in the small details in a piece of work and lose sight of the larger design, and with this project I learned to take a step back and consult some good friends for perspective :) I usually just barrel on ahead and worry myself silly in the meantime, so this is a lesson I'll try and remember for the future.


My favourite part? The beading! It doesn't just sparkle, it glows in the sunlight :)

My SFS Spending for September, Month #9:

Nothing! Nada! Nyet! Non! For the third month in a row (yay!) my spending is $0.00. Which really surprised me, but it's largely because I haven't sorted my Christmas Gift Stitching out yet. So next month will likely see some splurging ;)

That adds the full monthly allowance of $25 to my bank, for a grand total of $147.03 Banked, Hopefully I'll make it over the $150.00 mark next month!


Thursday, August 28, 2014

SFS # 8 - No Stash, But A Small Finish!


August always seems to be a time of change for me and my family, and this year has proven to be no exception! It's been a rollercoaster month - some highs, some lows - but hopefully it'll all work out for the better in the end :) This Autumn will certainly be interesting at least LOL! My apologies in being so behind in e-mails and blog visits. Thank you very much, as usual, for your patience, and I'll be trying to catch up soon!

I haven't had much time for stashing or stitching, but I did put the backing fabric and floss I bought in June (SFS #6) to good use, and managed to finish this ornament:


The design is my Spring Variation of the Just Nan "Christmas Hearts" freebie, which I stitched for my second entry in the JN SAL. I was hoping to share this little finish with the SAL as well, but unfortunately some negative experiences have caused Zeb to put the JN SAL on hiatus. I really enjoyed the two months I joined in, and I'd like to thank Zeb for all of her hard work and for creating a wonderful Stitch Along!!!

Here is the back of my ornament, which is just plain pink 100% cotton fabric:


I assembled it in my usual way, using a padded insert made with two layers of quilt batting stitched together. The biggest challenge was the cording, because I couldn't find any commercial burgundy cording to match. I've never been good with making floss cording. My Stitchy Guru Mother is, and has a surefire method using a hand drill fitted with a cup hook for the twisting, but I twisted this one all by hand myself.

Although I bought two skeins of floss to make the cording, I ended up only using one, and I tried something different by tying a knot at one end of the cording to make the hanging loop first, instead of doing the loop and the cording separately.


In all honesty, this is best hand-cording I've ever made, and I'm very proud of it :)


Not only do I have trouble making it, but I have MAJOR problems sewing it on! With commercial cording, the twists are hard (wrapped around a firm core) and it's easy - well, relatively speaking LOL - to pop your thread into the spaces between the twists. Floss cording is soft, often has to be re-twisted and smoothed as you go, and will show your stitches, so it's very tricky to hide your thread. Or at least, I find it so ;)


As you can see, the twists aren't perfectly even, but it's a big improvement for me :) I've tried many methods of attachment over the years, but the combination I ended up with here is the best yet. I'm going to try to recreate it sometime in future, and if it works again I'll definitely share! Sometimes I find myself doing things with no idea of how I'm actually doing them, and this was the case here LOL!


And I also think this is the best corner I've ever turned :) It makes me ridiculously happy every time I see it. All my corners are squishy instead of square, no matter how much I poke and prod at them! Now, if only I could get all four the same...


My SFS Spending for August, Month #8:

This is the first time I've had zero spending for two months in a row (yay!), but it was completely by accident not by design :) So I spent $0.00, adding the monthly total of $25.00 to my Bank, for a grand total of $122.03 saved! So I did make it over the $100 Bank mark, which makes me ridiculously happy for some strange reason LOL.

But I don't think this trend will be continuing. I love Autumn and have a few projects lined up, and it's getting near the time to start thinking about Christmas Gift Stitching (ugh - it's still WAY to early for me!), so I can foresee some Serious Stashing going on in September :) That's actually pretty funny, because my timing is off as always - Mel generously gave us a bonus $25 to spend this month. But that's always how it seems to go with me: a day late and a dollar short, as they say ;) I'm also thinking about my Sampler of Samples, so I've got some Stash Diving to look forward to as well!

Saturday, July 26, 2014

SFS #7 + A FC Forget-Me-Not Bouquet!


Wowzers, it's so unusually hot here this summer and I'm really feeling the heat! Don't get me wrong - I'm not complaining; I know a lot of people are loving this heatwave. But I usually stitch with everything spread out across my lap and piled up on every nearby available surface, so it's just been too much to manage for me. Thankfully, fine crochet has come to my rescue; it just needs a hook and some thread :)

Thanks to the wonderful comments on my last post about the Vintage Needle Arts Sampler, I have decided to make my own littler sampler of samples :) But instead of planning everything out right away I'm going to start making some things and hope they all come together at the end! This will be a great chance to use some of my most Special Stash, and to try some new techniques ;) Like this pretty fine crochet posy:


It's my own Variation on this lovely FREE Violets Pin by Maggie Petsch for Kreinik:


The original uses strands of the super sparkly Kreinik Blending Filament crocheted together with the cotton, which is an interesting idea and would be great for special occasions. It's a very adaptable pattern and is fairly easy to stitch, the tricky part was figuring out the assembly! It's also a little large for a brooch but cute as an ornament:


I really love the backing doily, the little loops were fun to do and add a lot of detail :) To make the Violets into Forget-Me-Nots, I just made the first round yellow and used a Magic Circle so the stitches would pull more tightly together. The Violets had four small petals and one large, so I made all five of mine the same size. I also shortened the stems a little so they wouldn't trail over the bottom edge, and added the little white crocheted bow in place of the ribbon, which took some finangling LOL!

The biggest change I made is actually one you can't really see. The flowers and stems were supposed to be stitched directly to the middle of the doily, but all the tacking and darning stitches from the coloured threads would show up on the white back. Since this will be an applique of sorts, the back won't be seen, but I wanted to see if the pattern would work as an ornament too. So I made a false front simply by repeating the first three rounds of the doily and stitched everything to that!

And as I was joining the two pieces, I noticed that the false front and doily back formed a little pocket, so I added a bit of fibrefill stuffing and the posy just came to life! All the flowers mounded up like a real bouquet, the stems flared out and the ribbon bow stood out more! You can see the effect more on the back here:


And from the side you can see how the flowers (I made seven in all) layer together:


I'm so pleased with how this turned out! I think it's a wonderful start to the Sampler of Samples (I really have to come up with a better name, but we'll call it that for now LOL). And it can easily be changed to other flowers; add a sixth petal and work them in pink and you have Cosmos, with white you'd have Daisies.


Forget-Me-Nots are a humble little flower and often overlooked, but I have always loved them for their cheerful look and the wonderful sentiment. They also seem to me to be very determined; we've been very fortunate to have a few growing wild on the lawn every year, and I've even seen them pop up in sidewalk cracks :)

My SFS Total for Month #7, July:

I'm happy to report that for only the second time ever (the first being March) my total is $0.00! That leaves the Monthly Budget of $25 free, adding up to the grand sum of $97.03 in my Bank. I'm hopeful that I'll hit the $100 saved mark next month, which will be encouraging to see even though it's all imaginary money LOL!

Wonderful News: Mel, the Host of Stitch From Stash (SFS), has just had her blog Epic Stitching chosen for a magazine feature and she's having a Great Giveaway for her Followers to celebrate!!! Congratulations Mel - well deserved :) (Disclosure - sharing the news does give me an extra entry, but I'd share the news anyway!)

UPDATE: The Giveaway has now been drawn :) Congratulations to the Winners!