Sunday, December 23, 2018

❤🎄 A Very Merry Christmas! 🎄❤


❤ The Greatest Gift is Love ❤
My Variation of a Lizzie*Kate design from the
Just Cross Stitch 2001 Christmas Ornament Special

(There's a lovely finish of the design by Anne on Flickr here, closer to the original)

Hope you're getting into the Christmas Spirit! It's been a little hard for my family this year, as it's our second Christmas without my beloved Grandpa. He died on Christmas Day 2016, and last year was a blur - I have no idea how we got through it to be honest. This year his loss is always in our thoughts, and the grief hits hard at the strangest times. So I stitched this little ornament as reminder to us all that it's not the Holiday hustle and bustle that matters, but the time we spend together and the memories that we make 😊


I really enjoyed working on this, and it stitched up quickly! My first idea was to stitch everything with beads, but the lettering looked too wobbly, since I was using inexpensive silver-lined seed beads that have a pretty sparkle but unfortunately aren't a regular size. So I settled for beading the star and the border, which I turned into little red flowers with gold centers. The lettering is in metallic floss, for some extra sparkle ✨


In keeping with the sparkle, I found this beautiful glittered gold fabric for the back! It is so lovely, especially in the Christmas lights - it looks like it's sprinkled with real gold dust 💛 Unfortunately I had trouble capturing that in the photo.

And I used some of my favourite cording, a red-gold-green tinsel cording I found at Michaels a few years ago (and really wish I'd bought more of!):


It's a little challenging to attach, but I've found that sewing through the trim with invisible thread does the trick. And the end result is fantastically sparkly! I tried to capture all that pretty glitter, and this is the closest I could get (sorry it's a bit dark):


You can see a little bit of that gorgeous silver-lined seed bead shine on the star ⭐

2018 has been an interesting stitchy year for me! Although I haven't been able to do nearly as much with the blog as I'd hoped, I joined Instagram and have greatly enjoyed the huge stitchy community over there. I was awed and incredibly thankful for the support my Joyful Jester entry to the SFSNAD Stitch At Home Challenge brought 🤗 And I've been having a ton of fun experimenting with hand embroidery.

Hopefully 2019 will bring more stitchy time, for all of us! 😄


Best Wishes for A Very Happy Holidays, and a Stitchtacular New Year!

Tuesday, December 4, 2018

A Maple Leaf for a Canadian Traveler!


As Winter sets in and Christmas is coming just around the corner, I want to take a step back and bid a fond Farewell to Autumn! You may remember the Lolli & Grace Autumn Leaf SAL from October; if you do, this design will be very familiar 😊 My best friend loved the finished needlepainting project so much she almost took it home with her LOL

Although she's always generously supportive of everything I make, it's been a while since she so obviously fell in love with one of my projects. She mentioned it would make a nice bag - a tote, or a purse - and after some thought, I decided to stitch a "bag brooch".

She's not one for wearing pins or brooches on a shirt or coat, so I wanted a larger motif she could pin to any of the canvas messanger bags she usually carries. The pins make it removable, for when the Autumn season is over. She's also a globetrotter who loves to travel, and Canadians like ourselves often wear badges or pins with the Maple Leaf to find fellow explorers, so this colourful little brooch can also serve that purpose!

I hope it will be a fun reminder of home when she's off having adventures abroad ❤


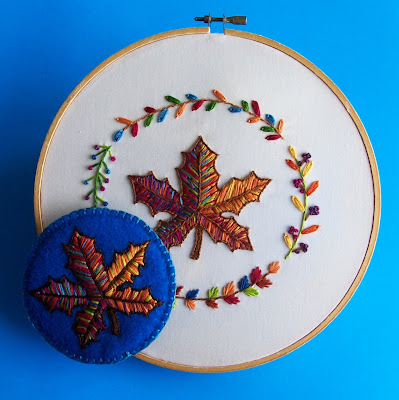
Here's the brooch in comparison with the original project! For the hoop, I enlarged the pattern slightly; for the brooch, I used the original Maple Leaf sizing. The colours and technique are the same. If you would like to stitch your own, the pattern, stitch guide and incredibly helpful video tutorials are all still available on the Lolli & Grace site, and you can find all the direct links in my project post.

This was my first time finishing an oversized embroidered brooch, and it was very much a trial-and-error process! I stitched my leaf on felt, just ordinary acrylic craft felt, in a pretty turquoise colour. Originally, I wanted to cut the border following the outline of the leaf, but I was rushed for time and went with a simple circle. In the end, I really like the extra colour, and the way the felt picks up those beautiful blues Anne chose that make this project so unique 🎨


I did baste a square of sew-on stabilizer to the back, for extra strength:


The brand is Pellon, but I'm not sure which type. It is very firm. I bought it off the bolt at my local craft shop. It did require a little extra strength to sew through it, but it made sure the felt didn't stretch (which was extra likely since I was stitching in hand without a hoop!) and it really helped to make sure the felt didn't pucker under the weight of all that thread painting. All the different colours result in quite a few layers of thread!

When I was finished stitching, I removed the basting threads. Since I was going for an outline finish at first, I spent some time cutting the stabilizer close to the stitching but in hindsight I would have just cut it to the circle shape, as it would have added some extra support to the backing. And would've been so much simpler 😄


The main problem with finishing an oversize brooch is making it stiff enough to stand on its own and keep its shape. Although I don't have any pictures of the process, what I did was cut the top of a clean plastic salad container - the kind you get from the deli - to shape. This type of plastic is clear and somewhat flexible. I did not want a thick plastic that might get brittle, and so be more likely to break.

I cut the plastic circle about 1/4 inch smaller than the felt, to give me room for my Blanket Stitch Edging. I punched four holes in the middle of the plastic with a hole punch. Then I cut a circle of polyester quilt backing, and sewed that to the plastic, tacking through the circles. This gave me a stiff insert with batting on one side.


For the back, I cut out a matching circle of felt, and sewed two pinbacks on either side of the middle. I used two because the brooch is oversize, and I wanted some extra security. To assemble, I put the insert batting side up - to cushion to the back of the stitches - and sandwiched it between the embroidery (right side up) and the backing circle of felt. Then I sewed the edges with blanket stitch.


I'm very happy to say that that recipient is very pleased with her bag brooch! I really like that the brooch is removeable and can be pinned to anything fabric. I hope the finish holds up with wear, but only time will tell 😊


✈ Do you have a traveler in your life? Have you ever stitched something for them? 🌍