Showing posts with label Kits. Show all posts

Friday, November 6, 2020

🍁 A New Start for Autumn πŸ‚

Has there ever been something that you would absolutely love to stitch but have never been able to buy for some reason (or have bought but haven't had the time to start)? Dimensions Gold's Fall Fairy has been at the top of my wishlist for years! I've loved it ever since I first saw it on the cover of a Herrschners mail order catalogue when it was released several years ago (unfortunately, I can't remember the exact year - if you do, please let me know! I'd really appreciate it). 

Most of my stitching has been gifts for others, and I rarely do large projects - and never one for myself, as of yet, although I have several planned in my Stitchy Stash. They require a much larger commitment of time, energy and resources - and space! 

And Dimensions Gold kits are expensive, because the designs are complex and intricate - in my opinion, they're the best mass-market cross-stitch kits available, although I've ever only worked one: my Twilight Angel (which is a smaller Gold Petites kit), which is still unfinished (but not forgotten - I'm still waiting on finding the perfect frame to finish stitching on the background scattering of stars and sequins and the embellishments). 

To my surprise and delight, a very kind friend - who isn't a stitcher (yet!), but who happened to remember my love for this kit from a passing conversation - gifted me the Fall Fairy for my birthday this year, and I'm so excited and grateful to finally have a chance to stitch her! It's an amazing feeling to get your dream project in your hands πŸ˜ƒ

This design is based on Ruth Sanderson's amazing artwork:


Although the cross-stitch version is cropped and simplified - the fairy is missing her butterfly wings, and the many little pixies and sprites have vanished - she retains the lovely joyful exuberance that I also feel for Autumn. You can almost feel the magic wind she's creating whirling the leaves and whipping her clothes! 

And the Fall Fairy is part of an informal seasonal series of Dimensions Gold Sanderson artwork adaptations!  I absolutely love designs based on the Four Seasons πŸ‚❄🌷🌻

There is also the beautiful Woodland Enchantress (Winter):


Thanks to my Stitchy Guru Mother, who gifted this kit to me a few years ago (she was looking for the Fall Fairy to give me but it was out of stock at the time), I also have the Enchantress in my Stash and she will make a wonderful companion for my Fall Fairy! 

She's a kit I've put off stitching because, frankly, the design is very intricate and a little intimidating πŸ˜† I also thought I would need a dedicated space to leave her set up  - and an actual needlework stand of some kind - but I'm finding ways around both with my Fall Fairy. So if I can finish this kit, this will be the next big project I tackle πŸ˜„

Also, there is the delicate Spring Fairy, playing a flute (I love her wings!): 


And finally, there is the charming Fairytale (Summer), which unfortunately seems to be out of production at the moment:


Although I don't think these were meant to be an official set, I do think they compliment each other perfectly! For anyone who has wondered what comes in a Dimensions Gold kit, I thought I'd do a quick run down. The kit contents come in clear plastic folder with a large full-colour photo on the front:


The charts have changed, and are now on shiny paper. I was concerned at first that this wouldn't take highlighter well (I mark off the stitches as I do them to keep track of my place), but thankfully it does. Both pages are double sided, with no overlap. There is a small inset for the detailed backstitch on the face. The symbols are large, clear and multi-coloured. There is an additional page with instructions in several languages, a legend for floss and materials, and stitch diagrams and order.


My favourite part of Dimensions Gold kits are the presorted threads!
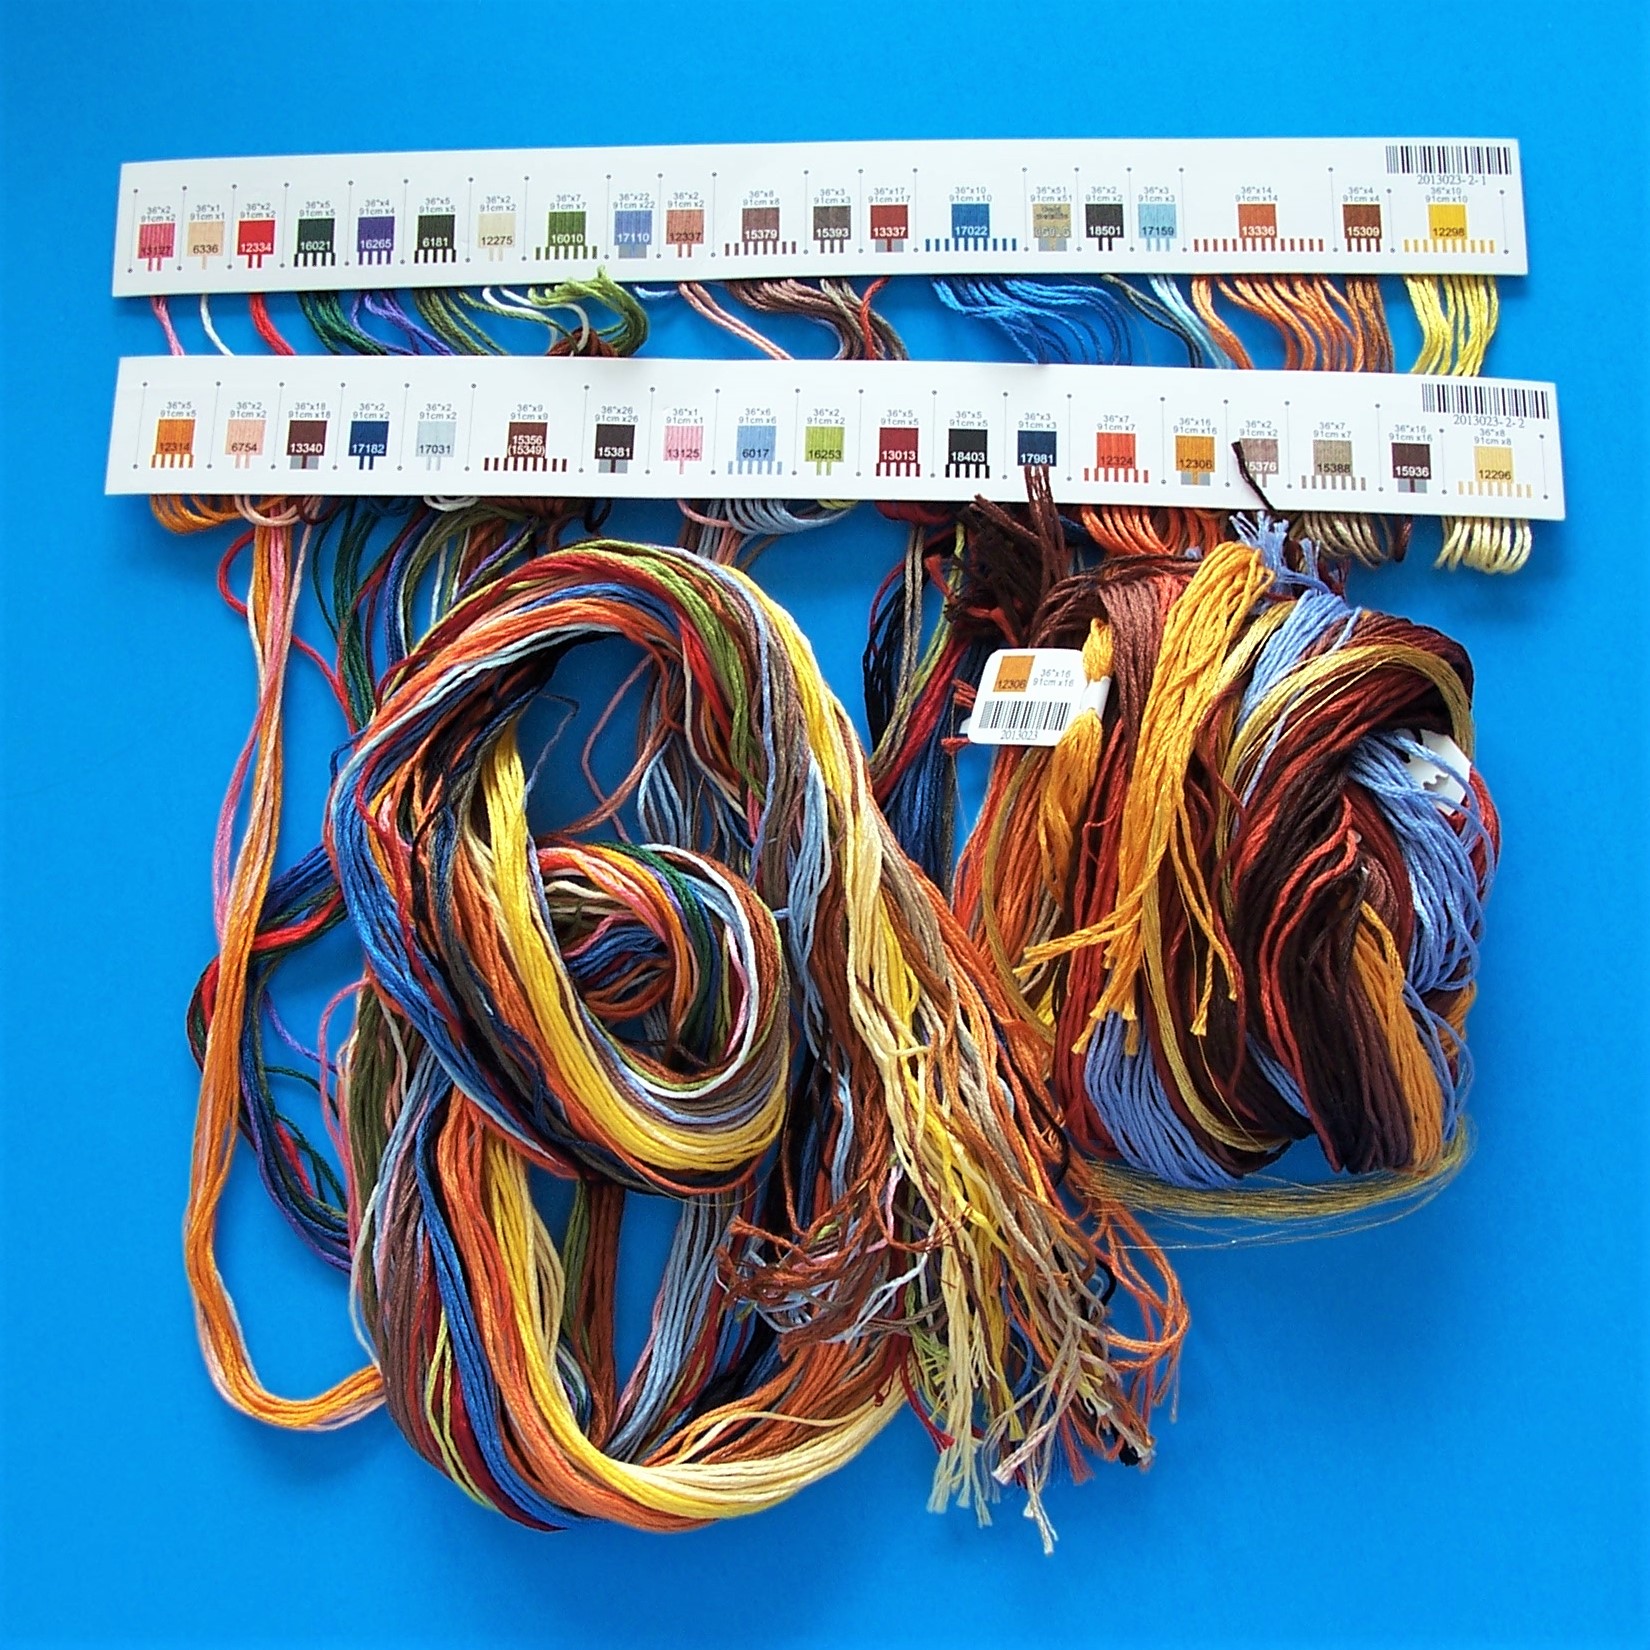

There are 38 colours (with 8 blended colours) and a single-stranded gold metallic. They come already affixed to two cards with a small image of the colour and the colour number. Extra threads for some colours come in additional bundles labelled with the colour number only. I love these, and I make my own versions for nearly every project. 

The only thing that could be improved is including the stitch symbol by each colour! I try to draw my own on, but they're always wonky πŸ˜‚ I also use a hole punch to add a parking spot for each thread colour on the opposite side, in the white space. For the blended colours, I'll be making my own little thread card to keep them tidy.

The kit comes with a gorgeous blue-gray 16 count Aida - the colour of a blustery Autumn sky - and gold beads. There are also two needles, one tapestry and the other crewel (for beading, I think, although it's a little thick). I'm using a 17x17 Q-Snaps style frame (mine is made by Unique / H. A. Kidd) instead of a hoop.

For this project, I decided to do something I've never done before: I gridded the fabric!


Although I've seen gridding recommended for larger projects, I've never tried it before. Because the design is fully stitched (also a first for me!), I wanted to make the counting easier. It took some time to set up but I'm so glad I did - it's really helped

There are many different ways to stitch a grid pattern on your fabric, and several different special materials available, including guideline threads. Most tutorials recommend an easy-to-see colour not used in your project (frequently bright red) and a stiff thread, like fishing line or monofilament.


Since I was impatient to start my Fall Fairy, I used sewing thread to grid, using the Over 8, Under 2 method to make 10 stitch squares. I chose this design because it keeps the majority of the thread visible on top the fabric, so it's easy to adjust the tension and there's less chance of getting the gridding thread caught up in my cross-stitches. I only gridded the vertical lines, and that works well for me - again, less gridding thread to catch in my stitches, but a great guideline for positioning them. 

As you can see, I started the threads on the front side of the fabric from the bottom, gridded up and over and then back down, in a U shaped pattern. I let the ends dangle so they are easy to adjust and hopefully easy to pull out once my stitching is finished!

The blue star pin is marking the middle of my fabric, the point where all four sections of the pattern converge. I later changed it out for a less pointy (and therefore less thread-catchy) green heart pin. I left the gridding threads a little slack so they float over the cross stitches; it's easy to make them tighter or looser by pulling them out with your needle, and I just nudge them aside when stitching close to them.

It took a bit of time to adjust to working in this new way and it was awkward at first but I'm only sorry I never tried it before! It really does give you a way to double-check your placement and avoid counting errors. I've made a few small ones but the grid has made me catch them much faster than I would have otherwise.


Here's my start so far! I'm really enjoying stitching my Fall Fairy during her Season, it makes it extra-special πŸ‚ What's your dream stitchy kit or project? And do you enjoy seasonal stitching? I hope you'll follow along with me on this new stitchy adventure! 

Saturday, July 28, 2018

Finish: 🐝🌸 Bee Happy Brooch 🌸🐝


Love & Roses Vintage Brooch
Free Stamped Cross Stitch Kit
with Cross Stitcher magazine (UK), March 2018


I hope everyone is having a nice Summer, despite the heatwaves everywhere! It hasn't been that warm here compared to other places, but I'm not used to the heat and it's been challenging with temperatures of 30 degrees Celsius, plus Humidexes between 35-38 every day. Needless to say, I haven't been able to do much stitching!


This is Cross Stitcher, the UK magazine, from March 2018 which my Stitchy Guru Mother bought me as a little everyday cheer-up kind of gift, which are always fun to receive! The kit is the Love and Roses Vintage Brooch:


It is a Stamped Cross-Stitch motif with flowering branches, a bee, two ribbon roses and a little saying. My favourite part was that you could choose which phrase you wanted; the kit was shown with "Mum" but I chose the "Bee Happy" to go with the bee ❤🐝

For anyone who would rather stitch it regularly, a chart is included in the magazine.


The one thing that gave me trouble was the fabric. It is supposed to be "Shabby Chic", but to me too much fraying just looks plain shabby. So I added some iron-on interfacing (off the bolt from the local quilt store, Pellon brand) to the back of the piece and it really helped immensely, especially when it came to cutting out the little saying, the Made with Love piece for the back and trimming the edges. It cut down on the fabric puckering too, so I'd really recommend doing this before stitching your own kit, or anything like it!


Of course, I did make a few changes πŸ˜„ The thread given in the kit to stitch the bee was navy blue (?!), so I substituted DMC 3371 (Black Brown) for it. I also used 3 strands of floss instead of 2, to better cover the stamped blue lines, and I even had a little left over! I added a stitch to fill in the Lazy Daisy leaves, and the little blue French Knot flowers were on the chart, although not shown on the kit cover.


Finally, I switched the two white buttons out with two from my Grandma's button tin, a pink and a yellow and I'm very pleased with how they look! She's not sure where they came from, so there's no particular story attached, but I love that they have a family connection. I also added DMC 996 to attach the pinback and for the Buttonhole Stitch along the Made with Love tag on the back (3 strands) and the front edging (6 strands).


The motif was supposed to be stitched to the backing with Running Stitch, but the Buttonhole Stitch helped pull the fabric straight and covered up the cut edges, which frayed a little even with the added interfacing. I left the guidelines for the Running Stitch visible deliberately, as that turquoise matches the text on the labels and nothing else did. If I had thought about it, I would have worked the blue French Knot flowers in turquoise, but this didn't occur to me until after I had them stitched in!


My favourite part was the Ribbon Roses! Although the lengths of ribbon given could have been longer, this is such an easy and effective stitch and something I'd love to try more of in the future! All in all this was a fun little project, once I got past the frustration of the fabric, and I really enjoyed that it included some different stitchy techniques (Stamped Cross-Stitch, Embroidery and Ribbon Embroidery).


One thing I did learn - Stamped Cross-Stitch is not nearly as easy as I'd always thought it would be! My Grandma has a lovely cushion, four little birds for each of the Seasons, that she bought at a yard sale done in the technique. The work is even and fine except for a few wonky stitches, and those "mistakes" always bothered me.

Now I know that they are the norm, not the exception, and greatly respect how well the majority of the work was stitched! A lot of vintage kits were Stamped Cross-Stitch - dresser cloths, tea towels, doilies - and I always thought I'd like to try them. But it is extremely difficult getting both legs of the cross-stitch even, and fitting groups of cross-stitches together. I greatly prefer working on counted cloth, and it made me realize afresh what a miracle Aida cloth was when it was invented πŸ˜ŠπŸ’Ÿ

Have you ever try Stamped Cross-Stitch, or Ribbon Embroidery, or would you like to?

Monday, July 11, 2011

EKSuccess Brands Contest!


This is a quick post to let you know about a contest being hosted by EK Success Brands, the umbrella crafting corporation that includes Dimensions cross-stitch and needlework kits, Martha Stewart Crafts, Jolee's scrapbooking supplies, Jolee's Jewels (which has recently been rebranded as Create Your Style With Swarovski Elements) and Perler Beads, among many others.

Although it's been running since June, I just received information on this contest today, via the multi-brand Newsletter (you can select the brands you wish to follow).


The Craft, Tell, Win! Contest offers two prizes of $250 (US) EKSuccess Brands "online gift cards", and entry is automatic upon completion of a product review. The full rules are in this .PDF document; the important facts are that the contest closes July 31st, 2011, and it is open to anyone in the United States and Canada (excluding Quebec) who is 18 or over.

Every completed product review submission counts as one entry, and you can enter as often as you wish. All entries must be written in English, and all the required information on the review from (signified by a red asterik - *) must be filled in for a review to be considered as complete, and thus eligible for entry.

Because I was curious, I went to a Dimesions kit and followed the procedure described in the ad; that is, I clicked on "Write A Review", and then created an account (you need to provide a name, e-mail address and password).

This opens up the Review Form, and it is one of the most extensive I've ever seen. You must provide a star rating, a summary, and a review (of 50 words or more). But you can then add pictures or videos of your work, you can link to 'related projects' on the website, and you can submit feedback to customer service about the kit!

The whole point of the contest, I think, is to get crafters on the product sites, filling out the review forms and making recommendations.

It seems that EKSuccess Brands is aiming to create a sort of crafter's social network, with their Spotted Carnary "community" site (Cross-Stitch and Embroidery is hidden under the General Crafts heading, by the way) which serves as the "Gallery" section of the EKSuccess home website where crafters can post pictures and text about projects made using EKSuccess product lines.

And since the Gallery posts link to the products used,the reviews are another level of 'advice from fellow crafters' to consider. It's an interesting idea, and if you're a crafter who uses EKSuccess products (I know a lot of us stitchers use Dimensions!), now is a good time to try out the review feature if you'd like to do so :)

If you do decide to enter,


And feel free to link to your reviews in the comments, since I'd love to see them!

Personally, I'd be a bit careful, because I can't tell if the review content will become EKSuccess property or not, and that's something you may want to consider before posting up pictures or video of your work, but then I'm paranoid like that ;)