Showing posts with label Specialty Techniques. Show all posts

Friday, November 6, 2020

🍁 A New Start for Autumn 🍂

Has there ever been something that you would absolutely love to stitch but have never been able to buy for some reason (or have bought but haven't had the time to start)? Dimensions Gold's Fall Fairy has been at the top of my wishlist for years! I've loved it ever since I first saw it on the cover of a Herrschners mail order catalogue when it was released several years ago (unfortunately, I can't remember the exact year - if you do, please let me know! I'd really appreciate it). 

Most of my stitching has been gifts for others, and I rarely do large projects - and never one for myself, as of yet, although I have several planned in my Stitchy Stash. They require a much larger commitment of time, energy and resources - and space! 

And Dimensions Gold kits are expensive, because the designs are complex and intricate - in my opinion, they're the best mass-market cross-stitch kits available, although I've ever only worked one: my Twilight Angel (which is a smaller Gold Petites kit), which is still unfinished (but not forgotten - I'm still waiting on finding the perfect frame to finish stitching on the background scattering of stars and sequins and the embellishments). 

To my surprise and delight, a very kind friend - who isn't a stitcher (yet!), but who happened to remember my love for this kit from a passing conversation - gifted me the Fall Fairy for my birthday this year, and I'm so excited and grateful to finally have a chance to stitch her! It's an amazing feeling to get your dream project in your hands 😃

This design is based on Ruth Sanderson's amazing artwork:


Although the cross-stitch version is cropped and simplified - the fairy is missing her butterfly wings, and the many little pixies and sprites have vanished - she retains the lovely joyful exuberance that I also feel for Autumn. You can almost feel the magic wind she's creating whirling the leaves and whipping her clothes! 

And the Fall Fairy is part of an informal seasonal series of Dimensions Gold Sanderson artwork adaptations!  I absolutely love designs based on the Four Seasons 🍂❄🌷🌻

There is also the beautiful Woodland Enchantress (Winter):


Thanks to my Stitchy Guru Mother, who gifted this kit to me a few years ago (she was looking for the Fall Fairy to give me but it was out of stock at the time), I also have the Enchantress in my Stash and she will make a wonderful companion for my Fall Fairy! 

She's a kit I've put off stitching because, frankly, the design is very intricate and a little intimidating 😆 I also thought I would need a dedicated space to leave her set up  - and an actual needlework stand of some kind - but I'm finding ways around both with my Fall Fairy. So if I can finish this kit, this will be the next big project I tackle 😄

Also, there is the delicate Spring Fairy, playing a flute (I love her wings!): 


And finally, there is the charming Fairytale (Summer), which unfortunately seems to be out of production at the moment:


Although I don't think these were meant to be an official set, I do think they compliment each other perfectly! For anyone who has wondered what comes in a Dimensions Gold kit, I thought I'd do a quick run down. The kit contents come in clear plastic folder with a large full-colour photo on the front:


The charts have changed, and are now on shiny paper. I was concerned at first that this wouldn't take highlighter well (I mark off the stitches as I do them to keep track of my place), but thankfully it does. Both pages are double sided, with no overlap. There is a small inset for the detailed backstitch on the face. The symbols are large, clear and multi-coloured. There is an additional page with instructions in several languages, a legend for floss and materials, and stitch diagrams and order.


My favourite part of Dimensions Gold kits are the presorted threads!
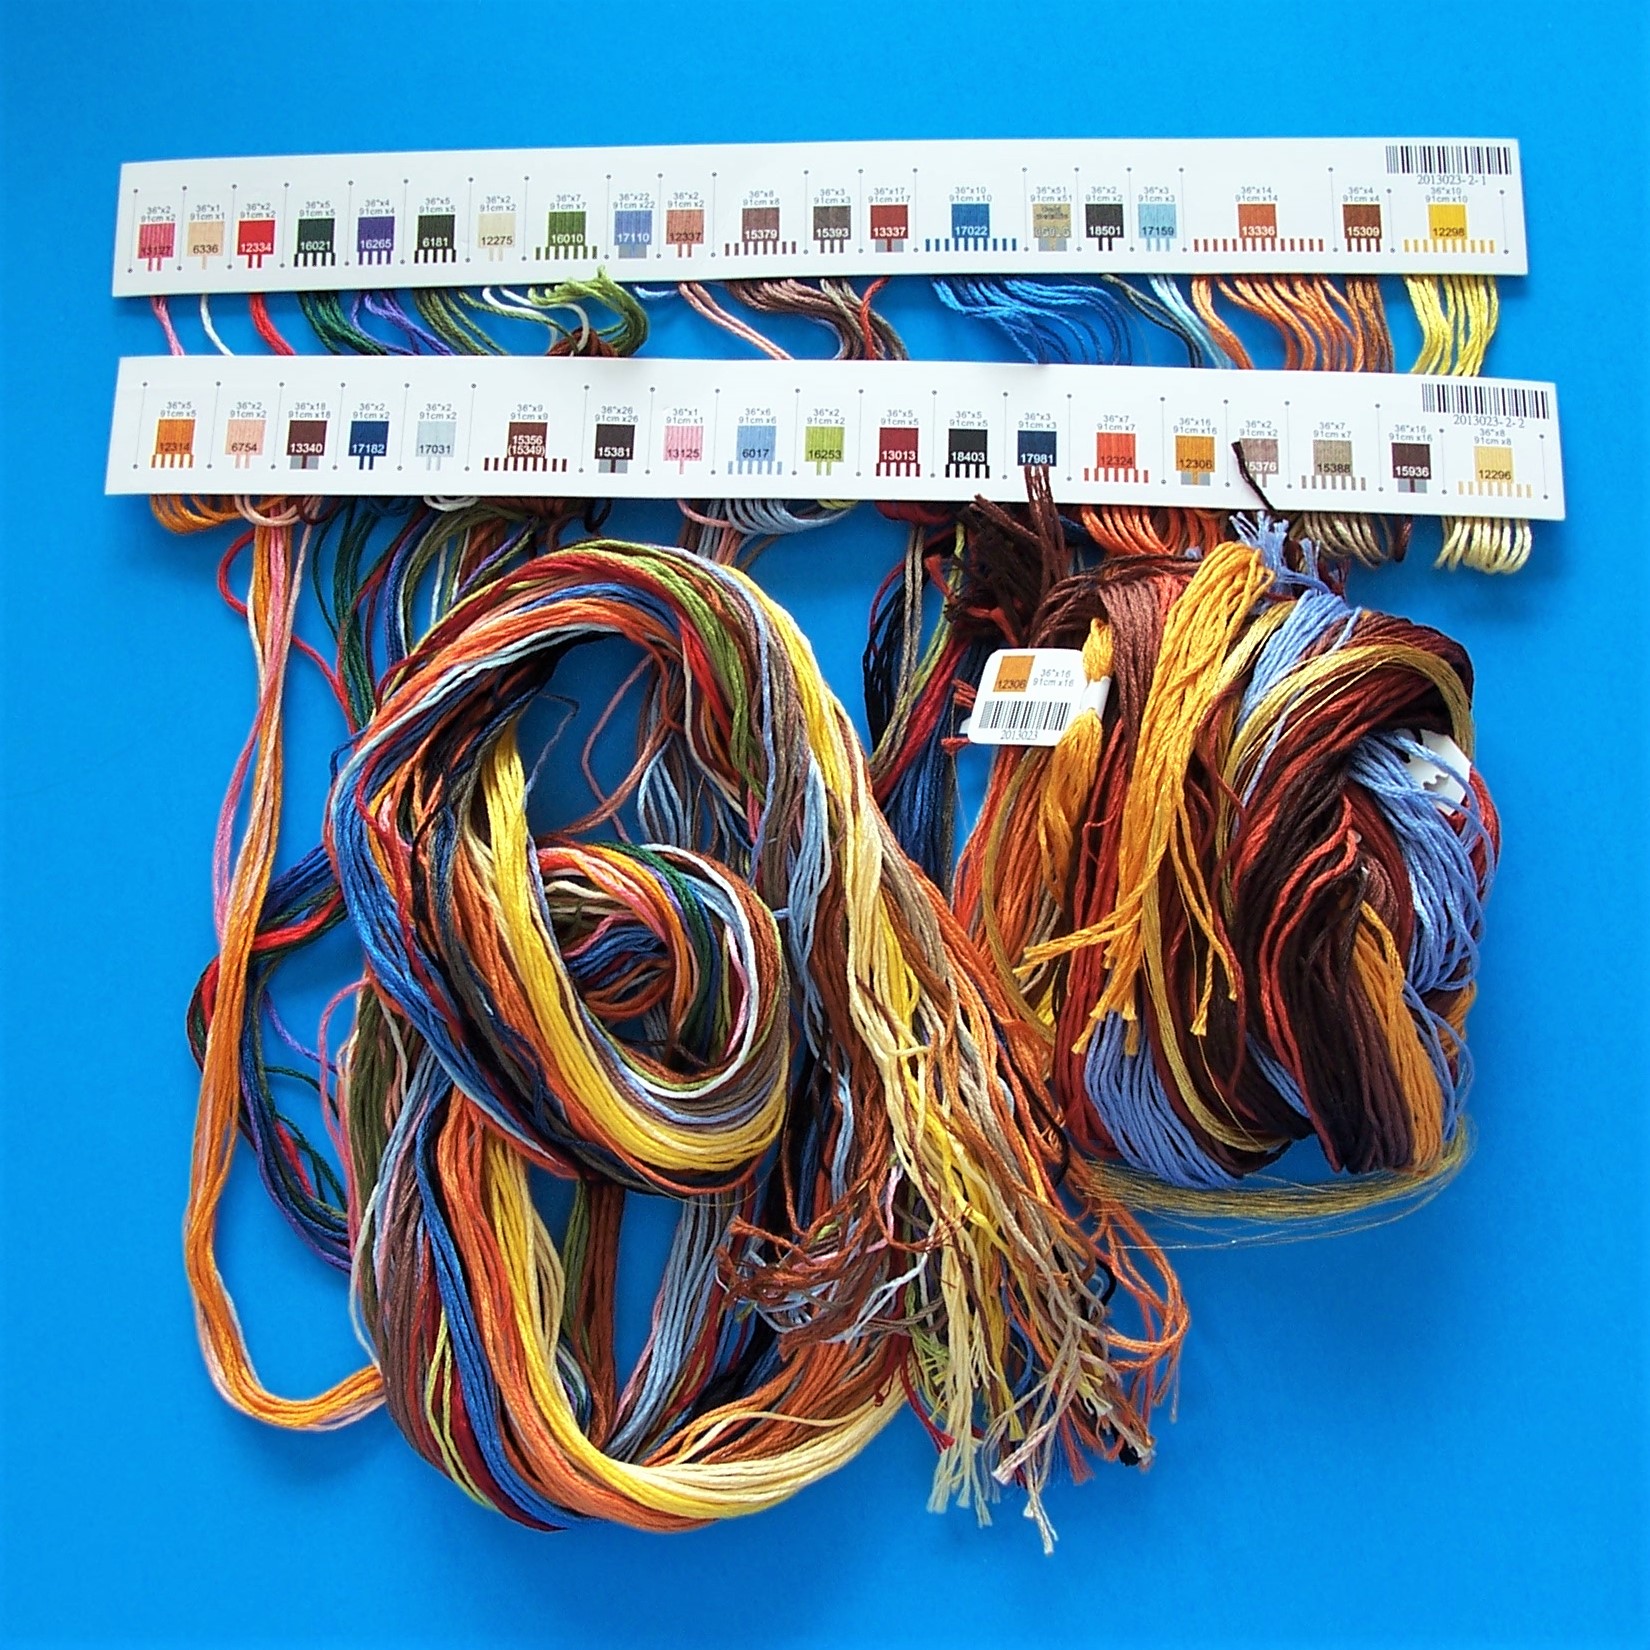

There are 38 colours (with 8 blended colours) and a single-stranded gold metallic. They come already affixed to two cards with a small image of the colour and the colour number. Extra threads for some colours come in additional bundles labelled with the colour number only. I love these, and I make my own versions for nearly every project. 

The only thing that could be improved is including the stitch symbol by each colour! I try to draw my own on, but they're always wonky 😂 I also use a hole punch to add a parking spot for each thread colour on the opposite side, in the white space. For the blended colours, I'll be making my own little thread card to keep them tidy.

The kit comes with a gorgeous blue-gray 16 count Aida - the colour of a blustery Autumn sky - and gold beads. There are also two needles, one tapestry and the other crewel (for beading, I think, although it's a little thick). I'm using a 17x17 Q-Snaps style frame (mine is made by Unique / H. A. Kidd) instead of a hoop.

For this project, I decided to do something I've never done before: I gridded the fabric!


Although I've seen gridding recommended for larger projects, I've never tried it before. Because the design is fully stitched (also a first for me!), I wanted to make the counting easier. It took some time to set up but I'm so glad I did - it's really helped

There are many different ways to stitch a grid pattern on your fabric, and several different special materials available, including guideline threads. Most tutorials recommend an easy-to-see colour not used in your project (frequently bright red) and a stiff thread, like fishing line or monofilament.


Since I was impatient to start my Fall Fairy, I used sewing thread to grid, using the Over 8, Under 2 method to make 10 stitch squares. I chose this design because it keeps the majority of the thread visible on top the fabric, so it's easy to adjust the tension and there's less chance of getting the gridding thread caught up in my cross-stitches. I only gridded the vertical lines, and that works well for me - again, less gridding thread to catch in my stitches, but a great guideline for positioning them. 

As you can see, I started the threads on the front side of the fabric from the bottom, gridded up and over and then back down, in a U shaped pattern. I let the ends dangle so they are easy to adjust and hopefully easy to pull out once my stitching is finished!

The blue star pin is marking the middle of my fabric, the point where all four sections of the pattern converge. I later changed it out for a less pointy (and therefore less thread-catchy) green heart pin. I left the gridding threads a little slack so they float over the cross stitches; it's easy to make them tighter or looser by pulling them out with your needle, and I just nudge them aside when stitching close to them.

It took a bit of time to adjust to working in this new way and it was awkward at first but I'm only sorry I never tried it before! It really does give you a way to double-check your placement and avoid counting errors. I've made a few small ones but the grid has made me catch them much faster than I would have otherwise.


Here's my start so far! I'm really enjoying stitching my Fall Fairy during her Season, it makes it extra-special 🍂 What's your dream stitchy kit or project? And do you enjoy seasonal stitching? I hope you'll follow along with me on this new stitchy adventure! 

Thursday, March 7, 2019

SFSNAD SAH Challenge Virtual Tour


Original WWII Poster excerpt; see full poster at the British Imperial War Museum

If you're a stitcher or crafter, you've probably heard that old thrifty phrase "Make Do and Mend", which came from the shortage of supplies under rationing during the Second World War. This phrase also happens to be the theme of the last Stitch At Home Challenge from the San Francisco School of Needlework (SFSNAD).

You may remember my Joyful Jester, which I entered in the previous Stitch At Home Challenge - Burlesque. In that challenge, we were given a Bag O' Bits full of scraps of metallic threads, courtesy of Kreinik, which we had to use in our project. For the Make Do and Mend Challenge, participants were, fittingly, encouraged to use found items and stash supplies in innovative ways - that is, to "make do" 😊

Many of the participants also took up the second half of the Challenge -"mend" - by incorporating visible mending into their work. Mending is a very old technique, where the aim was usually to repair cloth as seamlessly as possible. Visible mending takes the same techniques but uses highly contrasting threads for a decorative approach. There is a whole school of thought behind this method, including a rebellion against "fast fashion", but for an introduction I enjoy following the tomofholland blog.

Visible mending also draws heavily from the Japanese mending traditions of Sashiko, which according to A Threaded Needle encompasses four types of stitching: Simple Sashiko (tutorial: clouds pattern), Hitomezashi (tutorial), Kogin (examples) and Boro (see Authentic vs. Modern Boro and Boro Style , Boro in Fashion, tutorial for clothing from Threads magazine and this Boro Bag tutorial for a sense of the style).

I first discovered the SFSNAD on Instagram, and what I really love about their Stitch At Home Challenges is that they are free to participate in, for stitchers of any skill level, and are open Internationally. You can ship your project to San Francisco, for display in a special exhibition at the end of each Challenge, or - as I did - you can send in a photo to be used in the Online Gallery that is hosted a few months after the end of the Challenge.

But what is really neat, and what I wanted to share with you today, is that for the Make Do and Mend Challenge, the SFSNAD has made a Virtual Tour available on YouTube, and it is amazing to watch! It is so fun to see the many different interpretations on the theme, and to see the wonderful creativity of the stitchers who participated.

The YouTube link is here, or you can watch the tour below:


The current Stitch At Home Challenge theme is Borders and submissions are open until April 15th, 2019. Please see the Challenge post for entry forms and rules, and the Borders Inspiration Blog for ideas. I will not be entering this time, but I really enjoyed the Burlesque SAH Challenge and hope to participate again sometime in the future 😊

Sunday, October 14, 2018

Lolli & Grace Free Autumn Leaf SAL


Lolli & Grace Autumn Leaf SAL, Free Pattern

Although the four day SAL, ran on Instagram with instructions on the Lolli & Grace website, is now over, the pattern and videos are still available for free:


Last month, I tried a new type of Needlepainting for the first time, in the amazing FREE Lolli & Grace Autumn Leaf Stitch Along (SAL) on Instagram! Anne, @lolliandgrace, the designer of colourful, cheerful and absolutely charming hand embroidery designs (see her Etsy shop for more), very kindly and generously put together this beautiful design and showed us how to stitch it with incredibly helpful video tutorials.

To me, the technique of Needlepainting usually brings to mind the exquisite details of silk Long and Short Stitch embroidery, usually worked with a single strand of thread with natural and subtle shading. This is a casual, relaxed, much chunkier version of Needlepainting, using four strands of thread at a time and a variety of high contrast colours (my absolutely favourite part of this design are the touches of bright blue!).

And it is FUN 😊


Honestly, I was really nervous about trying the colour blending in the center Maple Leaf. But thanks to Anne's encouragement, it was easier than I thought it would be and now I'm eager to try more Needlepainting! It's stitchy magic - you start adding the darker colours, in this case my red and brown, then layer the medium tones and finally add the lighter tones as highlights. I learned to stagger my stitches between long and short, but you don't pack them together in the rigidly long-short-long-short pattern you see in stitch dictionaries. It's very much instinctual, and I only started to enjoy it when I let go of the idea of perfection and just added colours where I felt they would work.


This was a little difficult at first, since the colours are not the traditional close tone shading, but once I had sorted them in my mind (a little arbitrarily) into my dark, medium and light colours it was a lot easier. I thought of it as: a bit of dark, lots of medium and a little light. The bright blue (806), for example, I thought of as a highlight, even thought it's a medium colour shade.

I wanted it to look like that beautiful golden late Autumn honeyed sunlight was shining on my Maple Leaf, so I deliberately kept the left side darker and added the brighter yellows and oranges on the right. As Anne said, you can go back and add a few stitches if there's any blank areas or you need more colour. I tried to add a few small groupings of two or three stitches with the same colour here and there to break up the stripe-y look.

I also really enjoyed learning the Pearly Leaf Stitch for the bottom branch!

Here's a slideshow, from floss toss to finish:


I did make some small changes here and there. I was so excited to start that I began pulling my DMC floss right away, so I made some colour substitutions for the shades I didn't have, which you can see in the first photo in the slideshow. They are:

Light Green: 581 substituted with 907
Medium Green: 3346 substituted with 905
Maroon: 815 substituted with 498 (red)
Tan: 167 substituted with 436
Gold: 3852 substituted with 728
Dark Blue: 3750 substituted with 824

The two most unique colours, other than the striking 806 Blue, are the Plum (3834) and Berry (915) which I was going to substitute with 333 and 718, respectively. But when I started stitching I realized that the original colours were more Autumnal and unlike anything else in the DMC collection. Here they are in progress on the left wreath branch:


French Knots are my Stitchy Nemesis, so I'm very proud of these nice plump berries!

For the Maple Leaf, I used Satin Stitch for the stem, rather than Outline Stitch, and I left the small veins out because when I tried to add them in they broke up the colour blending too much, especially at the tips. I also used Outline Stitch for the long veins because, as klutzy as I am, I was sure I would catch the long stitches on something 😂

I also added some Straight Stiches to the middle of the Lazy Daisy leaves for extra colour, and a few extra French Knots (gasp!) to the branch on the right. I do have a few little puckers in the fabric, since the Maple Leaf is stitched so heavily, but I'm optimistic that they will come out during finishing. I'm not sure what I'm going to make with it, probably not a hoop. A friend suggested a tote bag, which might be nice. For now, it will happily join the others in my project drawer.


The Lolli & Grace SAL was a fabulous, fun experience and I'm so glad I decided to jump in! To see other finishes, search the #lolligraceautumnSAL on Instagram. Not only was it awesome to learn new stitchy techniques but this SAL was an excellent way to find other stitchers to follow! What I really loved about this SAL is that although every stitcher used the same pattern, every Maple Leaf turned out completely different and it was so interesting and inspiring seeing how other people chose to Needlepaint 🎨

Have you ever tried Needlepainting? Would you like to?

Wednesday, May 18, 2016

GG SAL: Silk Lovebirds Final Finish!


I'm so happy to report that I realized my goal from April's Gifted Gorgeousness SAL and final-finished my Silk Lovebirds off into this pretty diamond ornament for the merry month of May! Although I struggled a bit with the finishing process, I am very pleased with the result :)

For the full project details, please read my last GG post here. A quick summary:

~ Pattern from Cross Stitch & Country Crafts magazine, Sept/Oct 1990
~ Worked on gifted 14 count Aida in a pretty buttercream yellow
~ Stitched with gifted overdyed silk floss, the gorgeous Airlie (#95) by Dinky Dyes
~ Stitched using the Mirror Technique for Variegated Threads

Recently, I've been experimenting with ornament making methods! One of my long-standing stitchy ambitions is to get better at final-finishing so I'm pushing myself to try new things :) My usual go-to method is using a quilt batting insert with fabric backing and corded edging, such as I did with my Blackwork Snowflake.

Although in the past I greatly preferred store-bought cording, like the navy cording I used in that tutorial, I'm hand-twisting my own lately, which is harder to attach but has the great advantage of being a perfect colour-match to the stitching!

For this ornament, I used two squares of mat board and wrapped them each with a piece of quilt batting, which I hot-glued to the back of each mat board square.

I used a beautiful dusky blue 100% cotton for the backing fabric:


Then I laced each side around a mat board form, and sewed the two halves together. Because of the padding, and the stiffness of the mat board, both sides turned out to be rather thick and it was difficult to sew them together. I ended up using a curved upholstery needle for the first ladder stitch pass, stitching about 1/4 inch in from the edge, and then did a second pass close to the edge like usual.

The first pass brought both sides together loosely while the second pass tightened the seams and brought both sides together fully, giving me a more even surface for attaching the cording. Although this was more time consuming, it worked well!

Tanja Berlin of Berlin Embroidery Designs has a great photo tutorial showing how to lace work onto mat board, and there is a close-up look at lacing small squares here.

Vonna at The Twisted Stitcher calls this style of mat board finish a basic Flat Ornament and has a few interesting variations (the Layered Flat Ornament and the super cute Layered Felt Mounted Ornament) on her popular finishing blog.

Mary Corbet of Needle N' Thread finished a goldwork embroidery ornament much the same way back in 2008 and had the same troubles with extra thickness that I did! She greatly reduced the thickness by remaking the ornament with a thinner board.

This great tutorial, with a style similar to my ornament, suggests using comic book boards instead of mat board, as it is much thinner but still stiff and of archival acid-free quality, and that's something I'm definitely going to check out :)

You can see the thickness mostly at the corners, like this:


Thankfully, the cording mostly covers it and it's not really noticeable at all once the ornament is hanging up! I do like the nice, crisp corners that mat board makes.

I also added some small squares of batting in the middle of the ornament to fill in the lacing gaps and make sure the center was flat and even:


This photo also shows the cording join at the bottom left, right above the start of the tassel. That was the single most troublesome part of the finishing, sinking the end of the cording back into the ornament and making it look as seamless as possible.

You can definitely see the join, obviously, but it was the neatest I could make it (and I redid that part over a dozen times!). Eventually, I reached that dangerous point where I needed to stop fussing with it and let it be or take it apart altogether and start over, and I am glad that I decided to stop and take a step back.

I really find that when you're working closely with little details for a while that they can overwhelm you with dissatisfaction, but if you take a break and then look at that detail in larger context, it may not be nearly as big of a problem as you thought :)

Here is a close-up of the tassel, which is my favourite part:


I love tassels! As I mentioned, I made the cording by hand, and I also made a smaller corded hanging loop and the cording loop that was the basis for the tassel. In all, I used 6 full skeins of DMC 3803 - 3 skeins for the cording, 1 skein (split evenly) for the two cording loops, and 2 skeins for the tassel. I wanted both the cording and the tassel to be extra thick, and I really like the way it turned out :)

I tied the tassel with a bit of the silk floss I had left (amazingly - and sadly LOL - this project used nearly all of the 8 meter skein of Airlie silk!) and simply wrapped it around the tassel, securing it in the back with some stitches through the wrap:


I love the rainbow effect, and the sheen of the silk against the cotton floss!


Initially, I had planned to use a metallic gold cording, and I'm really glad that I went with a simple floss instead. When I first decided on floss, I was thinking of a light buttercream yellow to match the Aida but I couldn't find an exact match.

Although the burgundy 3803 is not actually used anywhere in the stitching, it's a darker match that is close to the deepest mauve in the overdyed silk and I think it really sets off the lighter colours and subtle tone shifts in the variegated thread.

My Stitchy Guru Mother has a rule for colour-matching a sewing thread to fabric - when in doubt, go with a darker thread instead of a lighter one - and I think it applies to choosing finishing trims like cording as well :)


What is your favourite way to final-finish stitchy ornaments? I'd love to know! If you're reading this post in your e-mail, please visit the blog to leave a comment :)


Gifted Gorgeousness is a monthly SAL hosted by Jo @ Serendipitous Stitching! It is a fun and relaxed way to thank those who have given us Stitchy Gifts and show off what we've made with those generous gifts. It's never to late to come and join us!

Sunday, April 17, 2016

Gifted Gorgeousness: Silk Lovebirds


Thank you all so much for the lovely comments you left on my last entry (the first this year) into Jo's Gifted Gorgeousness 2016 SAL, my Floral Blackwork Variation :)

I forgot to mention in my post that the designer, Elizabeth Almond, also generously offers many freebies - mostly in Blackwork but with some other techniques too - on her Blackwork Journey website (which is also linked on my Free Patterns page, but that section needs updating ASAP). She is currently running a free multi-technique SAL called "Pandora's Box", and I've considered doing a small version of her cute and clever "Box of Delights" - inspired by chocolates! - for a while now.


This month, I tried something I've never done before - I worked with silk floss! And it was an AMAZING experience!!! The pattern as it was designed is the angled square you see above, but I will final finish it into an upright diamond like you see at the top. The pretty dusky blue fabric in the photos is the 100% cotton I've chosen for the ornament backing, and I'm hoping to make some floss cording for the edging.

I was, of course, hoping to get the final finishing done before this post, but the best laid plans often go astray, as they say ;) Maybe next month! Here's the pattern:


This little pair of lovebirds is a charming old-fashioned monochromatic design, part of an unnamed trio of traditional Scandanavian motifs (the other two squares are roses and tulips) featured in the "Focus on Evenweave" section in a vintage Cross Stitch & Country Crafts magazine. It's from the September/October 1990 issue.

The three patterns were designed to fit into squares on a (then) new pre-finished afghan product, called Lady Elizabeth from Coats & Clark. My square is done in blue on the white afghan at the front and in red on the afghan folded on the stool at right.

Afghans like this with the special Aida panels for stitching seemed to be very popular from the early to mid-1990s but then died off. I've never understood how you could make the back neat and secure without adding on some kind of backing fabric, so despite the many patterns I've seen for them, I've never been tempted to make one :)

Anyway, this might seem a strange pattern choice, but I deliberately chose a design that was monochromatic with simple motifs to highlight the Star of the Show:

*drumroll please*


It is my great pleasure to introduce you to Airlie, an absolutely beautiful overdyed silk floss from Dinky-Dyes, an Australian brand now located in the US:


#95 in the product line, Airlie is still in production according to the DD website.


Airlie was a wonderfully generous gift from my friend Karen, and she also sent me the lovely buttercream yellow 14 count Aida that you can see I used to stitched the Lovebirds on. It was part of a whole roll of ornament cuts (a great and incredibly useful gift idea for any stitchy friend who likes smalls!), and it happened to match the light gold in the overdyed thread perfectly. Stitchy Karma was at work here :)

It is so hard to capture how luminous this thread actually is in real life.

Here's a closer view:


The silk has this indescribable sheen to it, a little bit like a perle (pearl) cotton but somehow softer, if that makes sense? And it feels entirely different from regular cotton floss too! It's spring-y, with a bounce that makes each stitch plump, lofty and round and in the very rare instance that it does knot, it is easy to untangle.

Here is my attempt to show up some of the special shine in the silk:


The silk floss is six-stranded just like DMC cotton floss, and I used three strands to stitch with. I did consider using two strands to save on thread use, but I prefer the fuller look of three strands of cotton for 14 count Aida and with the overdyed I think this extra strand helped make the colours more vivid, especially in the paler sections.

This also had the bonus of creating a pair of twinned strands with the same colours - as the colourway changes are closer together and more random than those in variegated cotton threads - which I then used to "mirror" the design as I stitched.

At first, I was changing out the needles and switching from side-to-side until the bright idea hit me to use two needles, which made everything so much easier:


I effectively split the pattern down an imaginary axis in the middle, and when I had stitched so far laying out a "thread trail" in the pattern on one side, I would put that needle down and replicate that trail on the other side before switching back. This way, I had one thread that was a "trailblazer" and one that was a "follower".

Switching back and forth enabled me to replicate the same sequence of stitches which is what creates the colour reflection. To get this mirror effect, I had to make each cross stitch individually, so even though the design is small and simple the stitching was sometimes complicated and very involving and it took a while to finish.


It was also unexpectedly FUN - the only way I can explain it is to say that it was like the stitching equivalent of putting together a jigsaw puzzle where the only image you had to work from was a blur of colours and you had no idea what the image actually was until you had finished putting it together.

I mean, I could obviously see the colourway of the floss, and make some general guess as to how it might work out and even manipulate the colours in small ways (for example, I started with the hearts and stitched from the end starting with a bright pink so that the hearts would definitely have some pink in them) but it was a total mystery to me exactly how it would work out in the end.

That not-quite-knowing was sometimes nerve-wracking but incredibly addicting :)


I also learned another very valuable lesson from this project. It was not something I had planned to start. At the time, I was having a very difficult week and I just wanted something to concentrate on and cheer me up a bit.

So I looked through my Very Special Stash - all the pretty things that I've saved for that Special Project that has very rarely ever happened - and chose the brightest, most Spring-iest thread that I had, which happened to be Karen's wonderful gift.

In all honestly, my fingers had been itching to stitch with it ever since Airlie first came to live with me many months ago. But Airlie is Silk, and I had never stitched with Silk. Indeed, I've always seen Silk as the Most Exulted and Elegant of all the Specialty Threads and I have been intimidated by it's beauty, it's rarity and it's expense. I have been afraid that I am, frankly, Not A Good Enough Stitcher for Silk.

Silly, I know. Sound familiar? If it does, please rest assured that you're not alone!

Saving treasures for Very Special Projects is certainly valid and often very wise, but somewhere along the line I also started pushing the very idea of any Special Projects far, far away off to Some Nameless Day Yet To Come when I would be Good Enough to Stitch With Them. Or have a Better Project to Use Them With. And so forth.

And I just realized that that Day is never going to come ;) I learn something different, be it for good or ill, with every little project I stitch and the work I'm so proud of today will no doubt embarrass me with its obvious flaws at some time in the future.

It's totally reasonable, in my opinion, to be concerned about wasting your Stash on projects you don't totally love (there are some treasures you will never get again) but when that leads to not using your Stash at all - then there's a problem. Right?

So I have made a resolution to myself to Have More Stitchy Stash Adventures :) None of us will be around forever, and time and Stash wait for no Stitcher LOL!

P.S. I searched Google for Stitchy Stash, and this came up:


The Dowager Countess, Lady Violet, from "Downtown Abbey"

Very sage advice, I must say ;)

You might also like this freebie by Kincavel Krosses which reads:

"Money can't buy happiness
But it can buy
Stash
And that's kind of
the same thing"

Have you ever worked with silk floss before? How did you like it?
If you're reading this post in your e-mail, please visit the blog to leave a comment!

Gifted Gorgeousness is a monthly SAL hosted by Jo @ Serendiptious Stitching! It is a fun and relaxed way to thank those who have given us Stitchy Gifts and show off what we've made with those generous gifts. It's never to late to come and join us!