Showing posts with label Book Review. Show all posts

Friday, September 11, 2015

A High-Flying End to Summer :)


I've always been a Disney girl, and Mary Poppins is one of my all-time favourite movies! I don't usually enjoy musicals, but the many catchy songs of this one have stayed with me over the years: "A Spoonful of Sugar", "Feed The Birds", "Chim Chim Cheree" and, of course, "Supercalifragilisticexpialidocious". During this project, it was the grand finale of "Let's Go Fly a Kite" that keep running around in my head ;)


Let's go fly a kite
Up to the highest height
Let's go fly a kite
And send it soaring
Up through the atmosphere
Up where the air is clear
Oh, let's go
Fly a kite!

(you can read the full lyrics here)

And you may see why I can't seem to get that uplifting ditty off of my mind lately:


This little trio of kites started off as a sort of test project. Thanks to The Great Stitchy Karma Gods, I recently thrifted an interesting book called the Anchor Complete Embroidery Course by Christina Marsh. Mine is the original hardcover edition published in the UK in 1998 by David & Charles (no longer in business).


When looking for some information on the author, I learned that it was re-published in 2003, in a paperback, as The Beginner's Guide to Freestyle Embroidery. Also, according to Marsh's Author Page on Amazon, she wrote six themed cross-stitch design collections. Unfortunately, other than that, information is scarce.

This is a great book for absolute beginners to embroidery! Unlike most books, which are usually either stitch dictionaries or project books, this is indeed a "course" that starts with the simplest stitches and gradually builds in complexity and skill level.

It starts with basics, with advice on choosing materials and how to thread a needle:


And extensive information about patterns - how to read them, how to transfer them, how to resize them - and also directions for learning to read from a chart, since there are a few simple but attractive counted projects worked on Aida cloth.

There are interesting ideas for simple finishing methods right at the start...


...and then comes the first Chapter, Just Five Stitches - Backstitch, French Knot, Lazy Daisy (Detached Chain Stitch), Satin Stitch and Blanket Stitch - which is a bit of an unusual selection. I would have put Stem Stitch in place of Satin and Chain Stitch in place of Blanket, but it works. This is the first project, easy and cute:


And then comes five Chapters, with six stitches each grouped by function (Stems and Outlines, Knots and Dots, Chains and Loops, Solid and Open Fillings and Borders and Bands), for a total of 30 stitches (35 counting the 5 foundational stitches).

All of the stitch diagrams are large, clear and super easy to follow:


Each chapter has several projects at different skill levels, and the projects only use those 6 section stitches, plus the 5 Foundation Stitches.

So this neat pincushion from Chapter 2 uses only Stem and Outline stitches:


However, the idea could easily be adapted to include other stitches :)

The final chapter - Mix and Match - shows some designs with stitches from several chapter "sets". These are not necessarily the largest in the book either. In fact, my favourite is this very small Holly design that is shown stitched with three different levels of complexity, from simple outline to advanced full filling:


It is worth noting that all the patterns are only one diagram with a medium thick black outline, which serves as the transfer you copy as well as the stitching guide:


Since most of the designs are on the smaller side, this works mostly okay, but for large projects like this gorgeous goldwork floral - which reminds me of pretty blue-and-white china - it might be a bit tricky! Keeping the glossy pages flat is hard.

Another of my favourite projects is this quirky and fun Fireworks Display cityscape:


One blogger actually put the Fireworks idea to a great use on a landscape quilt! The round white firecracker is made with an intriguing stitch called a Danish Knot, which I hadn't come across before now and am hoping to try soon :)

The "showpiece" project of the book is from the same Chapter, Knots and Dots(3):


Called the Medieval Strawberry Sampler, this is a colourful and open translation of historial crewelwork, which was stitched much more densely with wool.

But my favourite project by far is this beautiful Summer Bouquet (Chapter 4):
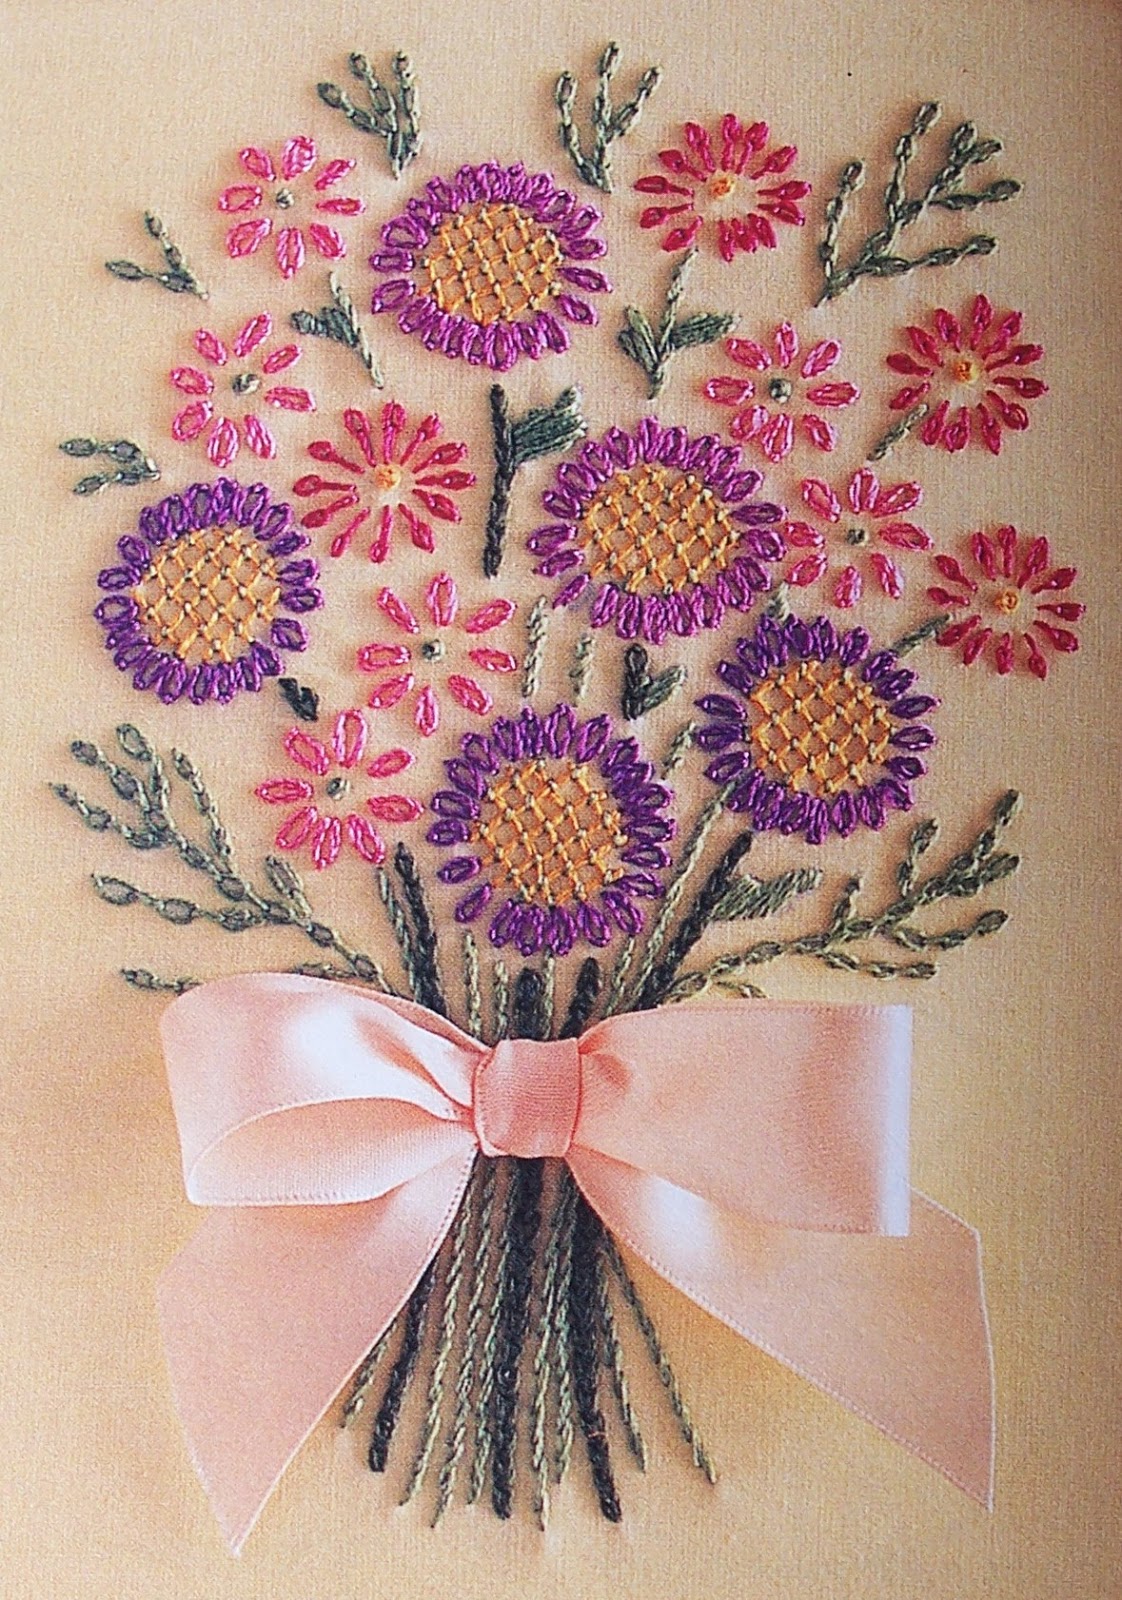

I absolutely LOVE the pink ribbon tie! This project was the whole reason I bought the book and it was what I intended to stitch first - then I fell for the adorable kites:


This trio of kites is called High Fliers and is Project 2 in Chapter 2. I stitched it pretty much as written, although I did make a few changes as I went along ;)


Instead of my usual iron-on transfer methods, this time I traced the design directly from the book! I used the white Nonce Marking Pencil, and it worked wonderfully - the lines are visible but subtle and they did not smudge or fade at all while stitching.


This pencil is designed for marking on dark fabrics, and although it is water soluble, I didn't see any need to wash the work since the embroidery covered the lines well.

The lead is not like an ordinary colouring pencil - it's slightly waxy, and it traced a pretty fine and clear line with only light pressure. It's a very convenient, inexpensive tool and I'm really looking forward to experimenting with it more!

The fabric is my favourite sky blue 100% cotton :)

I started stitching with the lovely DMC PC #8 I recently used for my Happy Bluebird:


However, the stitches were too skinny compared to the project design, which uses all six strands of Anchor floss in the needle at once. I needed something a bit chunkier, so I took out what I had stitched (I had already removed some in this photo).

I found it quicker to cut right through the loops, and use the needle to lift up the short pieces. Although this wastes thread, it does help reduce strain on the fabric:


Then I remembered the Prism craft threads I last used for my Floral Umbrella, which was fully embroidered. I was interested in seeing how these threads would work for simple outline stitching, so I chose some pretty pastels from the "Sweets" collection:


This particular thread isn't mercerized so it's more fragile than other craft threads on the market. This is what gives it the lovely vintage look, and it's like a thicker single-stranded version of the matte Flower Thread flosses that used to be on the market.

I'm happy to report that it works great for outline stitching - much better than it does for heavy embroidery like my Floral Umbrella! For beginners especially, I would consider this a specialty thread, akin to working with metallic flosses in cross-stitch.

Just like metallics, it helps to use shorter lengths and you need to trim the ends often as they are prone to fraying, which makes the thread more likely to knot and tangle.


I had tons of fun stitching these kites! But I did change the stitches up just a little ;) I used the recommended Stem Stitch and Backstitch, and learned the Coral Knot for the tails and Whipped Running Stitch from the chapter diagrams. Instead of Couching, I used Whipped Backstitch and I added some ties to the kite tails using Lazy Daisy (Detached Chain Stitch), French Knots, Straight Stitch and Cross Stitch.

And since the kites looked a little bare, I added some quick fillings with French Knot polka dots, Oblong Cross Stitch, Double Seed Stitch and Seed Stitch :)

Here's a close-up of the fillings and the kite tails:
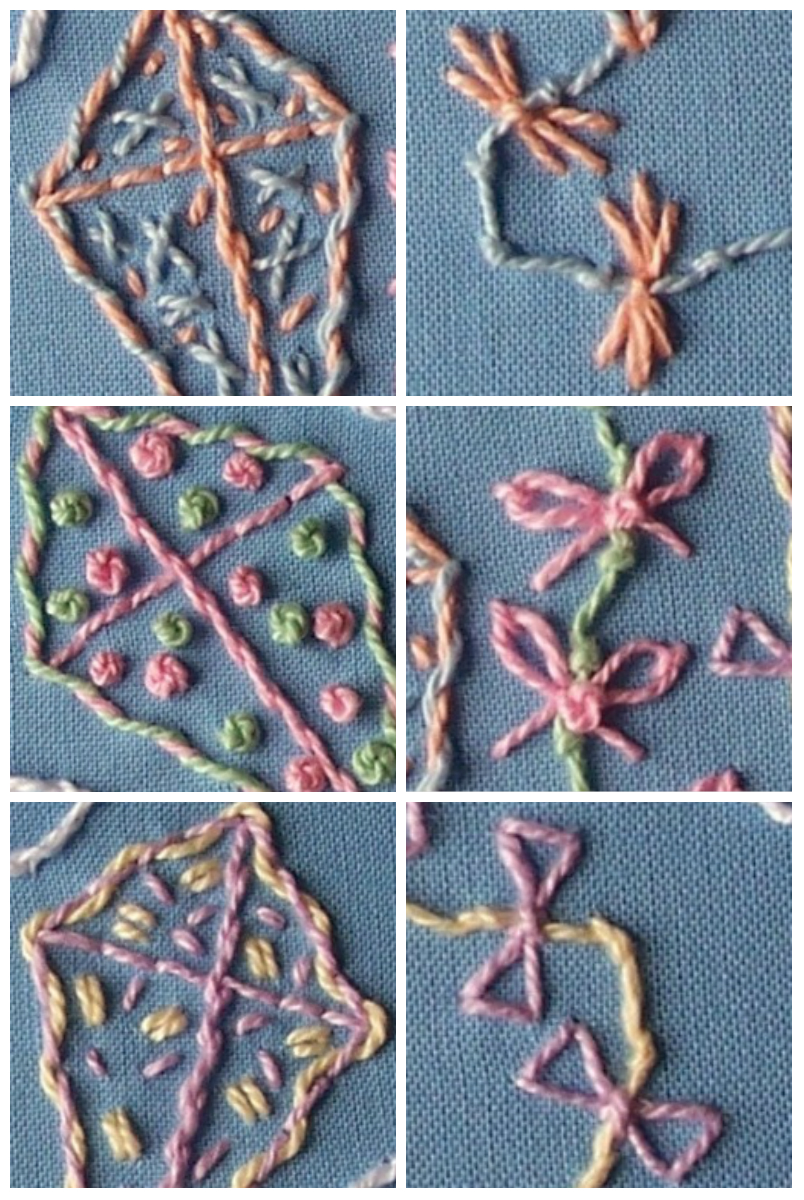

The chunky texture of the thread gave the stitches a wonderful lofty lift:


Finally, I decided my trio of kites needed some company, so I added some whimsical floofy clouds with Whipped Backstitch! This gave me the sunny sky feeling I wanted.
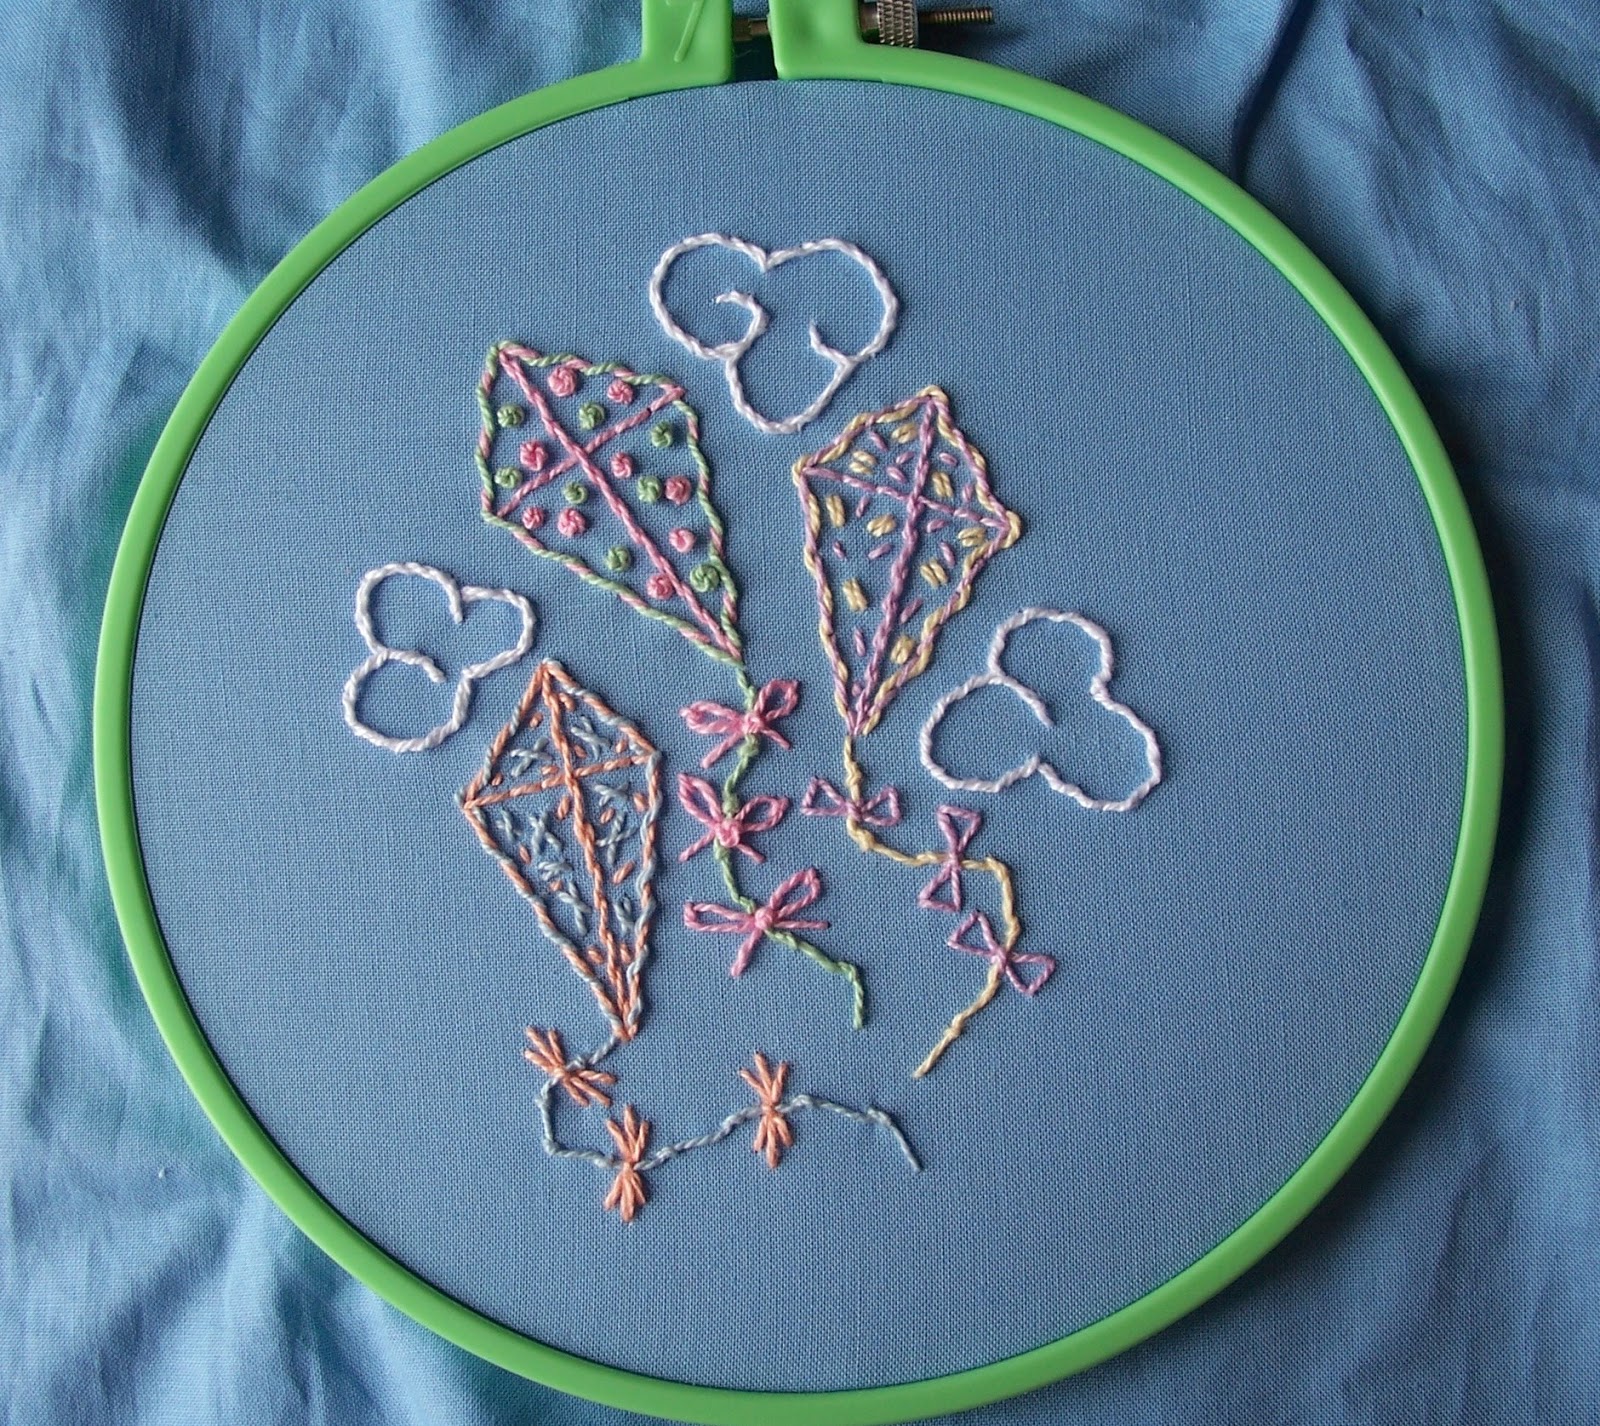

I just free-handed the designs, and although I was worried at first that they were too wonky, I've come to like them :) Although I love the funky, folksy look of simple outline embroidery, I find it very difficult to step back and stop trying to "finish" it off into something more complex. The imperfections are all part of the charm, and while I know that, it's hard to put that into practice.
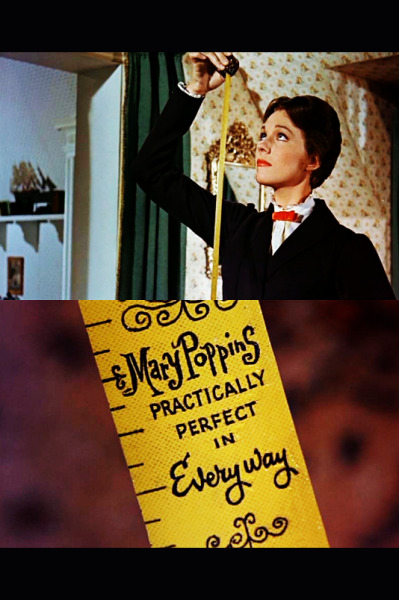

Following Mary Poppins, rather than thinking about these natural variations in stitching as "imperfect", I'm trying to think of them as "practically perfect" instead ;)

It's a struggle I think many stitchers who cross over from counted techniques to free-style embroidery must face! When you're used to stitches that are symmetrical and evenly spaced, it's an adjustment to have every stitch be slightly different, no matter how hard you try to keep them the same (which can be incredibly frustrating!).

But it is exactly this quality that makes embroidery so much fun to stitch, and I'm trying to let go and embrace the wonkiness :) All of the projects I've done to date have ended up being a surprise of sorts, because it's so easy to change up elements as you go, and I've had the best results when I don't try to plan things out much beyond the basic design beforehand and just "go with the flow" for the stitches themselves.

It's a totally different mindset, and I'm curious if others have this problem too?


Hopefully, your Summer is also coming to a happy end! As Autumn comes in, I'm letting my imagination soar with project ideas, although I can't quite bring myself to look ahead to Christmas yet as so many stitchers are doing. But that cute little Holly design from the book is calling out to me so I may change my mind soon :)

Thursday, April 23, 2015

Booklet Review: Ribbon Stitches


Ribbon Stitches by Mary Lou Wright and Suzanne McNeill for Design Originals

Although this little booklet is currently out of print, and probably has been for a few years, I'm making an effort to review some of my thrifted stitchy stuff like this so you can keep an eye out for a copy on your own treasure hunting adventures :)

It's a lot easier to find something you're interested in if you know what to look for!

When hunting about for craft booklets like this, I often find them stuffed in with magazines of all kinds in thrift shops and used book stores. Although the sticker price is $3.00, I only paid a dollar, and that's pretty typical for these, so booklets like this can be a very affordable way to experiment with a new technique.


I've always loved the look of ribbon embroidery, and I've read quite a bit about it over the years. Although this guide is small, it packs in a lot of content and is actually better, instruction-wise, than some of the full-length books I've read on the subject!

Like most booklets, it's a project book, with 15 small floral designs finished off as ornaments and wall hangings. The front and back cover and a two-page center insert are full-colour while the rest of the book is black-and-white.


As you can see from the photo above, each project includes a B&W photo, a drawn illustration to use as a pattern guideline, fabric cutting templates and a list of materials. Arrows labelled with the stitch name point to each area of the illustration.

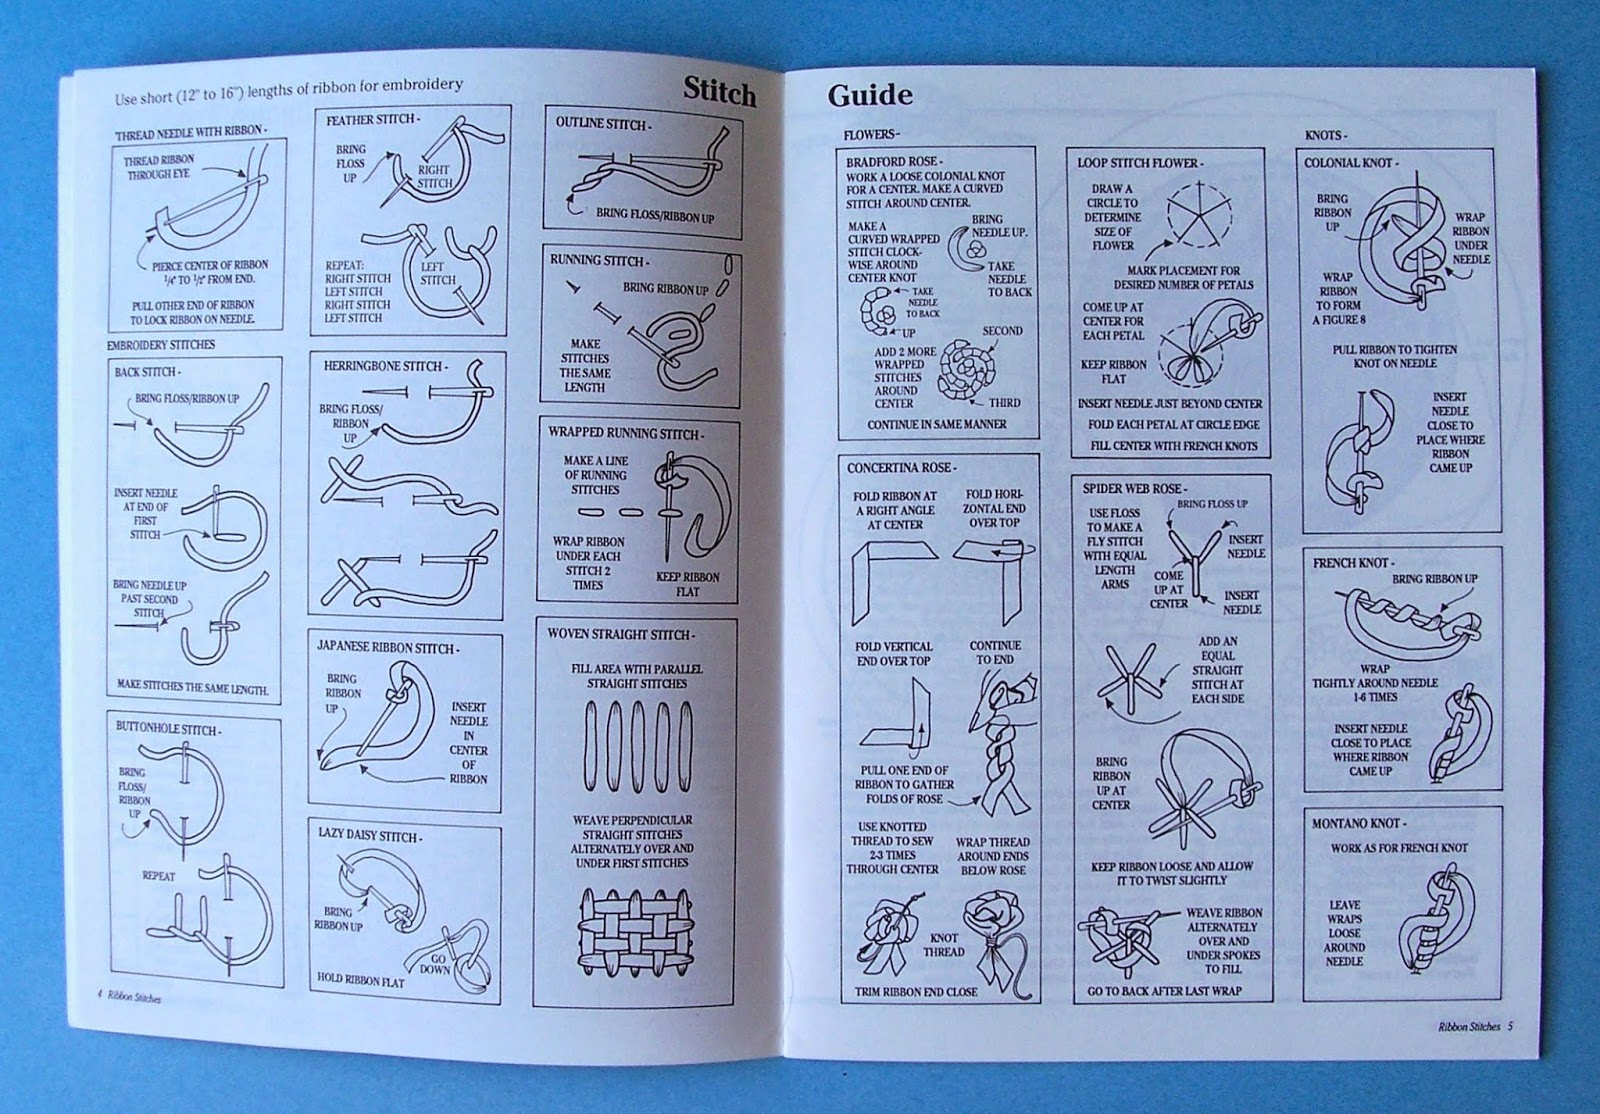
And these names correspond to the Stitch Diagrams given at the front of the book:


Besides illustrating how to lock the ribbon on the needle before stitching - which was incredibly helpful! - there are 17 stitches shown, most with multiple parts. All seem clear and concise, although I did try folding the Concertina Rose several times with disastrous results; I suspect there's a trick of the wrist somewhere in there!

But by far the most useful feature is indeed the "Full-Color Stitch Sampler Inside!":


I've never seen anything like this before and it's amazing to see the stitches laid out "in progress"! Some even have the needles still in place, which is cute touch ;) Most compare the same stitch in floss and silk ribbon, and some show multiple steps, like the beautiful yellow Bradford Rose at the top right (which I'm hoping to try soon!).

The recommended materials are regular DMC cotton floss and YLI Silk Ribbon, which seemed to be the most popular supplier of the Silk Ribbon Revival in the mid-1990's, which was right around when this book was written in 1994.

As a kid, I spent lots of time happily trailing along after my Stitchy Guru Mother in fabric stores, and I remember seeing all the cards and bundles of shiny, pretty ribbon on the pegboard shelves, long before I ever thought about picking up a needle :)

Unfortunately, the lack of availability of silk ribbon - and it's expense! - is the biggest stumbling block to Ribbon Embroidery today. But I've been experimenting with polyester "satin" ribbon, and while it lacks the soft drape of silk, I like the look!


Here's a selection from my Stitchy Guru Mother's stash of practice threads; like me, she was hesitant to use the silks she bought and started with these, but other things came along and she never did try the real thing. She may still have some silk ribbon somewhere, so if I get good at this I may try that for something VERY special ;)

Meanwhile, I tried my hand at a Spiderweb Rose, using the diagram in the booklet:


You can see the ribbon I used here, in the original skein and wound on floss cards.


And here are my roses! The weird blobs in the middle are French Knots, which definitely need some work (and aren't any easier in ribbon LOL). The rose on the left has the floss base recommended in the booklet, and the larger one on the right is worked over a base made with the same ribbon, which is usually how it's done.

I'm really pleased with how the floss-based Spiderweb Rose turned out, and I'll be using this method in the future! Small tidbits of information like this can make a HUGE difference when it actually comes to stitching, and I'm so glad that The Great Stitchy Karma Gods brought this little booklet my way! Highly recommended.

Finally, here's my favourite project in Ribbon Stitches, which is also the simplest:


Elegant and pretty, this bouquet features a Bradford Rose and Loop Stitch flowers with Lazy Daisy leaves! I really love that Ribbon Embroidery is so rich and lavish looking yet most of the stitches are basic surface embroidery ones you may already know. It all very much depends on the ribbon you use, and your tension.

Over the next few weeks I'll be letting my imagination run rampant with ribbons :) Hope this little review was helpful. Have you thrifted anything stitchy lately?!

(And if you're Spring Cleaning your craft closet, please consider donating to a thrift store near you! It's a great way to help old supplies and projects find a new home.)

Saturday, June 7, 2014

Book Review: The Embroiderer's Story


Many sticky notes are the sign of a really good read! Er, that's my excuse anyway ;)

It's a little bit embarrassing to admit that this post has been over two years (eek!) in the making! Way back in 2012, I wrote about the Jane Bostocke Sampler (JBS) and shared a photo of the sampler from this book, intending to write the review soon. Well, it's finally here! LOL Hope it will be worth the wait ;)

The Embroiderer's Story: Needlework from the Renaissance to the Present Day by Thomasina Beck was first published as a hardcover in 1995, with this paperback edition following in 1999. The first thing that struck me is the sheer size of the book! It's not especially thick, but it's definitely larger than average. I've put a regular size market paperback (Sharon Shinn's Quatrain) alongside to demonstrate scale.

The beautiful cover art is a painting from 1913 called "I am Half-Sick of Shadows" by artist Sidney Harold Meteyard. It shows the Lady of Shallot (from the poem by Lord Alfred Tennyson) waiting for her lover, and whiling away the hours with embroidery. The background is a vintage Morris & Co. embroidered bedcover from 1889.


Thomasina Beck's Publisher, David & Charles (which was taken over by F+W Media), followed this design theme for her other popular books: The Embroiderer's Garden (1997), The Embroiderer's Flowers (1992, later reissued in this edition to match) and Gardening with Silk and Gold: A History of Gardens in Embroidery (1998). This discussion thread states that the latter is a revised edition of Embroidered Gardens: A Studio Book from 1979. Frustratingly, there is little information about Beck online!

One day, I would love to read more of her works, especially the Gardening in Silk and Gold. Unfortunately, all of her books appear to be out of print and very hard to find. I was lucky enough to find The Embroiderer's Story in a local library collection. It's a wonderful introduction for anyone interested in historical needlework styles!

Although there is a lot of information here, and the text is well-researched, it's all presented in a very accessible tone. One chapter flows into the next and it makes for entertaining and inspiring reading! This is more of a general interest book than an academic treatise, which is unusual and refreshing. The pictures don't always line up with the text though - there will be a page of text on needlepainting, for example, but the illustrations only turn up three pages later - but it's a minor inconvenience.


There are six chapters in all, covering the major stylistic eras. The pages are thick glossy paper with some stunning full-colour pictures, and the layout takes good advantage of all that extra space with frequent use of diagrams like these:


Pages 28 and 29 from Chapter 1, "The Elizabethan Embroiderer"

Please pardon my fingers in the photos, but I had to hold the pages flat somehow!

This is a typical layout for what I came to think of as the "inspiration" pages: photos (often colour) of historic pieces and ephemera with complimentary themes/links on one side with B&W sketches showing how the motifs might be adapted for new work on the other. These inspiration illustrations were done by Belinda Downes.


Page 24, close-up, from Chapter 1, "The Elizabethan Embroiderer"

Other design examples, like this blackwork grapevine with filling stitch suggestions, actually came from embroidery books, patterns, magazines, or manuals of the time. These types of details make the book an amazing scrapbook-like assemblage of all kinds of interesting bits that place the works within the cultures of their own times. Indeed, in the Introduction (8), Beck says that it was just simple curiosity as to how and why these things were made that led her to dig deeper into the past:

"Histories, biographies, novels, diaries and poems provided some answers, and I began piecing snippets of information together, as one might a collage, hoping thereby to build up a picture of what is was like to be an embroiderer at that time."

As a result, reading the book feels like undertaking that journey of discovery right alongside Beck as she rifles through all sorts of sources and displays examples for us to enjoy. It's a general history of styles, and so is not a project book or stitch guide but rather a sort of inspirational research journal. But there are technique hints:


Pages 60 and 61 from Chapter 3, "The Georgian Embroiderer"

As an example, this small diagram actually shows the best way to work tambour embroidery, in a laced frame or the tight hoop from which the method gets its name (a tambour is a type of drum, and refers to the tight tension necessary for the work). It actually makes a great deal of sense that the illustrations of older times were so intricate as most readers had limited literacy and printers had limited book space!

Here is one of my favourite examples of historical needlework in the book:


This twining floral design, worked with silks on a hostess apron in 1736 (page 63, Chapter 3) is still so beautiful! I really like the heavy shading in the center carnation, which looks a little like a whirligig with its fringed petals, and the roses :)


This sort of twining vine-based floral embellishment was very popular in this time, as also shown on this handsome crewelwork waistcoat from the 1740s (71, Chapter 3).


Page 104, close-up, from Chapter 5, "The Victorian Embroiderer"

Brightly coloured wools surged in popularity in the Victorian era when new dyes were developed; unfortunately, many of them were unstable and many works did not survive. A style of counted embroidery known as "Berlin Woolwork" soon became a fad (much criticized for poor taste and lack of style in its time!), and was the direct ancestor of modern cross-stitch! I really love this style, which is based on florals and geometrics with shading so intense that it often clashes. It is amazing to think that the hand-painted graphed charts eventually gave way to the craft we know today :)


Among the other odds and ends, each chapter also has a delightfully imagined pincushion drawn by quilter Paddy Killer. All her illustrations for this book can be seen on this page. My favourite one is this Victorian sewing garden (Chapter 5, 115)!


Towards the end of the era, the influence of the modernizing Arts & Crafts movement lead by William Morris becomes evident, with a preference for naturalistic motifs. These tiny Christening mittens embroidered by his daughter May Morris are sweet :)

Here is my absolute favourite work in this book, a blackwork and goldwork pillow:


Amazingly, although it looks eras older, this is a 20th Century reproduction! The caption (141; photo on 140, Chapter 6) says: "Fascination with Elizabethan history and embroidery led Jack Robinson to take up blackwork, explore the intricate patterns and then devise his own, as in this book cushion, 1992."


I really love the diamond windowpane border, the way the gold sparkles against the black, and the scattering of seed pearls throughout the embroidery. No flower seems to be exactly alike in shape or filling! It's just so elegant and striking :)


In the previous eras, needlework was fairly strictly limited to the popular culture of the time, with fads that came and went. But the Twentieth-Century Embroiderer has the option to break all those old bonds as well as honor them, and so Beck spends the final chapter with new works inspired by old techniques. This colourful "Passion for Tulips" feltwork by Jennifer Wilson (1994, page 153) is an example of this freedom.

It is so easy to take our creative impulses for granted! Although this book is very encouraging and inspiring, reading through the various styles really brings home how important popular culture was to needlework. You did whatever was "in", whether you liked it - or were good at it! - or not. And then the next fad came along, and you abandoned your old work as being of no value and moved on to the newest craze.

The accomplishment was in the act of creating, not so much the actual creation. It's absurd to think today that ladies in the Victorian era once took up certain styles of crafting just to show off their wrists to potential suitors! Or that needlework was just another dreary "domestic art" one had to master in order to wed and live well.

On the other hand, it is encouraging to imagine these same ladies cozily crafting around a parlour in the evenings, chatting and laughing with friends while they worked at their needlework or crochet or knitting, proud to show off their skills to one another :) As bloggers, perhaps that is what we do too, only now we are free to create whatever we will, whenever we please. It is a privilege we should cherish!


And the final thing that caught my eye is this illustration by Paddy Killer towards the end of the book (page 154, Chapter 6). It's an imagining of The Embroiderer's Story - and Beck's other books - as a searchable digital resource. Wouldn't that be cool?!