Showing posts with label Specialty Stitches. Show all posts

Friday, January 3, 2020

🧡 A Needlepoint Round Robin! 🧡


Happy New Year πŸŽ‰ Hope you had a wonderful Christmas and that 2020 brings lots of lovely stitching your way 😊 I had a fun stitchy adventure over the Holidays! My friend Shannan of Bobbin and Fred told me a about the #passthecanvas project hosted by Dish on Instagram (@dishingstitches) a few months ago and I was so excited to join in!

Dish is sending her beautiful funky geometric needlepoint canvas to stitchers around the world, like a round robin, and we each stitch five blocks in a week before sending it to the next stop! Happily, I received the canvas on December 30th, and I really enjoyed working on it in the quiet of the post-Christmas rush - it's now on it's way from snowy Newfoundland & Labrador ❄ to sunny Florida 🏝🍊

It has been many - MANY - years since I last tried needlepoint! When I was a teenager, I made a sampler out of my Stitchy Guru Mother's leftover supplies from her own bargello adventures in the 1970s. I used her vintage stitch guides to make an add-as-you-go mix of stitch blocks. I remember working on it all one Summer - it was my first and last experience trying to stitch outdoors πŸ˜‚ The wind liked to play with my threads, all the bright colours attracted flies and creepy crawlies, the sun was in my eyes - it was awful! And the edges of the canvas, even covered with masking tape, were so sharp that I took to wearing a pair of neon pink and black leg warmers on my arms to protect them from scratches, and they were way too hot, which added to the misery 🀣


That sampler is still in a tote box, waiting to be made into a cushion. I always meant to try more needlepoint, but I had trouble finding the supplies. So although I was super excited to add my block to the travelling canvas, when I first opened it, I was a little intimidated too. I had no idea what threads or stitches to use!


Here's the canvas as I received it! There are so many beautiful blocks, in all kinds of threads - velvets, braids, wools, metallics, and cottons. The stitch texture is fabulous, I wish you could run your fingers over the blocks and feel the stitches for yourself!

The package came with the canvas, a white storage bag (I just used the Ziploc the canvas was in), a little blue book to record your name, stitches used and materials used (which was so helpful and inspiring to read, especially the little messages to other stitchers!), and a cute little pocket stitch guide that was SUPER HELPFUL:


It's hard to tell from this photo, but it's a tiny book! With my favourite lay-flat coil binding. Small enough to slip in a project bag, and packed full of stitch diagrams:


I had so much fun flipping through this little guide and wondering what stitches I could try! Here are my five blocks, with a bit about stitching them:


Like most of the other stitchers, I chose my colours based on the printed blocks on the canvas. I started with the center block, using a leftover black Kreinik braid from the Bag O' Bits I received for the SFSNAD Challenge. I taught myself Norwich Stitch from the stitch guide (although I modified to fit the smaller space).


I absolutely LOVE this stitch, and it's one I will try again! It results in a wonderful woven effect 😍 It looks complex, but is surprisingly quick and easy to do as long as you pay careful attention to the order of the stitches. Using a non-divisible thread like the braid makes the woven effect stand out and makes it easier to lay the stitches.


Then I added the teal block. I knew I wanted lots of sparkle, but I didn't have many thicker threads suitable to needlepoint canvas on hand. I had intended to buy some DMC perle (pearl) cotton for this project, once I knew which blocks/colours I was stitching, but it being the Holidays, the local quilt shop that carries it was closed and I didn't have time to order anything online.

So I improvised! For this block, I used DMC 3812 (nine strands) with Gutermann Metallic Blending Filament in #235 (4 strands) and did a slanted Satin Stitch.


The small blue block was next. This was my first time using the new DMC Etoile thread in C798 (a gift from my friend Karen!). It is very different than regular floss, it is fluffy and spreads easily, giving it great coverage! I used 9 strands, and it worked great on this canvas. I intended to make Smyrna Cross Stitches, but I liked the base Cross Stitches so much I left them - I love the filigree look, where the canvas peeks through! I added a Woven Cross Stitch in the corner where both stripes meet.

And now for the BLING:


This is, without a doubt, my favourite block πŸ˜† You know how I love glitter!


This magnificent beauty is Needlecraft Craft Cord, meant for needlepoint and plastic canvas! It has a white base with a rainbow of pastel metallics woven in, in shades of teal, pink and gold. It is #55026, Rainbow White Frizette.


It came in a small bag of stitchy supplies from a thrift store that I bought several years ago, and I have been looking for a way to use it ever since! I was so disappointed when I realized it was too thick to go through the canvas easily. I put it aside, but in the end I decided I really wanted to make it work. So I laid it on top of the canvas, weaving it together at the corner (inspired by the Norwich stitch) and then worked Padded Brick stitch over top, with DMC 957 (six strands). It's a little wonky, and definitely quirky - so much so that I debated taking it out for a while - but it's super sparkly and love it ✨


And for my last block, I ended up going entirely off script. It was spontaneously stitched (seems to be my new stitchy theme lately, and I'm really loving this approach)! I wanted something softer after the bling block, so I used DMC 964 (9 strands) to stitch what I think is Smyrna Star, On Point, with Compensation Stitch edging (aka Make It Up As You Go Along Stitch) πŸ˜‚ It's not quite what I had in mind when I started stitching, but I do like the fun zig-zag bumpy texture and the pretty seafoam green colour.


And finally, I stitched my initials next to Shannan's (hers are in blue, to the left of mine, and her blocks are on the lower left of mine) using the same pink from the bling block. It is amazing to be part of project with stitchers I don't know from all over the world, but it is also really cool to stitch on the same project with a stitchy friend I do know, which is why I chose to stitch my blocks next to the ones Shannan did πŸ€— I did tent stitch first like all the other stitchers but then couldn't resist making them Cross Stitches 😁


And here is the canvas, ready to pass on to the next stitcher! I'm so glad that I had to chance to participate in #passthecanvas, and it's inspired me to try more needlepoint in the future ❤🧡 And if you have any online suppliers you'd recommend, I'd love to hear about them! I've been looking for Canadian shops, but haven't had much luck so far in finding blank needlepoint canvas; most offerings are tent stitch kits, or painted.

Have you participated in a crafty round robin project, or would you like to?


Thursday, October 3, 2019

Free Style SAL: Progress & Inspiration


My stitching on my double heart for the Free Style Sew Along on Instagram is starting to take shape! But first, I wanted to let you know about a Pinterest Board I just made for the SAL, with links to tutorials and stitch guides for flowers, leaves, lattices and outlines:


If you have any suggestions for this board, please e-mail me the links!

Even if you are not stitching along with us, these are ideas you can adapt to any project!

For anyone who missed my previous post, the Free Style Sew Along is a stress-free, stitch-at-your-own-pace simple SAL! Started by my Instagram stitchy friend Marianne and myself, you can join in at any time and post your progress anywhere online, including your own blog. The idea is to find a simple outline motif you like - Marianne and I are both using the same double heart, which you are welcome to use as well (please see my previous post for the free pattern and other motif ideas) - and fill it with spontaneously stitched flowers 🌼🌷🌻

My last post covered my materials, pattern choice and transfer. I've added a few new colours, which I'll list in a later post since I may add a few more before I'm finished 🎨

Here are my first stitches:


A trio of Spiderweb Roses and a little lattice!


Then I added some Fishbone Stitch Leaves (following Mary Corbet's excellent video tutorial) and a little pink ruffle using Mary's Scalloped Buttonholed Chain Stitch Tutoria, which looks fancy but is super easy once you get the hang of the tension!


I find it very helpful to hold on to the top of the chain stitch with one hand while gently tightening the Buttonhole Stitch loops with the other, and sort of slide them close together until each space is filled. I didn't count my Buttonhole Stitches, I just filled each arch until I couldn't add any more.


You could stitch down the center of each arch, and I might do so before I'm finished, but I like the free standing texture right now, even if my loops are a little wonky 😊


Fishbone Stitch Leaves are something I've been wanting to try for AGES, so I was very excited with how these turned out!!! They are fun to stitch too, and have great texture; I'm sure I will be adding some more here and there before I'm finished πŸƒ

And that's it from my end so far! Please do feel free to jump in and stitch with us πŸ˜ƒ You can follow the link in my sidebar at right to my Instagram profile (@aureliaeglantine) or leave a comment below! If you have any questions, please don't hesitate to ask and I'll do my best to answer πŸ’

Wednesday, November 7, 2018

Meet Annabelle, my Autumn Songbird!


Annabelle, the Autumn Songbird
Adapted from a Free Vintage Transfer (Vogart)
Tester for the Blue Washable Marker and Lazy Daisy Stitches

I have been in love with the vintage embroidery pattern that inspired this beautiful bird - whose name was chosen because Annabelle is Gaelic for "Joy" - for YEARs now:


Three Birds in a Tree
# 10007 / Animals & Insects / Vogart at Needlecrafter.com

Although it doesn't appear to have been updated since 2016, Needlecrafter is one of the best sites online to find free vintage embroidery transfers, and it is home to the pattern that I used for my first-ever embroidery, Bluebirds of Happiness.

I wanted a tester to try the Blue Washable Pen I recently used for Sammy the Squirrel. I was interested to see if having the full Lazy Daisy outline marked would help make my stitches rounder. When I'm using a permanent transfer method - lead pencil, fine-tipped Sharpie marker or iron-on pencil - I usually only put dots in place of the bottom and top tips on each petal.

This is because I find it difficult to make my stitches perfectly match the lovely even teardrops of the pattern designs. But when you have a lot of Lazy Daisy stitches close together, all those dots can be a little confusing, especially since I usually have French Knot dots marked in the middle of the flowers too. It's like playing Connect the Dots - and sometimes it's frustrating to figure out where everything goes πŸ˜‚

Please click the image to enlarge and save at full resolution

So I decided to focus only on one bird; this is my variation! I made some changes: altering the branch, adding another tail feather, changing the beak and adding extra French Knots and scattered Detached (Single) Lazy Daisies in the body for some extra colour. I also added another leg, because only one didn't look quite right!

You may notice the colours look a little familiar. That's because I loved the colour palette from my Lolli & Grace Autumn Leaf SAL so much that I just had to use it again! I made some minor substitutions in the original colourway and I kept those for this project. If you'd like to stitch your own Autumn Songbird, here is the Colour & Stitch Key:

Please click the image to enlarge and save at full resolution

The Blue Washable Marker (mine is the Unique Brand, from Walmart, that I used for Sammy the Squirrel) worked like magic again! A quick dip in a plastic container of cold water and Abracadabra! Shazam! Bibbety-bobbity-boo!!! A beautiful, joyful Songbird!


One teeny tiny minor quibble: my fabric choice was not the best. I have seen this pretty and unusual mustard yellow colour everywhere this Autumn, and when I found some fabric on the bargain wall, the same type of linen I used for The Joyful Jester, I was thrilled! That project was felt applique, so I've never actually embroidered on this fabric before. The loose weave means that it's easy to overstretch, and although I tried very hard not to do so, I distorted the fabric. Significantly.

I was SO proud of my Satin Stitch in this project, especially the Tail Feathers:


Smooth, right? This was the first layer I intended to use as padding but it worked out so well that I kept it to the single layer. The leaves were Satin Stitched inside as well. Out of the hoop, unfortunately, that fabric distortion means that all my painstakingly-stitched Satin Stitch went wavy and wonky πŸ™„ So it has to be stretched in a hoop or a frame.

Lesson learned!


Thankfully, my other major achievement - the Bullion Knot feet - emerged relatively unscathed 😊 Those teeny tiny toes are so cute!


Verdict: The Blue Washable Marker wins again! I'm so impressed with this embroidery transfer method. It really did help take the guess work out of my Lazy Daisies, although again the linen was not a good fabric choice. The nubby texture means that it was harder to mark the fabric and I had to go over most of the lines twice. Also, because I couldn't mark smoothly on the textured surface, I couldn't really get the teardrop shape of the Lazy Daisy stitches and they ended up more like straight lines LOL!

I really love the flexibility this marker gives you - you can change elements, as I did with this project when I reshaped the beak, you can add or omit parts of the pattern. Not having to stick to the pattern lines gives you so much stitching freedom!

And my Lazy Daisy stitches do look a little rounder than normal, which is a definite plus since mine usually turn out kind of skinny. In all likelihood, this had nothing at all to do with the marker and just happened because I was paying extra attention to them, but I'll take all the help I can get πŸ˜„

I'm so pleased with how Annabelle turned out, and I think she's lovely. A little songbird to sing a happy, joyful tune on these golden late Autumn afternoons while the leaves fall, reminding us that Spring will come again once Winter has its turn πŸ‚πŸ•ŠπŸ

Thursday, April 23, 2015

Booklet Review: Ribbon Stitches


Ribbon Stitches by Mary Lou Wright and Suzanne McNeill for Design Originals

Although this little booklet is currently out of print, and probably has been for a few years, I'm making an effort to review some of my thrifted stitchy stuff like this so you can keep an eye out for a copy on your own treasure hunting adventures :)

It's a lot easier to find something you're interested in if you know what to look for!

When hunting about for craft booklets like this, I often find them stuffed in with magazines of all kinds in thrift shops and used book stores. Although the sticker price is $3.00, I only paid a dollar, and that's pretty typical for these, so booklets like this can be a very affordable way to experiment with a new technique.


I've always loved the look of ribbon embroidery, and I've read quite a bit about it over the years. Although this guide is small, it packs in a lot of content and is actually better, instruction-wise, than some of the full-length books I've read on the subject!

Like most booklets, it's a project book, with 15 small floral designs finished off as ornaments and wall hangings. The front and back cover and a two-page center insert are full-colour while the rest of the book is black-and-white.


As you can see from the photo above, each project includes a B&W photo, a drawn illustration to use as a pattern guideline, fabric cutting templates and a list of materials. Arrows labelled with the stitch name point to each area of the illustration.

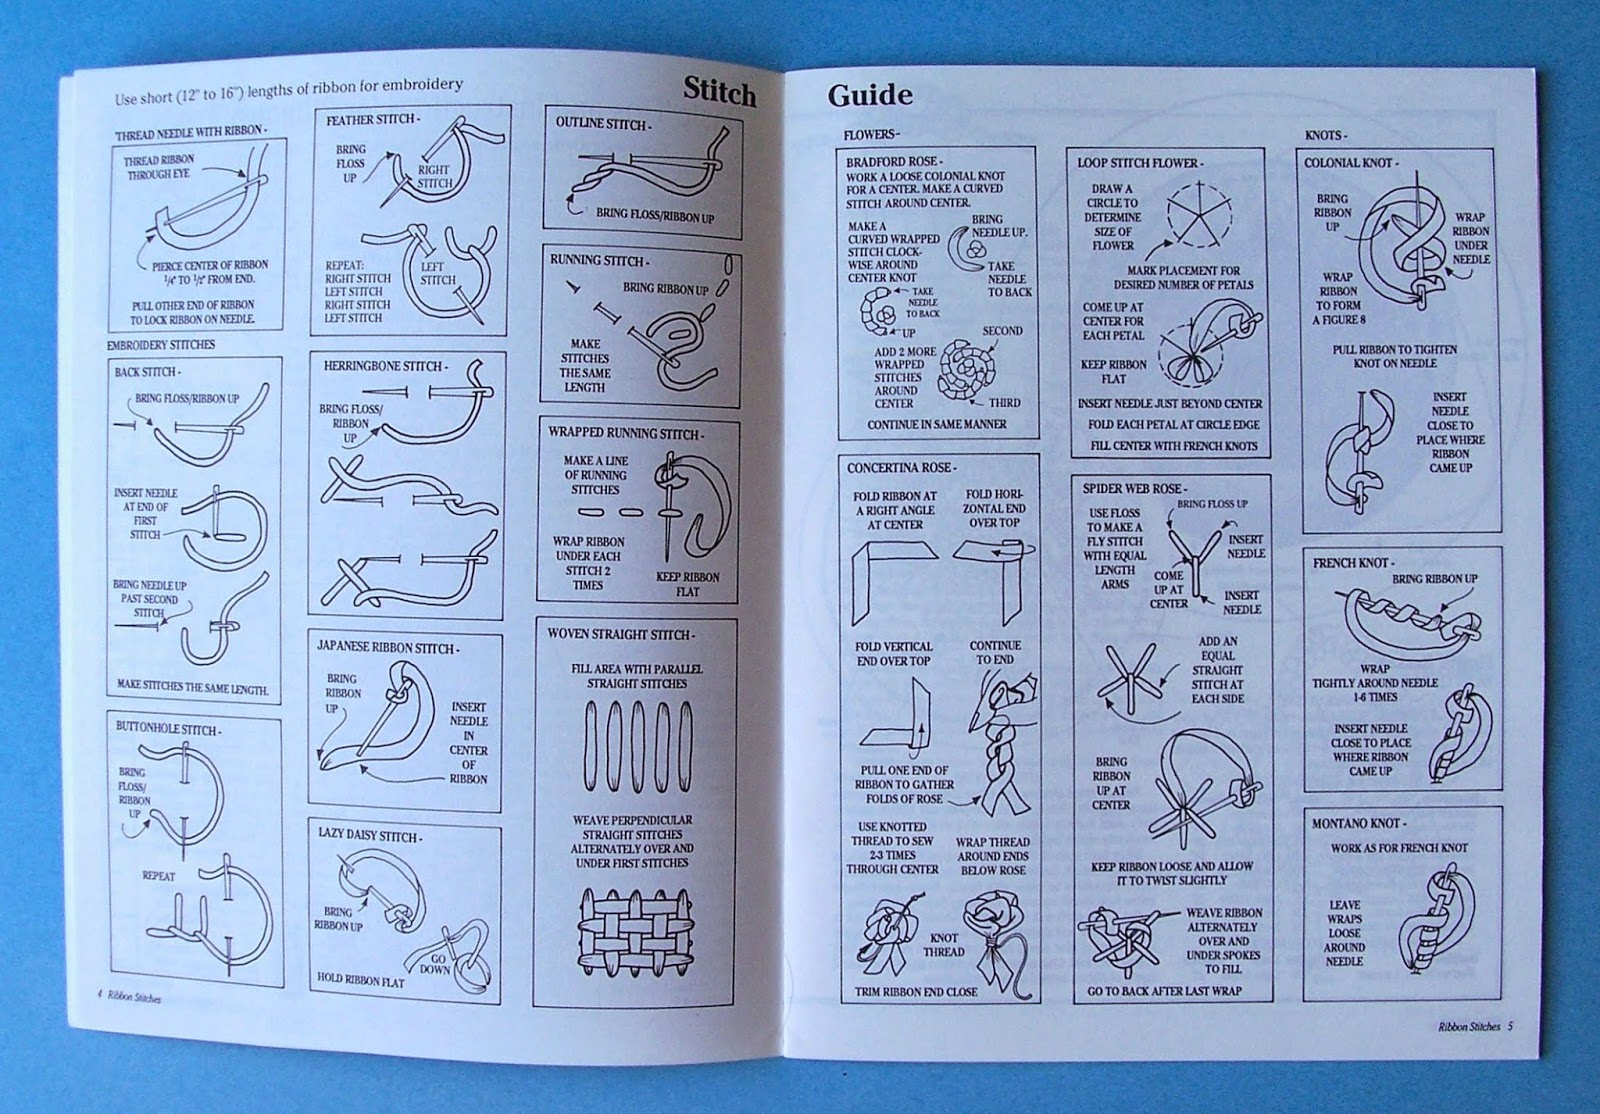
And these names correspond to the Stitch Diagrams given at the front of the book:


Besides illustrating how to lock the ribbon on the needle before stitching - which was incredibly helpful! - there are 17 stitches shown, most with multiple parts. All seem clear and concise, although I did try folding the Concertina Rose several times with disastrous results; I suspect there's a trick of the wrist somewhere in there!

But by far the most useful feature is indeed the "Full-Color Stitch Sampler Inside!":


I've never seen anything like this before and it's amazing to see the stitches laid out "in progress"! Some even have the needles still in place, which is cute touch ;) Most compare the same stitch in floss and silk ribbon, and some show multiple steps, like the beautiful yellow Bradford Rose at the top right (which I'm hoping to try soon!).

The recommended materials are regular DMC cotton floss and YLI Silk Ribbon, which seemed to be the most popular supplier of the Silk Ribbon Revival in the mid-1990's, which was right around when this book was written in 1994.

As a kid, I spent lots of time happily trailing along after my Stitchy Guru Mother in fabric stores, and I remember seeing all the cards and bundles of shiny, pretty ribbon on the pegboard shelves, long before I ever thought about picking up a needle :)

Unfortunately, the lack of availability of silk ribbon - and it's expense! - is the biggest stumbling block to Ribbon Embroidery today. But I've been experimenting with polyester "satin" ribbon, and while it lacks the soft drape of silk, I like the look!


Here's a selection from my Stitchy Guru Mother's stash of practice threads; like me, she was hesitant to use the silks she bought and started with these, but other things came along and she never did try the real thing. She may still have some silk ribbon somewhere, so if I get good at this I may try that for something VERY special ;)

Meanwhile, I tried my hand at a Spiderweb Rose, using the diagram in the booklet:


You can see the ribbon I used here, in the original skein and wound on floss cards.


And here are my roses! The weird blobs in the middle are French Knots, which definitely need some work (and aren't any easier in ribbon LOL). The rose on the left has the floss base recommended in the booklet, and the larger one on the right is worked over a base made with the same ribbon, which is usually how it's done.

I'm really pleased with how the floss-based Spiderweb Rose turned out, and I'll be using this method in the future! Small tidbits of information like this can make a HUGE difference when it actually comes to stitching, and I'm so glad that The Great Stitchy Karma Gods brought this little booklet my way! Highly recommended.

Finally, here's my favourite project in Ribbon Stitches, which is also the simplest:


Elegant and pretty, this bouquet features a Bradford Rose and Loop Stitch flowers with Lazy Daisy leaves! I really love that Ribbon Embroidery is so rich and lavish looking yet most of the stitches are basic surface embroidery ones you may already know. It all very much depends on the ribbon you use, and your tension.

Over the next few weeks I'll be letting my imagination run rampant with ribbons :) Hope this little review was helpful. Have you thrifted anything stitchy lately?!

(And if you're Spring Cleaning your craft closet, please consider donating to a thrift store near you! It's a great way to help old supplies and projects find a new home.)

Friday, May 16, 2014

Easter Egg Finish! + Craftsy Feature


My Easter Variation of "Christmas My Way" by Keslyn's Designs

Wow, has it ever been a hectic few weeks here! Mostly happily so, but very busy nonetheless :) My apologies to anyone who is waiting on e-mail from me! Hope to remedy that and resume my bloggy browsing ASAP. I just wanted to quickly share the Final Finish for my little Easter Egg ornament! It turned out a little - okay, a LOT - differently than I had envisioned, but that always seems to be the way, doesn't it? ;)

Also, thanks so much for all the lovely comments and encouragement you left on my last post, and the compliments on my colourway! Floss is really fun to play with :)

Here is the original project - from Just Cross Stitch's 2011 Christmas Ornaments Special - and my variation together for easy comparison (full details in this post):


For this finish, I made the corded trim out of the DMC 3846, a lovely turquoise:


Originally, I had intended to use the grosgrain ribbon I bought with my backing fabric (see it at the end of this post) to make a ruched trim with a ribbon bow (a little like this tutorial by Lynn B. @ Happiness Is Cross Stitching, but with longer tails) at the top. But: a) the turquoise ribbon was slightly off the floss colour, b) Two meters of ribbon was not nearly enough for ruching, and c) it just plain refused to work out!

So I just used what was left of my floss to make simple hand-twisted cording :)

What looks like a third loop in the middle is just the hanging loop - to make that, I cut a section off the end of the cording, made a loop, and attached it separately inside the top of the ornament before I ladder-stitched the top seam together, as I usually do.

To attach the cording and leave enough length to work with, I pinned the middle of the cording to the bottom center of the sewn-up ornament, leaving two long tails on either side. The cording was sewn down with one strand of floss, looped over the twists to help define them. Then when I reached the top again, I looped the "ears" over each other to form the bow, and wrapped my sewing floss around the center until it looked right to me. I did try tying the bow, but I couldn't get it to lie right!


Then I cut the ends to the same length and frayed the threads below the knots to make little tassels. Although I intended to leave the ends lose, they sort of flopped around so I tacked them with a stitch above each knot. They still aren't perfectly symmetrical by any means, but it was the closet I could get. I deliberately made the tacking stitches loose to leave a little give so I can adjust the way the ends hang.

And after a difficult start, when I had to discard my first backing piece because it frayed from putting in and taking out stitches, I *finally* got my motifs lined up:


I wanted the bunny talking to the little chick, and his buddy bunny with the floomy tail, to be the center and it took some finagling to keep the chick's wing in the frame! Happily, I'm still in love with the fabric, and I have plenty left over for next Easter :)

Feature on the Craftsy Blog

Some exciting news: My Chicken Scratch Sampler on Aida was recently featured in an article called "The Story Behind Amish Embroidery", written by Leigh Bowser for the Craftsy Blog! The site is also currently hosting the Lifetime of Craftsy contest.

Happy Victoria Day to Fellow Canadians!


Although I am confused, as always, as to why the 24th of May is celebrated a whole week early (it's got something to do with the Government's Holiday Timetable, or so I've been told), I'm nevertheless looking forward to the long weekend :) Whatever you do and wherever you go, I hope you have wonderful weather and a great time!

Saturday, April 26, 2014

SFS Month #4 - A Special Easter Egg!


Although Easter has come and gone and this post is a bit late, I wanted to share my second project for this month. I was working on it feverishly to get it posted up for the Holiday weekend, but this design is one of those that ended up going off in an entirely different direction to what I was imagining. Thankfully, despite all the twists and turns it took and the merry chase it led me on, I do like it and hope you will too!

(This story is a little long, so if you'd just like to see the SFS info, it's right at the end).

When I first signed up for SFS, I decided that my personal goal would be aimed not towards reducing spending as such but towards actually *stitching* from my stash. That hasn't worked out so far (for happy reasons!), but this project fits that goal :)


From the 2011 Christmas Ornament issue of Just Cross Stitch magazine, this egg is "Christmas My Way", by Keslyn's Designs. You can see a version of the original stitched up at this blog. It's full of pretty Specialty Stitches that the designer calls "Sym-Stitches", based on Symmography, or "String Art" (like this lovely example).

Way back when the issue first came out, I bought it just for this little egg pattern, thinking it would look beautiful in soft pastel colours for Easter :) So I set about putting together such a colour palette, and choose these pretty colours:


From top to bottom on the stack, and left to right on the ring: 3824 (peach), 776 (pink), 744 (yellow), 955 (green), 157 (blue) and 210 (purple). Then I remembered that I had used those pink and yellow shades in my Chicken Scratch Heart, so I added in the pretty DMC Colour Variations in 4095 from that project:


I thought it would pull all the different coloured bands together, and it did look really nice up close. But it completely faded away even at arm's length, and I was hoping for this to be a wall ornament for seasonal display. So after much deliberation, I came to the unfortunate conclusion that they were all too light.

So I went back to my floss boxes and played around with combinations. It took me days to decide! Sounds ridiculous, I know. Usually playing with colours and pulling flosses is great fun for me, but I was getting really frustrated. I tried other variegated threads, with complimentary colours. Darker versions of the pastels. Even metallics!

Finally, I kept coming back to this beautiful bright turquoise, and this happened:


Easter Brights! From top to bottom on the stack, and left to right on the ring: 209 (purple), 956 (pink), 703 (green), 743 (yellow) and 3846 (turquoise). And when these colours finally came together, I actually wondered why, exactly, I was thinking of Easter as pastels? New grass green, crocus purple, fluffly chick yellow...it fits!


Special Easter Variation of of "Christmas My Way" by Keslyn's Designs

Here's my finished Egg! Now, this is the first time I've stitched over one on 28 count Evenweave (by M.C.G. Textiles). I really missed the easy counting of Aida blocks, and I had some trouble with the stitch spacing initially, especially the big diamonds on the center line. I ended up taking out almost as many stitches as I put in ;) But by then I was really enjoying the colours and the different stitches, so I kept going.

Here is the Easter Egg before and after beading:


Of course, I did change a few things along the way :) I replaced the second row from the top with Diamond Eyelets, to echo the Half Eyelets on the center band border. The original stitch was very heavy and took away from the Rhodes Hearts directly below it. I also added some more rays on the topmost element to make it fuller, and made some minor adjustments to the Stand at the bottom to fit in all the colours!


But my favourite bit of Spontaneous Stitching is the little polka dots in the center band of the Egg, and the one in the center of the Stand. These are Rhodes Octagons, but at the time I was just fiddling around with thread and liked the shape!

After I added the polka dots, I almost left the beads off altogether! The original calls for Mill Hill Petites in Red, so I had pulled my trusty favourite Mill Hill metallic golds instead to work with this palette. I was thinking of using a regular Seed Bead in each center of the Diamonds, and the Petites everywhere else. I actually stitched a few on, but it really drew the attention away from the Specialty Stitches, so that was out.


Finally, I remembered some pretty little crystals I had left from another project and discovered that they fit the spaces in the centers of the Diamonds perfectly! Happily serendipitous :) They are 4mm faceted Rounds, in AB (Aurora Borealis) finish - that pretty rainbow shine look - from Jolee's Jewels, which is now Create Your Style with Swarovski Elements. The Mill Hills are regular size, #00161, in clear AB.


Since they are mostly translucent, it's hard to see where I added them all!


The beading ended up being my favourite element of my Easter Egg, and it is SO hard to capture all the sparkle! Nothing shines like Swarovski, and in full sun the three center crystals transform into tiny prisms, letting off rainbow flashes in the light :)


My SFS for April, Month #4: Finishing Supplies

As I mentioned, my plan is to turn this little Egg into a padded wall ornament to hang up and enjoy every Easter Season :) After my first project this month, my Chicken Scratch Easter Egg, this the only other thing I've stitched for Easter.

So I didn't have any Easter or Springy prints to use as backing fabric. Honestly, although I was secretly hoping for a small eggy print, I was resigned to settling for plain coordinating cotton at the most. And that eggy print I was trying hard not to want would have to be REALLY small - the Easter Egg turned out very little indeed:


The stitched motif is only roughly 1 1/2 inches wide and 3 inches tall! So imagine my surprise and utter delight when The Great Stitchy Karma Gods smiled upon me and granted me this most wonderful gift:


Eggy fabric! With Springy Flowers!! And Little Chicks!!! And Bunnies!!!! WITH FLUFFLY, FLOOMFY TAILS!!!!! *Ahem* I may still be a little bit excited :)


Can you blame me? Easter Joy! Every time I pull this fabric out to peek at it, I can't help but smile. And there was lovely turquoise Grosgrain ribbon to match too!


My SFS Total: I bought the smallest cut off the bolt, .02 of a meter, for $2.99, and paid $2.20 for 2 meters of ribbon. With tax, my spending totaled $6.57 CA. That leaves me with $18.43 from this month's $25 allowance, and $58.52 in the Bank.

Truly, my family and I had a wonderfully blessed Easter Holiday, and I hope you and yours did as well :) Even though I was disappointed that I didn't Final Finish this little ornament in time, I do intend to try to get it done now so we can enjoy it next year!