Showing posts with label Vintage Pattern. Show all posts

Wednesday, November 7, 2018

Meet Annabelle, my Autumn Songbird!


Annabelle, the Autumn Songbird
Adapted from a Free Vintage Transfer (Vogart)
Tester for the Blue Washable Marker and Lazy Daisy Stitches

I have been in love with the vintage embroidery pattern that inspired this beautiful bird - whose name was chosen because Annabelle is Gaelic for "Joy" - for YEARs now:


Three Birds in a Tree
# 10007 / Animals & Insects / Vogart at Needlecrafter.com

Although it doesn't appear to have been updated since 2016, Needlecrafter is one of the best sites online to find free vintage embroidery transfers, and it is home to the pattern that I used for my first-ever embroidery, Bluebirds of Happiness.

I wanted a tester to try the Blue Washable Pen I recently used for Sammy the Squirrel. I was interested to see if having the full Lazy Daisy outline marked would help make my stitches rounder. When I'm using a permanent transfer method - lead pencil, fine-tipped Sharpie marker or iron-on pencil - I usually only put dots in place of the bottom and top tips on each petal.

This is because I find it difficult to make my stitches perfectly match the lovely even teardrops of the pattern designs. But when you have a lot of Lazy Daisy stitches close together, all those dots can be a little confusing, especially since I usually have French Knot dots marked in the middle of the flowers too. It's like playing Connect the Dots - and sometimes it's frustrating to figure out where everything goes 😂

Please click the image to enlarge and save at full resolution

So I decided to focus only on one bird; this is my variation! I made some changes: altering the branch, adding another tail feather, changing the beak and adding extra French Knots and scattered Detached (Single) Lazy Daisies in the body for some extra colour. I also added another leg, because only one didn't look quite right!

You may notice the colours look a little familiar. That's because I loved the colour palette from my Lolli & Grace Autumn Leaf SAL so much that I just had to use it again! I made some minor substitutions in the original colourway and I kept those for this project. If you'd like to stitch your own Autumn Songbird, here is the Colour & Stitch Key:

Please click the image to enlarge and save at full resolution

The Blue Washable Marker (mine is the Unique Brand, from Walmart, that I used for Sammy the Squirrel) worked like magic again! A quick dip in a plastic container of cold water and Abracadabra! Shazam! Bibbety-bobbity-boo!!! A beautiful, joyful Songbird!


One teeny tiny minor quibble: my fabric choice was not the best. I have seen this pretty and unusual mustard yellow colour everywhere this Autumn, and when I found some fabric on the bargain wall, the same type of linen I used for The Joyful Jester, I was thrilled! That project was felt applique, so I've never actually embroidered on this fabric before. The loose weave means that it's easy to overstretch, and although I tried very hard not to do so, I distorted the fabric. Significantly.

I was SO proud of my Satin Stitch in this project, especially the Tail Feathers:


Smooth, right? This was the first layer I intended to use as padding but it worked out so well that I kept it to the single layer. The leaves were Satin Stitched inside as well. Out of the hoop, unfortunately, that fabric distortion means that all my painstakingly-stitched Satin Stitch went wavy and wonky 🙄 So it has to be stretched in a hoop or a frame.

Lesson learned!


Thankfully, my other major achievement - the Bullion Knot feet - emerged relatively unscathed 😊 Those teeny tiny toes are so cute!


Verdict: The Blue Washable Marker wins again! I'm so impressed with this embroidery transfer method. It really did help take the guess work out of my Lazy Daisies, although again the linen was not a good fabric choice. The nubby texture means that it was harder to mark the fabric and I had to go over most of the lines twice. Also, because I couldn't mark smoothly on the textured surface, I couldn't really get the teardrop shape of the Lazy Daisy stitches and they ended up more like straight lines LOL!

I really love the flexibility this marker gives you - you can change elements, as I did with this project when I reshaped the beak, you can add or omit parts of the pattern. Not having to stick to the pattern lines gives you so much stitching freedom!

And my Lazy Daisy stitches do look a little rounder than normal, which is a definite plus since mine usually turn out kind of skinny. In all likelihood, this had nothing at all to do with the marker and just happened because I was paying extra attention to them, but I'll take all the help I can get 😄

I'm so pleased with how Annabelle turned out, and I think she's lovely. A little songbird to sing a happy, joyful tune on these golden late Autumn afternoons while the leaves fall, reminding us that Spring will come again once Winter has its turn 🍂🕊🍁

Monday, October 29, 2018

Pilot FriXion Tester: Vintage Pumpkin


Vintage Pumpkin
Test Piece for Pilot FriXion Pen Transfer Method

Following my success with using a blue Washable Marker to transfer an embroidery pattern, I decided to work up a small tester with another very popular transfer method I've never tried: The Pilot FriXion Pen!


The FriXion pens are not meant for use on fabric. They are ink pens that come with an eraser on the bottom end (and wow, do I ever wish these had been out when I was writing exams in school!). They are very popular among quilters but are controversial in the embroidery community. Mary Corbet of Needle N' Thread very succinctly sums up her reasons for not using these pens to transfer embroidery patterns.

Namely, the ink does not really disappear. It can leave "ghost lines" that usually re-emerge if the embroidery gets cold, which is something to keep in mind if you are sending your work through the mail. So this is not a flexible transfer method like the Washable Marker - you have to intend to cover most of your lines.


Last year, a good friend sent me a black Pilot FriXion pen to try. They come in several different types and sizes. Mine is the extra fine 0.7 ballpoint, and I love the way it writes! The line is clear but thin, and the ballpoint glides over the fabric. Like the Washable Pen, you need to be able to see through your fabric to trace your transfer.

Most articles on using FriXion pen for embroidery transfers say that you need to iron the ink out. Since I usually iron embroidery from the back (placing the front on a thick fluffy towel so the stitches aren't squashed), I was a little nervous about ironing on the front. Then, a few weeks ago on Instagram, a stitcher said she used a hair dryer. Genius!


So that's what I tried, and it worked a treat! I'm afraid there are no good Before-and-After shots, because I did stick very close to the pattern. A few little bits around the curly vines were all I had to go by, but one blast of heat and they vanished. Obviously, this is something I will have to experiment with a bit more, but I am optimistic that these pens would be a good method for quick, casual patterns.

I really like that the line is easily visible but that you do not need to wash the finished embroidery. And although the FriXion pens do not give you the flexibility of Washable Markers, they do give you a tiny bit of wiggle room versus a lead pencil (my usual method). You need to be sure of your design and stick close to the drawn lines but if you do have an "oops!" moment, you can blast it away with heat.

I am looking for a transfer method that gives fine, non-smudging, easily visible lines that are thin enough to be covered by outline stitches, and this pen seems fits that bill!


Project Details

◾ Vintage Pumpkin from online freebie, unfortunately no longer available
◾ 4" wooden embroidery hoop
◾ 100% quilting cotton, Ecru
◾ DMC Floss:
Pumpkin: 900 (Dark Burnt Orange), 6 strands, Stem Stitch
Leaves: 986 (Very Dark Forest Green), 4 strands, Split Stitch Outline, and Backstitched Veins
Curly Vines: 988 (Medium Forest Green), 2 strands, Stem Stitch


All in all, I'm very happy with how my little Pumpkin turned out! I'm having fun right now stitching up these little transfer method testers, and the next is a pretty little bird that will try out the Washable Marker on Lazy Daisy stitches 🌼


Have you used a Pilot FriXion pen to write on fabric? How did you find it?

Wednesday, October 24, 2018

Meet Sammy, the Vintage Squirrel 🐿


Sammy the Vintage Squirrel
from Vintage Embroidery Transfer
(from an online freebie that is no longer available)

This fun little squirrel was my first experience using a Washable Marker to transfer an embroidery pattern! My pen is the Unique brand, and I bought it at Walmart for less than $5 CA. DMC makes a popular one as well.


The blue is nice and bright and easy to see! It has a felt-pen like tip which gives a pretty thin line. Unfortunately, it doesn't really write like a pen. I found it more effective to use quick, short strokes - much like using a pencil or pen to transfer.


These types of Washable Markers are very popular for embroidery transfers because you don't have to worry if your lines don't quite match your stitching, which also gives you some flexibility. If you want to omit or change the shape of an element you can! This would be incredibly helpful with stitches like the Lazy Daisy. There's a great article by Cheryl Fall about using washable pens for embroidery transfers at Spruce Crafts.

For cross-stitchers, these have some use too. I have recently seen someone on Instagram (@moiraestitches; see her #StageCoachInTheWoods for progress) use one of these markers on Aida, to outline a monotone (single colour) pattern for easy stitching. I think this is a fantastic idea, and saves you from having to constantly consult a chart for simple designs or for large blocks of colour in more complex designs. You could also use them to mark the center of a design or to help mark borders for accuracy!

I followed the lines pretty closely, but I still had a tiny bit of blue showing:


Here's a close-up - the red arrows point to visible marker lines:


I have to admit that I was nervous to wash Sammy, especially with the black and white eye! But a quick dip in cold tap water (I used a sandwich container) and it was like magic: when the marker lines hit the water, they vanished! No scrubbing at all!


Presto, changeo! Abracadabra! Ta-DA! I'm totally impressed, and can't wait to try this marker again 😊

Project Details:
◾ Fabric is 100% quilting Cotton, light beige
◾ 4" vintage wooden hoop
◾ DMC Floss: 919 (Fur), 3833 (Ears), 310 (Nose and Eye), 001 (Eye highlight), 780 (Acorn) and 938 (Acorn Cap)

I used 3 strands of floss for most of the stitching. I used 2 strands of white for the teeth, and also for the white Eye Highlight, with 1 strand of black for Split Stitch to define the outside of the Eye. First, I tried stitching the Eye with all black and adding the highlight with a French Knot, but I didn't like the way the Knot stood out. So I took it back and made a tiny circle with Satin Stitch for the highlight, with a Fly Stitch border:


I like it a lot better! The other place I struggled was Sammy's tail. I wanted a floofy, fluffy, floomphy tail, and I considered using Turkey Stitch first. I worked some samples in the top left corner of the cloth. After a LOT of hemming and hawing, I eventually settled on doing the outside lines on the tail with 6 strands, using Stem Stitch:


It wasn't as fluffy as I wanted but it gave me a nice bit of extra lift:


Ultimately, I think a Turkey Work tail would have overwhelmed her. This was a super fun stitch and a successful experiment in transferring using a Washable Marker! I'm hoping to do another little tester using the Pilot Frixion Pen transfer method soon 👩‍🔬


🍁🍂 Sammy the Squirrel says Happy Autumn! 🍂🍁

Wednesday, October 28, 2015

Happy Hallowe'en - Black Magic Doily!


Black Magic Doily

My special Hallowe'en Variation of the free vintage Hortensia Doily

NOTE: Unfortunately, the site where I found this pattern has been hacked, so I've decided not to post the link in case it is infected. If you'd like the pattern chart, please e-mail me - my address is in the sidebar, under the pretty postage stamps :)

This is the original pattern:


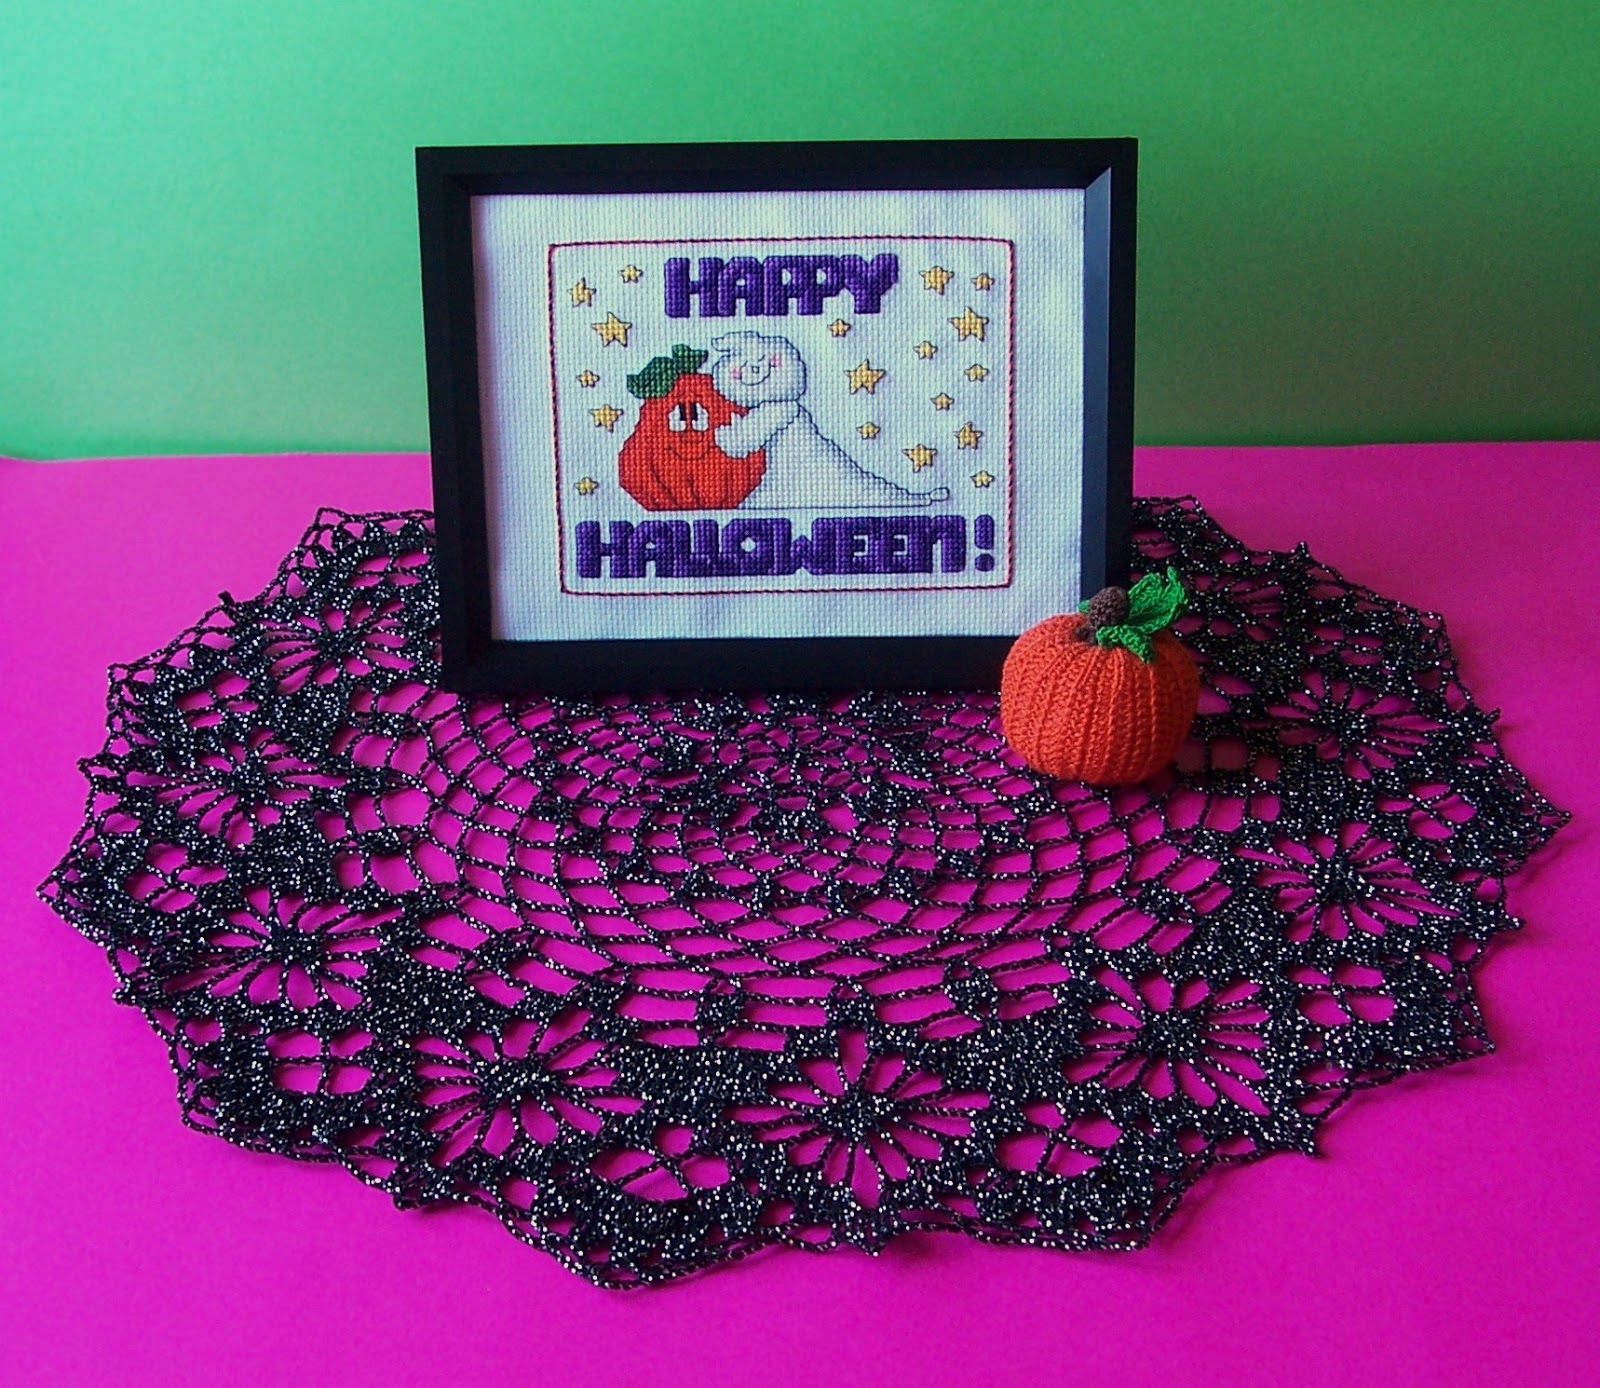
So, you might remember that around this time last year I finished and framed my very first Hallowe'en stitchery, Happy Hallowe'en Friends?


Well, I've been doing some more fine (thread) crochet lately, and I decided that the cute Ghost and Pumpkin looked a little lonely - so I made a spooky doily to keep them company :) Thanks to The Great Thrifty Karma Gods, I had a cool ball of black with silver metallic (size 10), and I ended up using nearly every bit of it. For the last few rounds, I was holding my breath and chanting "please let me make it" in my head over and over - and thankfully I did, with a scant few inches to spare LOL!

Here's a close-up of the little clusters in the center:


When I first thought about making a doily for Hallowe'en, the first thing that jumped to mind - naturally - was a spider's web! I've learned over the last few years that there are many different styles of crocheted lace, and I tend to like the chunkier Cluny and Irish styles. There are also a lot of fragile, spidery type doilies that are usually known as Cobweb Lace, but I wanted something more substantial.

Which was when I remembered a vintage motif I'd seen before. I thought it was - confusingly - called Cobweb Lace too, which it is; it's also known as Spiderweb Lace.


They key to this pattern style is the little square with the "spider" at the center, surrounded by lines of chain stitch "webs" :) It was often used in Edgings, and in combination with bunches of the pretty popular Pineapple motif for larger cloths.


The only change I made to the chart was to adjust the cluster groups between the "Spiderwebs"; the original called for 6 Clusters, but I downsized to 5 to save on thread. Serendipitously, this resulted in that neat pointed tip after I blocked the doily, rather than the loopy scallop of the original. It looks much more web-like this way, and I'm really happy with how the doily turned out :)


Amazingly, it's actually even sparklier in person! Unfortunately, the thrifted thread I used didn't have a label and I wasn't able to identify the brand. I've never seen that combination before, and the silver metallic is thicker than the more common white with silver that I've worked with before.


I also dug out the little Pumpkin Pincushion I crocheted back in 2013! Shortly after I wrote about it, I removed the pins and stored it away, not really sure what to do with it. I actually like it better this way, just as a display decoration. It's an Everlasting Pumpkin! I used to love real pumpkins, but I've never liked eating the seeds or pulp and it was such a waste to throw them away every year.

So here's my little Hallowe'en trio, spookily sweet and happily hanging out together:


I am a huge fan of Cute Hallowe'en, which seems to be getting rarer in the face of the much more common Horrific take on things. I love the treats, not the tricks LOL ;)

However you choose to celebrate All Hallows Eve, Happy Haunting!


Be Safe and Have Fun :)

Friday, July 31, 2015

Vintage Embroidery Pattern Resources


After my last post about my little Happy Bluebird, which I stitched from a vintage iron-on transfer "tester" design, I'd thought I'd share some of my favourite places online to find free vintage embroidery patterns! The photo above was my very first attempt at embroidery, my Bluebirds of Happiness, and it is also a vintage design :)


If you're interested in vintage embroidery patterns at all, this is the place to start! Although you do have to create an account to access the group, it's free and easy to set up and once you do you can search the giant collection of over 8,000 images!

The group is the gift of many members dedicated to scanning and sharing digital images of mostly iron-on transfer sheets - from as early as the late 1800s to about the 1970s - and most photos have been digitally cleaned up into line drawings that are ready to print and use! Here's a quick overview of how to search the Pool:

When you sign in and go to the Hoop Love Group Page and then to the Photos tab, you get this screen that shows the most recent image additions at the top:


To search within the images, use the search box directly across from the blue "Add Photos" button, next to "Contributors". If you use the search box at the top of the page, it will search all of Flickr! I searched for "bluebird" and here are my results:


From this page, there are several ways to narrow your search, including by colour or pattern, but these don't apply since the majority of results are all B&W designs.


I selected the first pattern, which takes me to the page for that photo. From here, you can Download the image by selecting the icon of a down arrow over a line at the far right hand corner of the screen, which brings up a drop-down menu where you can select the size of the photo and save the file to your computer. And that's it!

To edit or re-size the photo, I suggest using an imaging program on your computer, such as Microsoft Paint or a free online program like Pixlr Express.

Some of the contributors to Hoop Love also host patterns on their own sites/blogs.


This is a wonderful site that, while unfortunately no longer updated, has some of the cutest patterns out there! Including the Alice Brooks pattern "Bluebirds on a Branch" that was the basis for my Bluebirds of Happiness :) And there are two other designs in the same set: "Bluebird and Birdhouse" and Bluebird and Fountain".

It's searchable by keyword and also has themed categories you can browse.


This is a blog dedicated to sharing public domain craft patterns, including crochet, knitting, quilting and sewing. But the majority of the content is embroidery related. It has a post search box, and also a very detailed list of categories that make for happy browsing :) The Flowers section is large, and includes this pretty posy.

There is also a helpful Embroidery Stitch Guide that uses vintage stitch illustrations!


Although all of the over 300 patterns she has shared are on Flickr in her Vintage Embroidery Transfers Album, this is the personal blog of Gina, a graphic designer, Etsy seller and fervent thrifter. She includes vintage patterns in some of her posts, so the best way to find them is to browse her Embroidery blog tag, which also brings up all kinds of contemporary embroidery inspiration, her own work and fun posts.

It's well worth spending some time looking through her blog because Gina has shared some of the most unusual and interesting vintage transfers out there!


This amazing button hoop is one of my very favourite projects of all time, and has been high near the top of my To Be Stitched (TBS) List forever and a day :) Although it has a lovely vintage feel, with the pretty flowers, it's a new design of her own.


Floresita, who is also on Flickr and blogs for Feeling Stitchy, has compiled her vintage patterns in this easy-to-use blog format. It features category tabs across the top which are a quick way to browse. She specializes in the cute - like this pretty little kitty - and quirky, and has scanned several Days of the Week dishtowel sets.


Tipnut was a free weekly newsletter filled with household tips and projects that started in 2006 but stopped updating a few years ago. This section of the site shares whole sets of scanned vintage patterns, including several for stamped cross-stitch. Most are for dishtowels, including Days of the Week sets like these cute Busy Bees.


Martha makes beautiful quilts, many with hand-embroidered squares, and has some great vintage transfers on her blog, including an unusual trio of picture frame designs and this glorious peacock!


The Antique Pattern Library is a fabulous resource for all things vintage and crafty, and although I've spent lots of time on the site in the last few years, I know I've only just scratched the tip of the iceberg. The sheer amount of information can be a little overwhelming, especially since the Embroidery category includes counted thread work (like cross-stitch and Berlin Woolwork) and specialty techniques.

The major problem is that all the listings are for books - many of which concern multiple techniques - and not for the individual patterns themselves. And most of these patterns are really old, in a very different style, but even if they're not to your taste or suitable for following exactly, they can serve as stitchy inspiration :)

Mary Corbet of Needle n' Thread recently wrote a great post about her favourite books on APL for embroidery, and has some good tips for navigating the site. She also has an interesting post about her process for digitizing old embroidery patterns.

Finally, for an intriguing look at how the vintage paper transfer sheets actually are before being scanned and digitized, see this post, and this concise history of iron-on transfers and the companies that made them, along with a free pattern!

I hope you enjoy these resources and find them helpful. And if you have any other sites to suggest I'd love to hear them :) Happy Vintage Embroidery Pattern Hunting!

Thursday, July 23, 2015

The Wonderful World of DMC PC!


Hello, hello! And a very Happy Day to you :) It's so hard to believe that Summer has not only arrived, but that it's already half over. I know most stitchers are already thinking about Christmas, but I'm trying to hold on to flowers just a bit longer ;)

I'm still experimenting with Ribbon Embroidery, but I took a break to stitch up this cheerful little Bluebird of Happiness and it provided an excellent opportunity to talk about the absolutely brilliant thread that is DMC Perle (Pearl) Cotton!

But first, the pattern is a lovely vintage design from Workbasket magazine kindly shared by Love to Sew on Flickr in the Hoop Love Vintage Transfers group. If you're interested in these kinds of patterns, this is a great resource, but please be aware that you do have to sign up with a Yahoo! e-mail to view the image pool.


Available to Download in several sizes on Flickr here

It's a "tester" or "trial" pattern, which is a small motif usually included on an iron-on pattern transfer sheet for the purposes of testing the iron on the fabric. They usually matched the theme of the full-size pattern set. They were meant to be discarded after being used and were a practical way to make sure the transfers would work. I'm not sure if anyone actually stitched them, but they make wonderful stitch testers!


I traced over the pattern on thin notepad paper using my blue Sulky Transfer Pen (the same way I did for my Floral Umbrella), but this time I only put in little dots to represent the bottoms of the music notes and the ends and centers of the flowers. I find it very hard to get my Lazy Daisy loops to match up exactly to drawn ones, so this saved a lot of frustration and allowed some flexibility while stitching :)

And here's the back - isn't amazing how the flowers look like stars?! -


It's challenging to start and end so many colours in a pattern this small (the black was especially ornery) but I used the "travelling" method of winding new threads along the backside of old ones, and it made things considerably neater. I even find myself doing this for cross-stitch these days, and it's made a big difference!


Thanks to a very generous gift from a friend and to my Stitchy Guru Mother's Stash, I now - at very long last - have representatives of every size in the DMC Perle Cotton line!!! Although the "Perle" spelling is French, I've always heard it pronounced and sometimes spelled "Pearl", so that's how I think of it too :) I usually just call it PC.

I am a HUGE fan of this thread, as you may remember from my Floral Heart:


This project was stitched entirely in DMC PC #5, on gold velveteen

In my opinion, DMC PC is a criminally underutilized thread!!! Especially because it's absolutely perfect for embroidery! Unlike DMC Floss, which is six-stranded, PC is a single non-divisible strand of thread with a pretty twist and a lovely soft sheen.

It's actually that gorgeous luster that garnered it the name "Perle" (Pearl) in the first place! It not only makes stitching easier but it also, I think, shows off stitches better.

Mary Corbet at Needle N' Thread has some great posts explaining the differences in common embroidery threads that are well worth reading: Thread Comparisons, which covers PC, Floche and Floss; Thread Talk! Sizing Up Cotton Threads that goes into more detail, including PC sizing, and a two-part post Comparing Cotton Threads, Stitched and Embroidery Thread Comparisions which show stitch samples.

But as I was embroidering my little Bluebird of Happiness, I realized that I had never seen a picture showing all of the PC Sizes as they come, in Skeins and Balls, so I made this little chart to visually demonstrate the differences (feel free to share!):


That tagline, "The World's Most Beautiful Thread", is actually used by DMC online and in advertisements, and I really have to agree :)

Skeins: PC Skeins are probably the most widely available, with #5 being much more common in my experience than the larger #3, which seems to be mainly marketed for needlepoint use. According to the DMC Product Website for Art. 115, both are available in 292 solid colours with an extra 20 variegated hues made in #5.

The "How to Use" section of this page shows how to unwind and cut the skeins for use. Unfortunately, they are tricky to store as the thread is too large to be wound onto floss cards. I've used old ribbon spools and even small pill bottles for this purpose, but mostly just rewind the skein and tie the colour number onto one end.

There are also two metallics (Art. 315) - Silver and Gold - in #5, that I haven't tried.

Balls: Now, somewhat confusingly, PC #5 is also available in Balls! In the photo above, that green is actually a vintage ball from my Mom's Stash. I've never seen it sold this way, and I'd thought it was a discontinued line. But according to the DMC Product Website for Art. 116, there are still 5 solid colours - no wonder it's rare!

My Stitchy Guru Mother can remember a much larger colour range of these once, so that's something worth keeping in mind if you're thrifting or buying vintage threads.

Here are all the beautiful bright colours of PC #8 that I used in my little Bluebird:


According to the DMC Website, #8 Balls are available in 206 solids and 18 variegated shades! I also love using this thread for Blackwork on size 14 Aida cloth (like I did for my Metallic Monarch Variation). Unfortunately, it's availability seems to be limited. My local Michaels carries only White, Ecru, Black, Navy and a Burgundy.

So image my delight when a friend kindly sent me these wonderful COLOURS:


This was my first time embroidering with #8, and I am hooked!!! It makes a finer line than the #5, and although it is more delicate, this makes it ideal for fitting more stitches into a smaller area or working more detailed stitches.

This Bluebird is pretty small - I sized it to about 3 inches tall and 4 inches wide before printing my pattern - and the #8 PC allowed me follow all the fine curves of the back feathers while still mostly covering the permanent Sulky Transfer Pen lines!!!

Now, #12 Balls seem to be even less common than the #8! DMC says they make 40 solid colours, but I have only personally seen white retailed in this size.

DMC has a number of free projects for PC listed under Cotton Embroidery, mostly designed by Carina from Polka & Bloom (who has some more freebies here), my favourite of which is the Bird of Paradise :) There's a nice alphabet available too.

Here's a closer look at all four sizes of DMC PC together:


Although #12 doesn't look all that much finer, in person the difference is much more noticeable. Whereas #8 works well with size 14 Aida, #12 could be used on a size 16 or size 18 Aida! It's really too fine to embroider with, unless the design is very small or incredibly complex. But it is often used in combination with #8 for the accent details - like Wrapped Bars and Dove's Eyes - in Hardanger stitching.

#12 is also a great size for larger-scale Tatting - making lace with a shuttle (or, less commonly, with a needle) - which happily seems to be making a comeback. DMC also says that all four sizes of PC can be used for Crochet, but that would be an expensive proposition for anything bigger than a pair of earrings or a brooch!

PC is also very popular for Crazy Quilting, and there are companies like Colour Compliments that make gorgeous hand-dyed variegated versions of the threads.

I also wondered about the Colouring System for PC. All DMC Threads share the same Colour Numbers, but the difference in materials can affect the way the dyes absorb. PC is a little prismatic - because of the luster, the colour seems to shift slightly in tone depending on the direction that the light hits it. So I compared three of the brightest shades of PC #8 with their coordinating flosses, and you can see my results below:


The closest of the three was the pink (3689, which is a favourite of mine!), with the yellow (445) also being nearly indistinguishable. The blue (996) was actually further off than it looks in the photo - the floss was noticeably deeper. But in general I think it's safe to say that most Floss colours can be substituted for PC.


And finally, if you'd like to stitch your own little Bluebird, here's a Stitch Guide:


Please click to view Full Size to Save or Print

Of course, the really wonderful thing about small designs like this is how easy it is to experiment with them, so feel free to make your own substitutions!


I hope this overview of DMC Perle (Pearl) Cotton (PC) was helpful, and I really hope that you consider trying it out the next time you embroider, or experiment with adding it to your cross-stitch. It's a really beautiful thread that is so fun to work with, and if more stitchers use it and buy it, hopefully it will become more readily available in the future :) Or at least not get any scarcer LOL! What do you think of PC?