Hello, hello! Sorry for the delay in posting. I am working on that Tassel Tutorial and the Finishing Tutorial, but in the meantime I thought I'd share my own progress!
It was a lovely sunny afternoon today, so I spent a happy few hours with my needle and thread and managed to get the center square finished! Here it is in process:
And here it is completed:
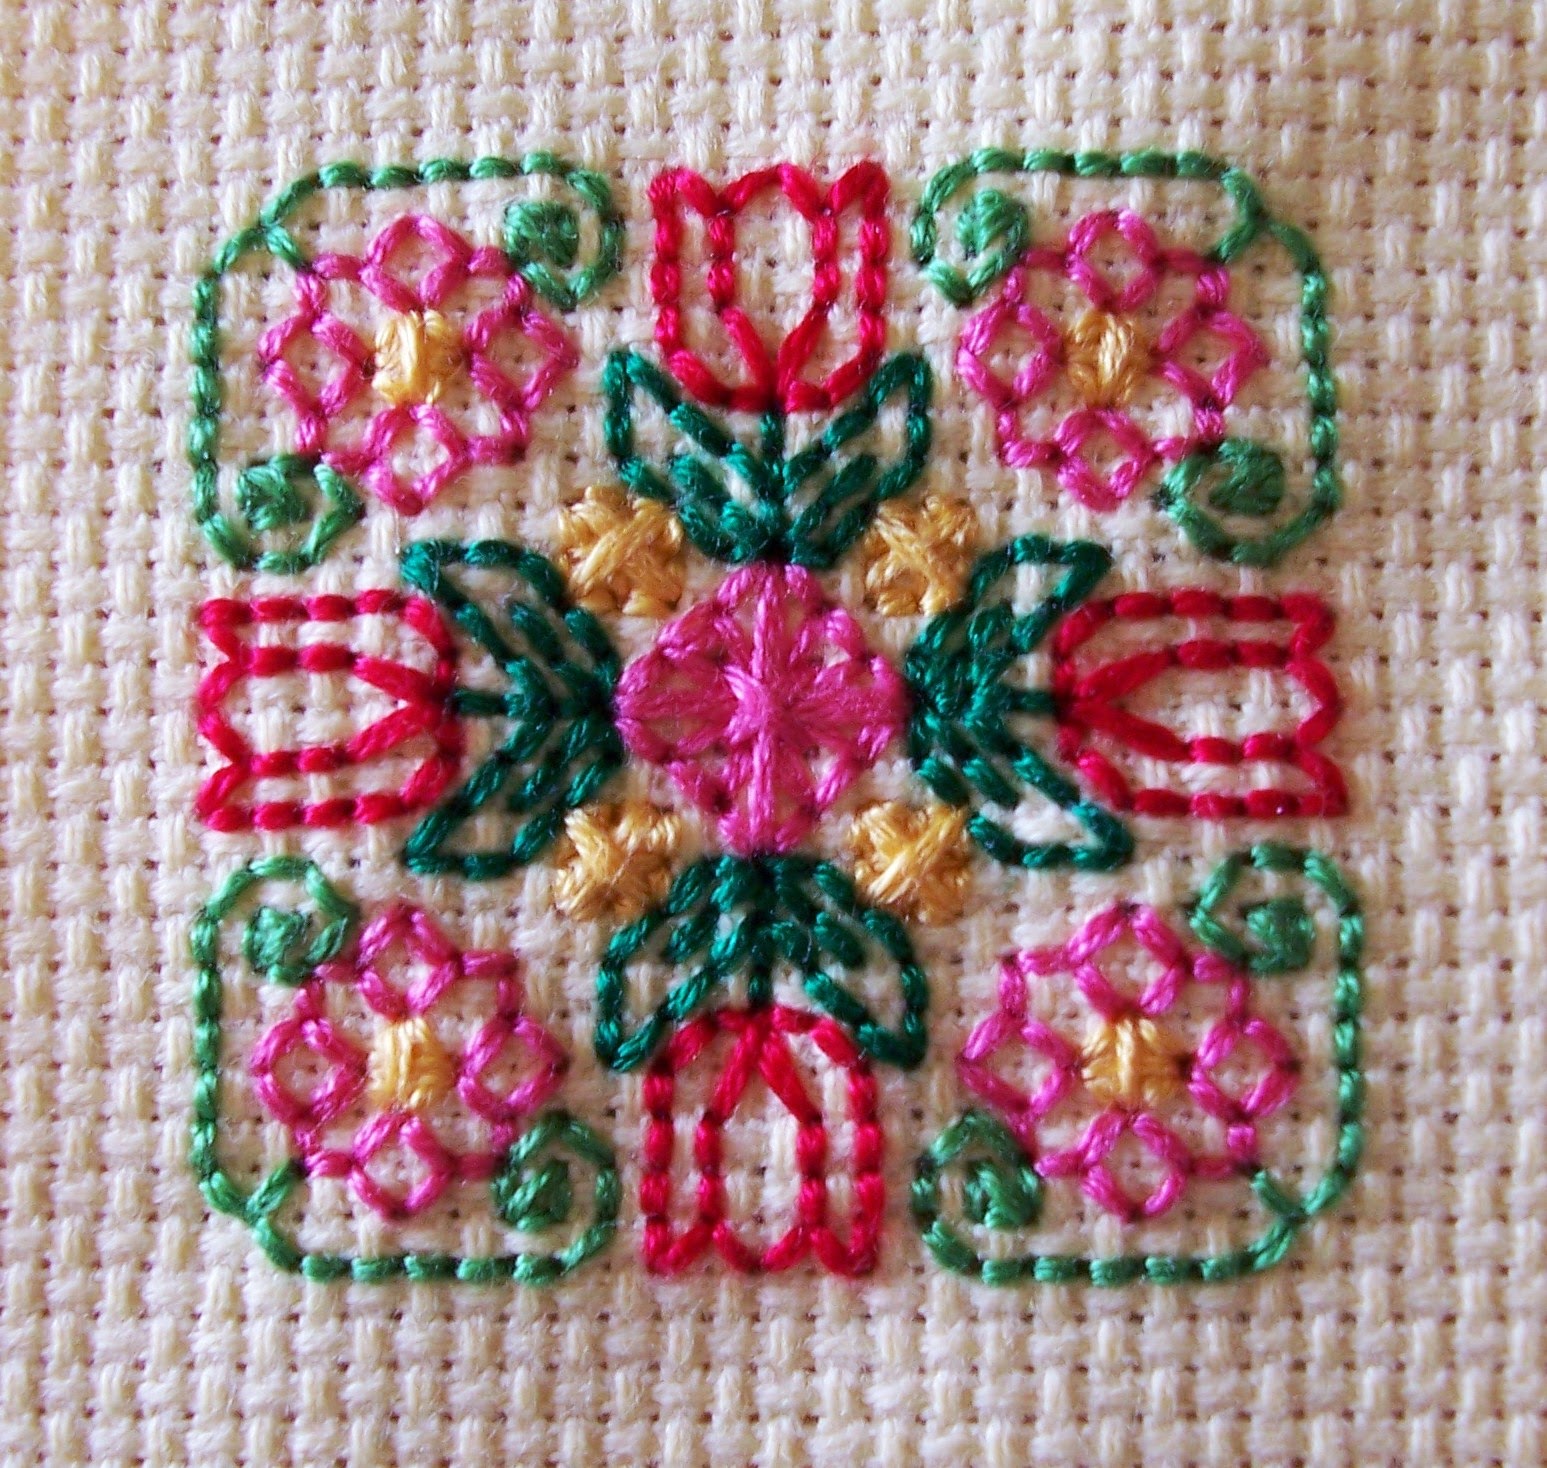
I ended up filling in the centers of the pink flowers with simple upright cross stitches because the outline faded against the yellow Aida. I'll do that to the others too :)
I'm stitching my bookmark in hand rather than in hoop, hence the wrinkles! Argh.
While I was stitching, I decided to take step-by-step photos of the way I worked the Center Diamond, because I think it's a really neat stitch. There is a specialty stitch diagram for it included in the SAL pattern, and most stitchers have already worked it.
But for those who haven't had the time to join, or who weren't interested in the SAL, this is a nice quick stitch that is a lot simpler than it looks and is a striking addition to any stitch repertoire. So I'm going to post the diagram and the photographs up as a guide :) Like all ES pictures, when clicked the large view will open in another window!
I call this a Variation (I continue to be amazed that any happy mistake can easily be called a "stitch variation", LOL!) because it differs from the usual Rhodes stitch in its backstitched border and in the working method. Instead working the laid stitches consecutively around the shape, three pairs of elongated cross-stitches are layered and then tied in the center. Here is the SAL diagram for clarification:
If you have any trouble viewing, please let me know. And if you do stitch your own version of the SAL Center Diamond Rhodes Variation, feel free to share! I think it has a lot of possibilities for use, and that's something I'd like to explore more myself in future. Plus, it's really fun to stitch! The whole Rhodes family is very interesting.
A few months ago, I came across this excellent Rhodes tutorial by Cheryl Fall, the former Embroidery Guide at About.com. Several different shapes are graphed in colour, including the conventional Rhodes Diamond and even a Clover/Shamrock!
Also at About.com, the former Cross-Stitch Guide (Connie Barwick) has a very simple step-by-step Rhodes Square tutorial, and one on the Vertical Half Rhodes.
Elsewhere online, Nordic Needle has a beautiful Rhodes Butterfly and Rhodes Heart (this is the diagram I learned from!). Needlelace's Stitch of the Month Archive has a smaller Rhodes Butterfly, a Half Rhodes with Stitched Bar, two sizes of Rhodes Hearts and an Irregular Rhodes! The sky is the limit with this stitch it seems ;)
When I was designing Spring Garden, I experimented with the order of the stitches, and discovered that the way you layer your stitches can give a completely different look! You can see how I slanted the top-most stitch in each Algerian Cross here:
This is a really fun and easy way to make even basic specialty stitches more versatile!
Now I'm ready to move on to the "brackets" at the top and bottom of the bookmark, and I hope to get some more quality stitching time in tomorrow :)
Confession: I just noticed today that I forgot to draw up a Specialty Stitch Guide for the spacer Lozenges, but the working order is similiar to the Center Diamond and it looks like no one had any trouble thankfully! But I do apologize for the omission.
Showing posts with label WIP. Show all posts
Friday, June 7, 2013
Monday, July 11, 2011
WIP: Twilight Angel - Couching!
Happy news! Pleased with the result of my test-piece, Couched Rose, I decided to go ahead and try out the couching on my Angel, and am pleased to report that it's finished! I've got lots of pictures to share! When we last left her, she looked like this:
And here she is in all her gilded glory:
I also added in the backstitched overlay to the skirt band before I started couching, but it's very subtle, and didn't show up well in the photographs.
Some close-ups - The top of her bodice (I may add some beads or something):
Her skirt sash (I really like the ribbony effect, though the tips were hard to curve!):
And her skirt band (which also has the lovely ribbony look):
Overall, I am very pleased with the outcome! There are a few spots where I should've curved the couching more, perhaps, and in the band above you can see a bit of blue there in the second underfold, but I was able to keep my stitches relatively small, and this is essential. Honestly, I don't think I would have been able to do such a neat job of it if I hadn't done my test piece, using the same gold thread, first; following the curves of the rose taught me how to follow the curves of the sash and band. And it was a bit awkward going in places, even with the practice piece experience, because the little curves and twists were quite small.
This is also the first time I've couched on Aida. I debated using Aida for my test piece, but went with cotton to get the feel of the technique first, and I am glad I did. Having done my Couched Rose as a true embrodiery, I was able to adapt the technique to Aida by doing the unthinkable - I went through threads randomly with my sharp "tacking" needle instead of just following the holes in the Aida! This is something I would never have done before, and the smooth look that I was able to attain would not have been possible if I had stuck to following the squares of the Aida (and my tacking stitches would've been a great deal larger and more visible!).
Once I had the outline couching finished, I considered couching the curliques on her skirt as well, and actually started out with that technique. However, I quickly realized that the colour called for (the 1 strand of yellow with 2 strands of gold, tacked with 1 strand of gold), which was used for all the couching work, just sort of vanished into the yellows of the skirt. Also, the extra three-dimensional work looked odd, and distracted from the outline couching I'd already done.
So, after some, er, "reverse stitching", I settled on using three strands of gold and using backstitch to follow the curliques on the pattern. A close-up of the area:
Where each loop-de-loop occurs (which are made with lazy daisy stitch, which I first worked in another test piece that I'll be writing about soon) there will be beads!
Here is my Angel, as she is now, all ready for embellishment:
So I'm very excited about the embellishment process! This will be the most heavily embellished design I've ever stitched, since there's seed beads (in various colours), sequins, and charms! And I have some interesting ideas that are a bit different than the kit suggestions. The instructions are only guidelines, after all! *wicked grin*
And here she is in all her gilded glory:
I also added in the backstitched overlay to the skirt band before I started couching, but it's very subtle, and didn't show up well in the photographs.
Some close-ups - The top of her bodice (I may add some beads or something):
Her skirt sash (I really like the ribbony effect, though the tips were hard to curve!):
And her skirt band (which also has the lovely ribbony look):
Overall, I am very pleased with the outcome! There are a few spots where I should've curved the couching more, perhaps, and in the band above you can see a bit of blue there in the second underfold, but I was able to keep my stitches relatively small, and this is essential. Honestly, I don't think I would have been able to do such a neat job of it if I hadn't done my test piece, using the same gold thread, first; following the curves of the rose taught me how to follow the curves of the sash and band. And it was a bit awkward going in places, even with the practice piece experience, because the little curves and twists were quite small.
This is also the first time I've couched on Aida. I debated using Aida for my test piece, but went with cotton to get the feel of the technique first, and I am glad I did. Having done my Couched Rose as a true embrodiery, I was able to adapt the technique to Aida by doing the unthinkable - I went through threads randomly with my sharp "tacking" needle instead of just following the holes in the Aida! This is something I would never have done before, and the smooth look that I was able to attain would not have been possible if I had stuck to following the squares of the Aida (and my tacking stitches would've been a great deal larger and more visible!).
Once I had the outline couching finished, I considered couching the curliques on her skirt as well, and actually started out with that technique. However, I quickly realized that the colour called for (the 1 strand of yellow with 2 strands of gold, tacked with 1 strand of gold), which was used for all the couching work, just sort of vanished into the yellows of the skirt. Also, the extra three-dimensional work looked odd, and distracted from the outline couching I'd already done.
So, after some, er, "reverse stitching", I settled on using three strands of gold and using backstitch to follow the curliques on the pattern. A close-up of the area:
Where each loop-de-loop occurs (which are made with lazy daisy stitch, which I first worked in another test piece that I'll be writing about soon) there will be beads!
Here is my Angel, as she is now, all ready for embellishment:
So I'm very excited about the embellishment process! This will be the most heavily embellished design I've ever stitched, since there's seed beads (in various colours), sequins, and charms! And I have some interesting ideas that are a bit different than the kit suggestions. The instructions are only guidelines, after all! *wicked grin*
Saturday, June 11, 2011
WIP: Twilight Angel - Backstitching!
With my forced blogging sabbatical, you'd think that I'd have lots of lovely projects finished off to show you. But that is not the case, as you'll soon see. I hit some minor road blocks with my Twilight Angel, which I'll explain as we go along :)
When we last saw her, all her whole and half cross-stitches were finished:
Here's another picture of the before-backstitching that is a bit clearer:
And here she is with her features (face and hands), her overskirt, the left edge of her underskirt, her blouse, her hair and her wings outlined:
You may have noticed the beaded headband. Here's a closer look:
The design calls for a variety of cross-stitches, French knots (my Most Afeared Foe), seedbeads and a star sequin in the middle. I decided to simplify her headband, since the space is quite small, and I wanted it to actually look like something *in* her hair instead of all these things piled *on* her hair, if you know what I mean *rolls eyes*.
I'm very pleased with the way it turned out :)
For the seedbeads, I used two Mill Hill colours I had that serendipitously matched the medium shades in her overskirt (the blue) and underskirt (the yellow). I intend to use these in place of the blue and yellow French knots elsewhere. The gold beads are Mill Hill Antique Petits, which is why they are smaller. I stitched in the blue and yellow first, and I decided that the smaller spaces were perfect for the Petits.
Previously, I had intended to add the pearly white beads (like those included with the kit, but substituting my own Mill Hills, to keep the finishes the same), but I think that they would have pushed the others out of alignment and ruined the 'headband' look.
And this is my Twilight Angel with her underskirt fully backstitched:
This section was a bit nerve wracking. Although the leading edge of her underskirt was stitched in dark grey, the pattern called for light grey to be used for the folds of her underskirt. But I had a problem - I had about two inches of the light grey left!
I'm not quite sure how I managed that. I'm generally careful with my threads, and have been especially so with this kit. One of the main reasons I love Dimensions - aside from their beautiful designs - is their wonderful customer service. I knew I could go on the website and order more of the colour I needed.
But I can never resist a challenge :)
After carefully studying the package picture, I came to the conclusion that the light grey blended in a bit too well with the darker yellows of her underskirt, and on a much thought about whim, I decided to go ahead with the dark grey. And I'm pleased with the result. As her blouse and sleeves were outlined in dark grey, I think adding that colour to the folds of her underskirt sort of connects the top and bottom.
So this is where my Twilight Angel stands at the moment. All of the regular backstitching has been done; there is some two-colour backstitching on the sash of her underskirt that I have finished but have yet to take pictures of (but will soon!). Being so close to the embellishment stage is tantalizing, but it is here I hit the wall.
You see, somehow in all my careful reading of the project instructions, I had missed the part that stated that the outlining on the Angel's ribbon sash and underskirt sash was actually couching (!). While familiar with the concept, I have never attempted couching so fine, or couched threads for an outline before, and was (and still remain!) very nervous about possibly ruining all the work I had put in so far.
To prepare myself, I started a specific couching project, with similar threads, so that I could test out my abilities (or lack thereof, let's be honest *wink*) and get a feel for it. That project is now finished, and I will be doing an in-depth post about it soon, but I'm still on the fence when it comes to couching on my Angel. I could substitute backstitching. But I'm afraid that if I do so, the sashes won't look as ribbon-like.
Decisions, decisions.
In the immortal logic of one of my all-time favourite cartoons, I am choosing not to make a choice for the time being :) And therefore, I can feel like I'm doing something by not doing anything at all! Ain't life grand?! Whatever and whenever I make up my mind, I'll be posting up information about all my substitutions (including the colour numbers and types of Mill Hill beads) when I finalize them.
Until then, I wish you very Happy Stitching and a wonderful weekend!
When we last saw her, all her whole and half cross-stitches were finished:
Here's another picture of the before-backstitching that is a bit clearer:
And here she is with her features (face and hands), her overskirt, the left edge of her underskirt, her blouse, her hair and her wings outlined:
You may have noticed the beaded headband. Here's a closer look:
The design calls for a variety of cross-stitches, French knots (my Most Afeared Foe), seedbeads and a star sequin in the middle. I decided to simplify her headband, since the space is quite small, and I wanted it to actually look like something *in* her hair instead of all these things piled *on* her hair, if you know what I mean *rolls eyes*.
I'm very pleased with the way it turned out :)
For the seedbeads, I used two Mill Hill colours I had that serendipitously matched the medium shades in her overskirt (the blue) and underskirt (the yellow). I intend to use these in place of the blue and yellow French knots elsewhere. The gold beads are Mill Hill Antique Petits, which is why they are smaller. I stitched in the blue and yellow first, and I decided that the smaller spaces were perfect for the Petits.
Previously, I had intended to add the pearly white beads (like those included with the kit, but substituting my own Mill Hills, to keep the finishes the same), but I think that they would have pushed the others out of alignment and ruined the 'headband' look.
And this is my Twilight Angel with her underskirt fully backstitched:
This section was a bit nerve wracking. Although the leading edge of her underskirt was stitched in dark grey, the pattern called for light grey to be used for the folds of her underskirt. But I had a problem - I had about two inches of the light grey left!
I'm not quite sure how I managed that. I'm generally careful with my threads, and have been especially so with this kit. One of the main reasons I love Dimensions - aside from their beautiful designs - is their wonderful customer service. I knew I could go on the website and order more of the colour I needed.
But I can never resist a challenge :)
After carefully studying the package picture, I came to the conclusion that the light grey blended in a bit too well with the darker yellows of her underskirt, and on a much thought about whim, I decided to go ahead with the dark grey. And I'm pleased with the result. As her blouse and sleeves were outlined in dark grey, I think adding that colour to the folds of her underskirt sort of connects the top and bottom.
So this is where my Twilight Angel stands at the moment. All of the regular backstitching has been done; there is some two-colour backstitching on the sash of her underskirt that I have finished but have yet to take pictures of (but will soon!). Being so close to the embellishment stage is tantalizing, but it is here I hit the wall.
You see, somehow in all my careful reading of the project instructions, I had missed the part that stated that the outlining on the Angel's ribbon sash and underskirt sash was actually couching (!). While familiar with the concept, I have never attempted couching so fine, or couched threads for an outline before, and was (and still remain!) very nervous about possibly ruining all the work I had put in so far.
To prepare myself, I started a specific couching project, with similar threads, so that I could test out my abilities (or lack thereof, let's be honest *wink*) and get a feel for it. That project is now finished, and I will be doing an in-depth post about it soon, but I'm still on the fence when it comes to couching on my Angel. I could substitute backstitching. But I'm afraid that if I do so, the sashes won't look as ribbon-like.
Decisions, decisions.
In the immortal logic of one of my all-time favourite cartoons, I am choosing not to make a choice for the time being :) And therefore, I can feel like I'm doing something by not doing anything at all! Ain't life grand?! Whatever and whenever I make up my mind, I'll be posting up information about all my substitutions (including the colour numbers and types of Mill Hill beads) when I finalize them.
Until then, I wish you very Happy Stitching and a wonderful weekend!
Friday, May 20, 2011
WIP: Twilight Angel - Almost Done!
Happy news! I've just finished all the whole cross-stitches and half cross-stitches on my Twilight Angel, and now can move on to the backstitching!
Normally, I would post up the last photo of my progress, but as I had to repost my last entry, it should appear right below this one. So on to the new photos!
The addition of her wings:
The start of the blue cloud:
And the completion of the blue cloud!
And there you have it! Next up is the backstitching, which I think will be very interesting, as it is done in several different colours and with different strand amounts. The blue cloud was a bit of a challenge, actually, because it only uses 1 strand of floss for its mix of whole and half cross-stitches, and it's the first time I've actually cross-stitched using 1 strand. I frequently use it for backstitch, but was surprised by how fragile it seemed when cross-stitching!
It took me a while to get my tension right, as I was afraid to tug too hard, lest I break the thread. But the differences in strand size make the cloud look very hazy and appropriately background-like! And it's funny, since when it's in, the blue I used for the cloud looks just a shade darker than the blue-violet Aida cloth, but it's actually a turquoise! When I first went to put it in, I was very dubious, but using the 1 strand really softens the colour. That's a neat trick I'll try to remember for the future! ;)
I'm greatly looking forward to moving on to the backstitching, because it will add a lot of detail. The feathers on her wings, for example, are all added by backstitch over the mix of white and greys that I've already done. And once I manage all the considerable backstitching, it's on to the sparkles, the wonderful sparkles!
And I realize that I haven't posted updates on anything else in a while, but now that the end (oh, the glimmering, shiny, sparkling end!) is in sight, I just can't put down Twilight Angel! I am happily looking forward to spending some quality stitching time with her during this Victoria Day weekend. Even the forecasted rains, methinks, will not stop me :) I suspect that once I start adding all the lovely shinies in, Mr. Sun will have to come and lend his light, just to see them glitter and gleam! Happy Stitching!
Normally, I would post up the last photo of my progress, but as I had to repost my last entry, it should appear right below this one. So on to the new photos!
The addition of her wings:
The start of the blue cloud:
And the completion of the blue cloud!
It took me a while to get my tension right, as I was afraid to tug too hard, lest I break the thread. But the differences in strand size make the cloud look very hazy and appropriately background-like! And it's funny, since when it's in, the blue I used for the cloud looks just a shade darker than the blue-violet Aida cloth, but it's actually a turquoise! When I first went to put it in, I was very dubious, but using the 1 strand really softens the colour. That's a neat trick I'll try to remember for the future! ;)
I'm greatly looking forward to moving on to the backstitching, because it will add a lot of detail. The feathers on her wings, for example, are all added by backstitch over the mix of white and greys that I've already done. And once I manage all the considerable backstitching, it's on to the sparkles, the wonderful sparkles!
And I realize that I haven't posted updates on anything else in a while, but now that the end (oh, the glimmering, shiny, sparkling end!) is in sight, I just can't put down Twilight Angel! I am happily looking forward to spending some quality stitching time with her during this Victoria Day weekend. Even the forecasted rains, methinks, will not stop me :) I suspect that once I start adding all the lovely shinies in, Mr. Sun will have to come and lend his light, just to see them glitter and gleam! Happy Stitching!
WIP Twilight Angel: Overdue Update!
This is a reposting, to fix the tags at the bottom of the post. After the glitch, they were not restored, and I wanted them to match the series. That way, if you would to see all the posts about Twilight Angel, all you have to do is click the tag at the bottom of any related entry.
If I had left the tags glitched, this post would have disappeared from such a search. Sorry for any inconvenience this has caused!
Hello Stitchy Friends!
My sincerest apologies for my lack of activity recently! I haven't been well, and so I just sort of got behind on everything (again). Thanks very much for your patience!
Stitchy-wise, I'm afraid that I don't have much progress to report.
But I do have a little bit of good news!
When I last posted about Twilight Angel, she looked like this:
Since then, I've managed to finish off her blue skirt band:
And, to my delight, have filled in everything on her person!
I'm very pleased with how she has turned out so far :)
The gaps at her wrists and neckline will be filled with a floss and gold metallic mix, and the space on the crown of her head is where her ornate headband will reside. My foe, the French knots, are called for, but I have sneaky secret beady substitution plans!
But by far the best thing is that I can now go on to work on her wings!
And, I am happy to report - especially to Rainy Day Crafter and CrazyStitcher, my cheerleaders in this matter - that I am remaining steadfast, despite the occassional urge to the contrary, in my resistance to completing my half cross-stitches!
I hope all is going well with your stitching, and I greatly look forward to catching up on all the new stitchy blog news in the next few days. Until then, Happy Stitching!
If I had left the tags glitched, this post would have disappeared from such a search. Sorry for any inconvenience this has caused!
Hello Stitchy Friends!
My sincerest apologies for my lack of activity recently! I haven't been well, and so I just sort of got behind on everything (again). Thanks very much for your patience!
Stitchy-wise, I'm afraid that I don't have much progress to report.
But I do have a little bit of good news!
When I last posted about Twilight Angel, she looked like this:
I'm very pleased with how she has turned out so far :)
The gaps at her wrists and neckline will be filled with a floss and gold metallic mix, and the space on the crown of her head is where her ornate headband will reside. My foe, the French knots, are called for, but I have sneaky secret beady substitution plans!
But by far the best thing is that I can now go on to work on her wings!
And, I am happy to report - especially to Rainy Day Crafter and CrazyStitcher, my cheerleaders in this matter - that I am remaining steadfast, despite the occassional urge to the contrary, in my resistance to completing my half cross-stitches!
I hope all is going well with your stitching, and I greatly look forward to catching up on all the new stitchy blog news in the next few days. Until then, Happy Stitching!
Wednesday, April 27, 2011
WIP: Twilight Angel - Her Skirts Appear!
Spring is surely on its way, for Mr. Sun made a greatly appreciated appearance on not one but two days! And so, much happy stitching resulted, aided and abetted by his sunbeams :)
When we last left Twilight Angel, she looked like this:
And she has since had her overskirt finished, and her blue sash added:
As if that wasn't enough, she has also had her underskirt finished:
Next up for stitching is the wide blue band on the bottom of her underskirt, which echoes all the blues in her sash! I was very surprised with how fast the stitching of the underskirt came along, actually. I think that the larger sections of a single colour really helped to speed up my stitching, as the colours of the overskirt changed every few stitches.
Although the colouration of the underskirt is less subtle than the overskirt, I really do like the sunray effect of the yellows! One of the features that attracted me to this design is that Twilight Angel has colours of the day (yellows, white) as well as colours of the early evening (lavenders, light blues) and the darker hues of the night (navy blue). Most angel designs that I've seen tend either towards the very light or the very dark, and I like that Twilight Angel contains the many different hues that characterize the actual transition of day into night!
So I am quite happy with my progress, although I must confess that I had a difficult section with the very right of her underskirt. I had thought my stitching on target, until I went to put in the final colour and realized that I was out by one and a half stitches. And I further realized that I needed to take out the other four colours in that section to properly remedy the error! As tempted as I was to fudge it, I took the time to undo the mistake and redo the stitching and am much happier for it, though I was less than content at the time *rolls eyes*
Also, I surpassed a Personal Stitchy Record - I have worked with Twilight Angel for weeks and have yet to make the half cross-stitches into full stitches! And furthermore, I have actually added in more half cross-stitches and left them alone too! This is a first for me.
Time will tell how long my fortitude will last :)
Weather-wise, Twilight Angel may have to be put aside for a little while. The forecast here is for rain and more rain (and perhaps a few flurries, *ack!*) for the next few days, so I will likely be working on other projects instead. I've finished the blackwork on my Monarch Pincushion, and will be starting on the filling stitches sometime soon; hopefully, I'll have some pictures to share in the near future! I'm also looking forward on catching up on my e-mails and stitchy blogging news; and I do appreciate your continued patience.
Here's hoping that Mr. Sun will come out and shine on your stitching! ;)
When we last left Twilight Angel, she looked like this:
Next up for stitching is the wide blue band on the bottom of her underskirt, which echoes all the blues in her sash! I was very surprised with how fast the stitching of the underskirt came along, actually. I think that the larger sections of a single colour really helped to speed up my stitching, as the colours of the overskirt changed every few stitches.
Although the colouration of the underskirt is less subtle than the overskirt, I really do like the sunray effect of the yellows! One of the features that attracted me to this design is that Twilight Angel has colours of the day (yellows, white) as well as colours of the early evening (lavenders, light blues) and the darker hues of the night (navy blue). Most angel designs that I've seen tend either towards the very light or the very dark, and I like that Twilight Angel contains the many different hues that characterize the actual transition of day into night!
So I am quite happy with my progress, although I must confess that I had a difficult section with the very right of her underskirt. I had thought my stitching on target, until I went to put in the final colour and realized that I was out by one and a half stitches. And I further realized that I needed to take out the other four colours in that section to properly remedy the error! As tempted as I was to fudge it, I took the time to undo the mistake and redo the stitching and am much happier for it, though I was less than content at the time *rolls eyes*
Also, I surpassed a Personal Stitchy Record - I have worked with Twilight Angel for weeks and have yet to make the half cross-stitches into full stitches! And furthermore, I have actually added in more half cross-stitches and left them alone too! This is a first for me.
Time will tell how long my fortitude will last :)
Weather-wise, Twilight Angel may have to be put aside for a little while. The forecast here is for rain and more rain (and perhaps a few flurries, *ack!*) for the next few days, so I will likely be working on other projects instead. I've finished the blackwork on my Monarch Pincushion, and will be starting on the filling stitches sometime soon; hopefully, I'll have some pictures to share in the near future! I'm also looking forward on catching up on my e-mails and stitchy blogging news; and I do appreciate your continued patience.
Here's hoping that Mr. Sun will come out and shine on your stitching! ;)
Friday, March 25, 2011
WIP: Twilight Angel - More Overskirt!
I got in a few nice afternoons last week, wherein the sun decided to come and machete-hack its way through the ever-present jungle of grey clouds and shine on my stitching for a while. This made the conditions perfect for a little more Twilight Angel work!
Last time I posted, she looked like this:
And now, she looks like this:
As you can see, this piece is hard to photograph, due its subtle colourations. Once I move past the overskirt, things will brighten up. The most challenging part of this for me wasn't the fractional stitches (I had to learn to come to a sort of stalemate with them a few months ago when stitching a large floral work for my Grandmother for Christmas, whereby I pleaded with them "I hate stitching you but I need you" and they sort of smugly said "of course you need us, and so you must stitch us, like it or not!" and so I had no choice. Doing something over and over may not mean you'll ever love it, but it does mean you learn to at least tolerate it when necessary, though it does not guarantee you'll do so with good grace).
No, the most challenging part of these few stitches for me was the half cross-stitches. Obviously, I can stitch them. But I've never liked the look of them. Here's a closer view:
The half cross-stitches are in the middle of the picture above. They are white, like the neighbouring whole cross-stitches to their right. Do you see what I mean? Half cross-stitches always seem, well, incomplete. I know half cross-stitches are an important tool in the kit of any stitch designer, and that they can be used very well to artistic effect, as I hope will be evident when I finish this piece. But I've never been able to stand leaving them as they are, and so in patterns that have called for them before - even in one where the background was essentially all half cross-stitch - I have gone back and filled them in with the other half, making them whole, despite my good intentions to resist doing so.
In Twilight Angel, half cross-stitch is everywhere - in the blue background, in the wings, and in the dress. And so I am doing my very best to stick to the design. When I first put these in, I thought they wouldn't stand even a few hours. But when I started stitching the white whole stitches around them, I could better see the effect that they will have. I think, when it's finished, that these half-stitches will serve to provide more gentle transitions between the shade colours of the overskirt and the bright highlights of the white folds. I hope.
So, for now, I am trusting in the great wisdom of Dimensions, and will leave them as they are. When the Sun sees fit to break out of its prison again, I will happily sit and bask in its welcome glow with my needle and my Angel in hand. However, as we are now in the middle of a raging blizzard, methinks it will be a while before that happens. Ah, Winter!
*flings back of hand to brow dramatically*
Hope this weekend provides lots of happy stitching times to you!
Last time I posted, she looked like this:
No, the most challenging part of these few stitches for me was the half cross-stitches. Obviously, I can stitch them. But I've never liked the look of them. Here's a closer view:
The half cross-stitches are in the middle of the picture above. They are white, like the neighbouring whole cross-stitches to their right. Do you see what I mean? Half cross-stitches always seem, well, incomplete. I know half cross-stitches are an important tool in the kit of any stitch designer, and that they can be used very well to artistic effect, as I hope will be evident when I finish this piece. But I've never been able to stand leaving them as they are, and so in patterns that have called for them before - even in one where the background was essentially all half cross-stitch - I have gone back and filled them in with the other half, making them whole, despite my good intentions to resist doing so.
In Twilight Angel, half cross-stitch is everywhere - in the blue background, in the wings, and in the dress. And so I am doing my very best to stick to the design. When I first put these in, I thought they wouldn't stand even a few hours. But when I started stitching the white whole stitches around them, I could better see the effect that they will have. I think, when it's finished, that these half-stitches will serve to provide more gentle transitions between the shade colours of the overskirt and the bright highlights of the white folds. I hope.
So, for now, I am trusting in the great wisdom of Dimensions, and will leave them as they are. When the Sun sees fit to break out of its prison again, I will happily sit and bask in its welcome glow with my needle and my Angel in hand. However, as we are now in the middle of a raging blizzard, methinks it will be a while before that happens. Ah, Winter!
*flings back of hand to brow dramatically*
Hope this weekend provides lots of happy stitching times to you!
Saturday, March 12, 2011
The Making of a Marker
At long last, I have finally decided on a marker for my blackwork bookmark!
Initially, I had all these visions of sparkly gold charms or beads to pick up the metallic gold in the fabric and the stitching. And I had some gold floral beads in my bead box that, in theory, were perfect. Only, when I pulled them out and tried them against my work, they didn't look quite right. I tried experimenting with glass beads, with pearls, with amethyst chips. But every combination I came up - no matter how nice it was on its own - did not mix well with my work. I was in quite a quandry.
Especially since I couldn't decide on what type or colour of ribbon to use either! I had purple ribbon, pink ribbon, gold mesh ribbon - and, like the beads, each looked right on their own and wrong with my bookmark. In exasperation, I appealed to my Mother for help. And she suggested wooden beads! Now, this isn't as out of left field as it might sound.
A few years ago, when a local fabric store changed ownership, they had a huge inventory clear-out and, among the odds and ends (and some were very odd, like doll's eyes and pom poms), I found this fabulous basket of wooden beads in all kinds of different colours that called out to me to take them home. Partly, it was the price (I only paid, if I can remember correctly, $10 for the lot - and it was a large lot, so big that I have to keep them somewhere other than my bead box) but mostly it was the unusual colours and the multiple applications for them that I dreamed up. At the time, I had visions of embroidered tote bags beaded with these wooden beads in flower shapes. Needless to say, that has not come to pass. Yet.
Anyway, for our purposes here, it is sufficient to say that I have a great many round wooden beads, in roughly 6mm and 4mm sizes, in all sorts of colours ranging from nigh-on-neon to natural. And, to my complete and utter surprise (and the smug satisfaction of my Mother), there were beads - in the larger of the two sizes (the 6mm) - in shades that almost exactly matched the purple and the magenta in my blackwork bookmark! And what's more, since wood is absorbent by nature, when these beads were dyed, they ended up with some colour variation, much like the colours shade from dark to very bright in the design of my backing material! At first, I worried that they were too simplistic and kitschy.
But, when I went back to first ribbon choice (a simple black grosgrain) this happened:
And the funny thing is that after all of the hours I spent fussing (the better part of two days, actually) I was finally pleased. By a simple black ribbon and a few wooden beads! Believe me, I'm still amazed by that. So, in keeping with the less-is-more dictates of this particular bookmark, I finished my marker simply - two overhead knots at the bottom and top of each stack of beads to keep them in place, and some quick stitching to keep the ends of the ribbon from fraying. My hand sewing needs work, as it's still a bit wonky, but it'll probably never be perfect. And if I can do it, anyone can do it. Seriously.
Here's a close-up view of the top of the marker (sorry for the shadow!):
As you can (hopefully) see, all I did was tuck the raw ribbon end into a little loop, and used Guterman 100% Polyester thread to sew the loop down, after which I used my stitching scissors to trim the excess close to my stitches. To be a little more fancy, you can first loop the raw edge back on itself and secure and then do the top loop, leaving no raw edges at all, no matter how neatly trimmed. Of course, this only occured to me after I finished off the second ribbon *rolls eyes*, so this is a trick I'll be trying sometime in the future.
Although this particular ribbon is double-sided, or "double-faced", meaning that it has the same finish on both sides, I added a few quick stitches at the bottom of the ribbon loop to secure the direction of both ribbons, so that the front side of my stitch loops would be showing instead of the back. Here is a close-up of the bottom of the marker:
Initially, I had all these visions of sparkly gold charms or beads to pick up the metallic gold in the fabric and the stitching. And I had some gold floral beads in my bead box that, in theory, were perfect. Only, when I pulled them out and tried them against my work, they didn't look quite right. I tried experimenting with glass beads, with pearls, with amethyst chips. But every combination I came up - no matter how nice it was on its own - did not mix well with my work. I was in quite a quandry.
Especially since I couldn't decide on what type or colour of ribbon to use either! I had purple ribbon, pink ribbon, gold mesh ribbon - and, like the beads, each looked right on their own and wrong with my bookmark. In exasperation, I appealed to my Mother for help. And she suggested wooden beads! Now, this isn't as out of left field as it might sound.
A few years ago, when a local fabric store changed ownership, they had a huge inventory clear-out and, among the odds and ends (and some were very odd, like doll's eyes and pom poms), I found this fabulous basket of wooden beads in all kinds of different colours that called out to me to take them home. Partly, it was the price (I only paid, if I can remember correctly, $10 for the lot - and it was a large lot, so big that I have to keep them somewhere other than my bead box) but mostly it was the unusual colours and the multiple applications for them that I dreamed up. At the time, I had visions of embroidered tote bags beaded with these wooden beads in flower shapes. Needless to say, that has not come to pass. Yet.
Anyway, for our purposes here, it is sufficient to say that I have a great many round wooden beads, in roughly 6mm and 4mm sizes, in all sorts of colours ranging from nigh-on-neon to natural. And, to my complete and utter surprise (and the smug satisfaction of my Mother), there were beads - in the larger of the two sizes (the 6mm) - in shades that almost exactly matched the purple and the magenta in my blackwork bookmark! And what's more, since wood is absorbent by nature, when these beads were dyed, they ended up with some colour variation, much like the colours shade from dark to very bright in the design of my backing material! At first, I worried that they were too simplistic and kitschy.
But, when I went back to first ribbon choice (a simple black grosgrain) this happened:
Here's a close-up view of the top of the marker (sorry for the shadow!):
As you can (hopefully) see, all I did was tuck the raw ribbon end into a little loop, and used Guterman 100% Polyester thread to sew the loop down, after which I used my stitching scissors to trim the excess close to my stitches. To be a little more fancy, you can first loop the raw edge back on itself and secure and then do the top loop, leaving no raw edges at all, no matter how neatly trimmed. Of course, this only occured to me after I finished off the second ribbon *rolls eyes*, so this is a trick I'll be trying sometime in the future.
Although this particular ribbon is double-sided, or "double-faced", meaning that it has the same finish on both sides, I added a few quick stitches at the bottom of the ribbon loop to secure the direction of both ribbons, so that the front side of my stitch loops would be showing instead of the back. Here is a close-up of the bottom of the marker:
There, on the right-hand side, you can see - if you peer at it closely and squint a little - the small line left by my stitches. I started at the bottom of the overlap and added about eight stitches, enough to keep the ribbons in place. The marker is a little long - I added the extra deliberately so I have some excess to play around with when sewing it in. You could cut off and sew in two entirely seperate ribbons, but having the overlap keeps them more secure and will make it easier to sew them in. Or at least I think it will.
Soon marker, bookmark and backing fabric will be united happily together to live out a long and useful life as the Very Important Keeper of My Pages. The stitching together is up next.
Wish me luck! :)
Saturday, March 5, 2011
Blackwork Bookmark - Now In Colour!
I have some very exciting news to share - my blackwork bookmark now has some colour!
Before:
I love, love, love this design! This is a freebie that you can stitch yourself, designed by Jeanne Dansby of WyrdByrd Designs. Jeanne has a generous collection of excellent blackwork charts available on her website, and as she recently wrote in a wonderful post that I highly recommend reading, although most of her designs are large and complex, they are composed of individual motifs. And the best part is that you can pull out those individual motifs that take your fancy and make smaller projects with them!
Although her post talks about starting with one motif and adding more to make a larger design, I essentially did the opposite - I started with her larger pattern called Robin's Nite and made the bookmark out of just the center square medallion, with two repeats, using the beautiful (and fun to stitch!) geometric floral motif as a connector in the middle.
The only real change I made was to make the sides of the squares straight to fit the narrow design area of my bookmark. You may notice I was a bit skimpy with the Aida; I'm using a scrap leftover from Monarch, and so the fit is a bit tight. Although I usually don't bother to do so, I took the time to do a running stitch around the edges to prevent fraying before I started so that I could maximise the space available on the fabric strip. You may want to leave yourself a little more wiggle room, though, if you decide to stitch this too.
As this is my first cross-stitched bookmark, the finishing is going to be an experiment! I'm thinking of using a ribbon for the marker, but that may change. I'd like to add a charm of some sort to the marker as well, something pretty and shiny :) I'm going to have to dig in my bead box and see what I can come up with! I'll have more photos when I'm done, and I will post a full stitching review then.
This is a wonderful project to try if you're new to blackwork, as there are no fractional stitches, and you can just sort of follow the lines with your specialty stitches; instead of trying to fit a predetermined stitch type into the design, I just made it up as I went along.
Spontaneous specialty stitching is fun! ;)
Before:
and After:
Neato, hey?! I'm so very happy with the way the colours turned out. I really wasn't sure how they would look, as pulling a colourway was a bit harder than you might think. You see, the backing fabric has four basic colours, which is obvious from these photos - a purple, a teal, a magenta and a hot pink, with a highlight of metallic gold. But it's not so easy to see that within each section, there is a gradient of light to dark tones that really provides three different options - a dark, medium and light colourway. I went with the brights, pulling the lightest highlight tones from the fabric, even though my initial impulse was to land in the middle. I'm glad I did though, as the the brights look very cheery against the black. I love, love, love this design! This is a freebie that you can stitch yourself, designed by Jeanne Dansby of WyrdByrd Designs. Jeanne has a generous collection of excellent blackwork charts available on her website, and as she recently wrote in a wonderful post that I highly recommend reading, although most of her designs are large and complex, they are composed of individual motifs. And the best part is that you can pull out those individual motifs that take your fancy and make smaller projects with them!
Although her post talks about starting with one motif and adding more to make a larger design, I essentially did the opposite - I started with her larger pattern called Robin's Nite and made the bookmark out of just the center square medallion, with two repeats, using the beautiful (and fun to stitch!) geometric floral motif as a connector in the middle.
The only real change I made was to make the sides of the squares straight to fit the narrow design area of my bookmark. You may notice I was a bit skimpy with the Aida; I'm using a scrap leftover from Monarch, and so the fit is a bit tight. Although I usually don't bother to do so, I took the time to do a running stitch around the edges to prevent fraying before I started so that I could maximise the space available on the fabric strip. You may want to leave yourself a little more wiggle room, though, if you decide to stitch this too.
As this is my first cross-stitched bookmark, the finishing is going to be an experiment! I'm thinking of using a ribbon for the marker, but that may change. I'd like to add a charm of some sort to the marker as well, something pretty and shiny :) I'm going to have to dig in my bead box and see what I can come up with! I'll have more photos when I'm done, and I will post a full stitching review then.
This is a wonderful project to try if you're new to blackwork, as there are no fractional stitches, and you can just sort of follow the lines with your specialty stitches; instead of trying to fit a predetermined stitch type into the design, I just made it up as I went along.
Spontaneous specialty stitching is fun! ;)
Thursday, March 3, 2011
New Project! Blackwork Bookmark
As predicted, I couldn't resist starting on another blackwork project, this time a quick-stitch bookmark using one of the excellent free designs from Jeanne Dansby at WyrdByrd Designs. I'm using the same inverted white stitching/black background as Monarch to show off colourful specialty stitches, this time in cotton floss instead of metallic.
So far, I have the blackwork frame worked (and will have photos soon!) but haven't yet started in on the specialty stitches. I'm just going to fill as I go, with whatever takes my fancy. This is not the way I usually work, but I'm finding it to be very exciting :)
I have picked out a cotton backing fabric, in a colourful print highlighted with metallic gold, and a quick shopping trip with a snippet yielded four good matches to the main colourways. Here is a photo of the fabric and the colours, with numbers, I'm intending to use:
Surprisingly, this will actually be my first cross-stitched bookmark. I love to read, and have always loved bookmarks, with their lovely tassels and pretty pictures or sayings. In fact, I like bookmarks of all types, from lowly plastic-laminated to those made of pewter.
However, there has always been one problem: I keep losing them! No matter how careful I've been with their placement, they just magically vanish soon after I start using them. And this has gone on for years. I'm not the only one in my family, so I suspect it must be some sort of genetic quirk, but this has resulted in a sad lack of bookmarks in my life.
About two years ago, when I caught myself tearing off random strips of paper (!) to mark my place, I thought enough was enough, and went shopping with determination. It took me a few months to find something that wasn't overly childish or drearily sentimental, but I eventually found and bought myself three lovely bookmarks. Nothing really special - just plastic - but with artwork by an artist whose work I have liked for a very long time. I never intended to cross-stitch a bookmark, but lately had an "aha!" moment and decided that I would treat myself to a small piece of stitching that would be useful as well as decorative.
Providing, that is, that I don't lose it ;)
Happy Stitching!
So far, I have the blackwork frame worked (and will have photos soon!) but haven't yet started in on the specialty stitches. I'm just going to fill as I go, with whatever takes my fancy. This is not the way I usually work, but I'm finding it to be very exciting :)
I have picked out a cotton backing fabric, in a colourful print highlighted with metallic gold, and a quick shopping trip with a snippet yielded four good matches to the main colourways. Here is a photo of the fabric and the colours, with numbers, I'm intending to use:
The beautiful fabric is not new to me; it's been a part of the large treasure trove my Mother has cultivated for sewing and other creative projects over the years, and has long been a particular favourite of mine. So I'm thrilled to finally be making something with it!Surprisingly, this will actually be my first cross-stitched bookmark. I love to read, and have always loved bookmarks, with their lovely tassels and pretty pictures or sayings. In fact, I like bookmarks of all types, from lowly plastic-laminated to those made of pewter.
However, there has always been one problem: I keep losing them! No matter how careful I've been with their placement, they just magically vanish soon after I start using them. And this has gone on for years. I'm not the only one in my family, so I suspect it must be some sort of genetic quirk, but this has resulted in a sad lack of bookmarks in my life.
About two years ago, when I caught myself tearing off random strips of paper (!) to mark my place, I thought enough was enough, and went shopping with determination. It took me a few months to find something that wasn't overly childish or drearily sentimental, but I eventually found and bought myself three lovely bookmarks. Nothing really special - just plastic - but with artwork by an artist whose work I have liked for a very long time. I never intended to cross-stitch a bookmark, but lately had an "aha!" moment and decided that I would treat myself to a small piece of stitching that would be useful as well as decorative.
Providing, that is, that I don't lose it ;)
Happy Stitching!
Friday, February 25, 2011
And Suddenly! Sparkly Threads!
I've finished the (white) blackwork stitching on Monarch:
Isn't it pretty? I think the pattern would look lovely left like this as it is reminscent of lace.
But the really exciting news is that I've started adding in the specialty stitches.
And lo, the sparkles magically (ha!) appeared:
You can see them better in this photo:
As you can see there are some seed beads in there as well, in the second border, which substitute for the original French knots (I loathe French knots, with a deep and abiding passion borne of long experience with trying - and failing - to like stitching them and so I substitute them all the time). There is also a minor change in the colour order of the third border, the Celtic Knotwork, but there is good reason and I'll explain about the metallic thread conversions in my stitching review when I finish, as it's rather pointless trying to talk about that without context, and I did not intend to do so today.
No, today I wanted to talk about something altogether different - Specialty Stitches!
You see, I haven't actually worked specialty stitches in a long time. In ever, effectively. I have tried to incorporate them into designs in the past, but always felt that my stitches were too messy and never looked quite right, so I ended up taking them out again. I have fallen in love with designs that used them extensively in the past, and I always meant to get around to trying them, but I always put it off. I did add a sort of star stitch to several Christmas ornaments I did in December this year, but that was more by accident than design.
It's just that specialty stitches always seem so, well, complex. And more like embroidery than cross-stitch. Logically, cross-stitch is a form of emboridery, sure, but specialty stitches seemed, to me at least, to be denizens of the world of pulled-thread work, hardanger, and free-form stitchery, and didn't seem to have much place in the rigidly charted world of counted cross-stitch. And, truthfully, I've always found them a bit intimidating.
So, when I fell in love with Monarch and was generously gifted the chart, I was a little alarmed that I might be in a bit over my head. I loved the look of the specialty stitches that Jeanne used, those being Algerian Eyelet, Smyrna Crosses and Upright Crosses (as well as the substituted French knots) and variations thereof. The stitches themselves go by many different names, but the form will likely be familiar to you. They certainly were to me.
Instead of panicking about it, while doing the blackwork I sort of pushed it into the back of my mind and mulled it over. I thought about ways to fill in the colour using regular cross-stitches and fractionals, and had pretty much resigned myself to doing so. But the longer I looked at the chart, the more I wanted to at least try the specialty stitches, until - at last! - something clicked.
When I was young, I wanted to draw stars. I could draw every other geometric shape, but I couldn't draw a star. No matter how hard I tried, I couldn't get the connection and my points were not only wobbly and all over the place, but I could not manage to even get the right number of them! This went on for, what seemed to my younger mind at least, a long, long while. I wasn't used to not being able to do something I wanted, with enough practice, and it frustrated me greatly. It wasn't until I was sitting and drawing with my Grandfather one day, and he noticed my plight, that things turned around. He listened to my problem, and then he thought a while.
Finally, he asked me if I could draw triangles. Well, of course, I could draw triangles (obviously). He drew one on his paper, and told me to draw one on mine. I remember being very dubious at the time and quite upset that he didn't seem to understand that I wanted special stars, not plain old triangles. Then, he said to me something like "A star is really only two triangles, that go in opposite directions, laid one on top of the other", and he demonstrated by drawing another triangle - this one point down - over the one already on the paper that had its point up. I copied him, still uncertain. But then - I had my star!
Once I saw the connections, it was ridiculously simple.
I made all my stars like that for years, and even when I learned to draw them freehand, I always remembered the overlapping triangles and could always see the connection. I still do, all these many, many years later. And when I looked at the specialty stitches on Monarch, really looked at them, I saw a form that looked familiar. The Upright Cross-Stitch, after all, is only a Cross-Stitch tilted at an angle. And from there, it wasn't hard to see that a Smyrna Cross was only actually a regular "x" cross-stitch overlaid by a tilted "+" upright cross-stitch! And from there, well, the Algerian Eyelet was much the same, only with the ends of the stitches going down into the common meeting point of the center so that the stitches, when all put in, pulled the center out leaving a small circular opening, or the 'eye' of the eyelet.
And with that in mind, I enthusiatically threaded my needle with my metallics, and started in on the specialty stitches, slowing filling the lacy white frame of Monarch with sparkling, shimmery colour. I will not lie - the first few stitches were a bit difficult, especially all those oblong diamonds that are turquoise in the picture, as the tips of the elongated Smyrna crosses ended in fractional stitches and it took a bit of figuring to arrange how to place the fractionals without piercing the blackwork (I developed a useful trick that I'll be sharing later on in detail in another post).
So - they may not be perfectly formed. They may, indeed, be quite a bit lopsided. They may even be not quite rightly executed. But, they are, quite finally, my very first attempts at making the shiny stars of the stitching world, and I couldn't be happier with how they have turned out. And I hope that if you have had reservations about specialty stitches that are similiar to mine that this little epiphany might inspire you to take out your needle and stitch them with a new perspective. Because right now, my only regret is that I waited so long.
In this instance, I can honestly say - Thank You, Grandpa, you taught me everything I know ;) I just won't say it loudly, because I'll never hear the end of it. *rolls eyes*
Happy Specialty Stitching and Beading to All!
I'm off to add more sparkly threads.
(There are many sites on the web that provide tutorials about working specialty stitches. For some simple and clear stitching diagrams, I like the extensive archive at Johanna's Needlework Stitches, particularly the Cross Stitches and Variations, which includes the Smyrna Cross and Star Stitch, and the Pulled Thread Stitches that include the Algerian and other Eyelets. Designer Ellen Maurer-Stroh also has a useful list of Stitching Diagrams)
Tuesday, February 22, 2011
The Beauty of Blackwork
I love stained glass. On vacations and visits to new places, I like to stop in to any old churches in the area - preferably while the sun is shining, so I can get the full effect of the colours - just to see the stained glass windows. And I love sun catchers made with stained glass. There's just something about the way the sun shifts through the coloured glass and makes these wonderful prismatic designs that amazes me :) The craft is one I'd like to try my hand at one of these days, although I know it's far from easy.
What does this have to do with cross-stitch, you may ask?
Everything, because I recently fell deeply in love - at first sight, no less :) - with a beautiful stained-glass inspired blackwork design over at the Byrd's Nest, home of designer Jeanne Dansby and her wonderful WyrdByrd Designs line. Regally named Monarch, this elaborate geometric design uses specialty stitches with coloured floss to transform the black lines of a traditional blackwork into something altogether different and very special. You can view the design and the original post here, and I suggest you do, as you'll better understand my enthusiasm if you can see how very innovative and beautiful it looks.
So, I left a comment on that post, telling Jeanne how much I liked it. And I started following her blog. What I didn't realize was that Jeanne had a generous reward for new followers that week, offering them a choice of four lovely patterns from WyrdByrd Designs for free. And, to my surprise and delight, Monarch was one of the patterns available!
Not only that, but Jeanne had added an additional extension to the original design, and this variation was included with the download! The variation can be viewed here. There is no colour added to this one, as Jeanne encourages stitchers in her pattern instructions to try their own colour combinations and materials. And that's what I've been working on all week!
In my defense, I didn't mean to start another WIP. I'm not usually able to juggle between different projects. I tend to get so absorbed in what I'm stitching that time away from that project feels more like a distraction than a pleasure for me. But I got inspired, and when I started pulling possible floss colours and combinations, I was so excited about it that I couldn't wait to start! That actually turned out to be a good thing, as my other WIP - Twilight Angel - has colours that are very close together (at least in the overskirt) and is better stitched in natural sunlight, which there hasn't been a lot of where I am lately.
Here are some pictures of my progress:
![]() |
| Image by Nuchylee / FreeDigitalPhotos.net |
I love stained glass. On vacations and visits to new places, I like to stop in to any old churches in the area - preferably while the sun is shining, so I can get the full effect of the colours - just to see the stained glass windows. And I love sun catchers made with stained glass. There's just something about the way the sun shifts through the coloured glass and makes these wonderful prismatic designs that amazes me :) The craft is one I'd like to try my hand at one of these days, although I know it's far from easy.
What does this have to do with cross-stitch, you may ask?
Everything, because I recently fell deeply in love - at first sight, no less :) - with a beautiful stained-glass inspired blackwork design over at the Byrd's Nest, home of designer Jeanne Dansby and her wonderful WyrdByrd Designs line. Regally named Monarch, this elaborate geometric design uses specialty stitches with coloured floss to transform the black lines of a traditional blackwork into something altogether different and very special. You can view the design and the original post here, and I suggest you do, as you'll better understand my enthusiasm if you can see how very innovative and beautiful it looks.
So, I left a comment on that post, telling Jeanne how much I liked it. And I started following her blog. What I didn't realize was that Jeanne had a generous reward for new followers that week, offering them a choice of four lovely patterns from WyrdByrd Designs for free. And, to my surprise and delight, Monarch was one of the patterns available!
Not only that, but Jeanne had added an additional extension to the original design, and this variation was included with the download! The variation can be viewed here. There is no colour added to this one, as Jeanne encourages stitchers in her pattern instructions to try their own colour combinations and materials. And that's what I've been working on all week!
In my defense, I didn't mean to start another WIP. I'm not usually able to juggle between different projects. I tend to get so absorbed in what I'm stitching that time away from that project feels more like a distraction than a pleasure for me. But I got inspired, and when I started pulling possible floss colours and combinations, I was so excited about it that I couldn't wait to start! That actually turned out to be a good thing, as my other WIP - Twilight Angel - has colours that are very close together (at least in the overskirt) and is better stitched in natural sunlight, which there hasn't been a lot of where I am lately.
Here are some pictures of my progress:
This is the center medallion and first three borders
This is the finished Monarch, with the first two sections of the diamond Variation
And this is where I am right now, with three sides of the Variation done!
For my work, I am using 14 count Aida in black and 1 strand of DMC Pearl Cotton #8 in white. While it might seem strange to invert the traditional white background/black stitching, I am intending to use metallic flosses for the specialty filling stitches, and I hope that the dark fabric will show off the sparkle and shine a bit more.
These are the colours I'm thinking of using for the filling:
From the top: Janlynn Purple, Janlynn Turquoise, DMC Jewel Effects and DMC Gold.
I have the two Janlynn colours left over from an old project, and decided to use them since they coordinate well with the Jewel Effects, which is the darker of DMC's two variegated metallics, having hints of red, gold, silver, turquoise, purple and lime green in its strands.
The Monarch Variation is a pleasure to stitch, and it's been so long since I worked on a blackwork design that I totally forgot about the near-instant gratification factor, as it stitches so much faster than whole cross-stitch! For other stitchers who would like to try their hand at this technique, Jeanne offers a large collection of beautiful free blackwork patterns at WyrdByrd's Nest - direct link here. All are downloadable instantly as .PDFs, and there is a slideshow that enables you to preview the designs before selecting. Also, there is a "View" option next to the download link which will bring the pattern up in your browser quickly so you can see what it's like before you download, which is great.
As I try out the colour filling, I'm hoping to post more regular updates. So check back for more Monarch! I'm very excited to see how this experiment turns out!
DISCLAIMER: When I logged in to write this post, I learned that Jeanne had posted a lovely recommendation for the Cross-Stitch Resources section of my blog (the post is here).
Thank you very much Jeanne! I love your site and your designs, and I greatly appreciate your post! I am hoping to expand the content of the Resources page in the near future, and it is an ongoing project, so there will hopefully be more interesting sites soon!
Please note that this complimentary review of my site does not have any bearing on my comments about stitching Monarch, nor does it influence my enthusiasm for this project.
Tuesday, February 15, 2011
WIP: Twilight Angel
As you can see, I have a *tiny* bit of progress to show you on my angel. The biggest change is the white running along what is, in effect, the 2nd fold in her overskirt. The stitching is bit slower going than usual because I am endeavouring to neaten up the colours underlying the backstitch. For example, sometimes the backstitch will cut through the stitch, but the pattern is showing a whole cross-stitch, leaving half of the stitch on the other side of the backstitch line. This isn't very important in some areas - such as the soft dress and overskirt folds - but I am making an attempt to neaten up the edges and lines that are very clear cut, making the whole stitches into 3/4 stitches as I go along.
It's very subjective, and therefore a bit time consuming, but I believe it will be worth it when it comes time to add the backstitch outlining. There are a few areas around her face, hands and hair where this 'messy outlining' is particularly obvious, and I hope to fix that as I go along. This is very good practice for me, in a way, because 'messy outlines' are usually something I can't stand in the least, so hopefully this will teach me to neaten what I can and tolerate what I cannot change. Or my patience will be improved. Perhaps both :)
Also, my apologies for the light shining through the Aida towards the top right of the photograph. In an effort to more accurately capture the colours, I tried taking the picture in natural light, and while I'm pleased with the outcome, it does look a bit unusual.
Sunday, February 13, 2011
Valentine's Day and a New Start
I also have a new start to share with you! It's not far along, but here is my new work in progress, Twilight Angel, my first Petite Dimensions Gold kit:
This photo unfortunately doesn't capture the delicacy of the colours very much, but it is very hard to capture the right tones. The background is 16 count Aida, in an unusual colour called "dove grey" that is really more of a smoky blue-grey.
These few stitches are my progress for the last two days, and form part of the angel's overskirt (for reference, please see the kit image in my sidebar under WIP). The lightest blue closely matches the colour of the background, and the floss has an unexpected but lovely sheen to it, like a cross between cotton and rayon. It is also more 'springy' than DMC. That's the only way I can think of to describe it.
I have worked a Dimensions Gold Collection design before, a wonderful piece that I completely fell in love with, and that inspired me to pick up cross-stitching again a few years ago. At the time, it was called Elegant Roses, but is now called Rose Cuttings, and appears to have become part of the regular line. I do not have a photograph of my work at the moment, but here is the kit image to give you an idea:
![]() |
Happy Valentine's Day to everyone!
May "Love Brighten Your Life!" and many good things come your way!
I also have a new start to share with you! It's not far along, but here is my new work in progress, Twilight Angel, my first Petite Dimensions Gold kit:
This photo unfortunately doesn't capture the delicacy of the colours very much, but it is very hard to capture the right tones. The background is 16 count Aida, in an unusual colour called "dove grey" that is really more of a smoky blue-grey.
These few stitches are my progress for the last two days, and form part of the angel's overskirt (for reference, please see the kit image in my sidebar under WIP). The lightest blue closely matches the colour of the background, and the floss has an unexpected but lovely sheen to it, like a cross between cotton and rayon. It is also more 'springy' than DMC. That's the only way I can think of to describe it.
I have worked a Dimensions Gold Collection design before, a wonderful piece that I completely fell in love with, and that inspired me to pick up cross-stitching again a few years ago. At the time, it was called Elegant Roses, but is now called Rose Cuttings, and appears to have become part of the regular line. I do not have a photograph of my work at the moment, but here is the kit image to give you an idea:
(I have yet to find the right frame for my piece, but am envisioning something much more elegant than the suggested frame, with scrollwork, perhaps in gold)
The kits have improved a great deal since that time. They now come in resuable hard plastic folders instead of plastic-bagged, which is very useful to keep the materials that you are not currently using together and clean, and with pre-sorted threads attached to a colour card.
When I worked on Elegant Roses, the floss was very reminiscent of DMC, a cotton whose only discernable difference was a lesser incidence of pilling or 'thread fluff' when stitching. So I suspect that the floss has been revamped along with the kit design, and it took a few stitches for me to get used to it. It has a bit more fullness, and its slight slipperiness makes firm darning of the starting and end threads more important, as the ends have a bit of a tendancy to slip out if not darned tightly. But the consistency is in no way as difficult to work with as rayon, and I am enjoying the way the floss lies smoothly against the Aida, and the extra little bit of shine!
I will post a review of my stitching experience and my impressions about the kit when I finish. For now, I am quite happy to be starting a new design, and greatly look forward to attaching all the pretty charms and beads and sequins when it comes time to finish. I've got a long way to go before I get there, though. :)
Subscribe to:
Posts (Atom)


