Sunday, December 23, 2018

❤🎄 A Very Merry Christmas! 🎄❤


❤ The Greatest Gift is Love ❤
My Variation of a Lizzie*Kate design from the
Just Cross Stitch 2001 Christmas Ornament Special

(There's a lovely finish of the design by Anne on Flickr here, closer to the original)

Hope you're getting into the Christmas Spirit! It's been a little hard for my family this year, as it's our second Christmas without my beloved Grandpa. He died on Christmas Day 2016, and last year was a blur - I have no idea how we got through it to be honest. This year his loss is always in our thoughts, and the grief hits hard at the strangest times. So I stitched this little ornament as reminder to us all that it's not the Holiday hustle and bustle that matters, but the time we spend together and the memories that we make 😊


I really enjoyed working on this, and it stitched up quickly! My first idea was to stitch everything with beads, but the lettering looked too wobbly, since I was using inexpensive silver-lined seed beads that have a pretty sparkle but unfortunately aren't a regular size. So I settled for beading the star and the border, which I turned into little red flowers with gold centers. The lettering is in metallic floss, for some extra sparkle ✨


In keeping with the sparkle, I found this beautiful glittered gold fabric for the back! It is so lovely, especially in the Christmas lights - it looks like it's sprinkled with real gold dust 💛 Unfortunately I had trouble capturing that in the photo.

And I used some of my favourite cording, a red-gold-green tinsel cording I found at Michaels a few years ago (and really wish I'd bought more of!):


It's a little challenging to attach, but I've found that sewing through the trim with invisible thread does the trick. And the end result is fantastically sparkly! I tried to capture all that pretty glitter, and this is the closest I could get (sorry it's a bit dark):


You can see a little bit of that gorgeous silver-lined seed bead shine on the star ⭐

2018 has been an interesting stitchy year for me! Although I haven't been able to do nearly as much with the blog as I'd hoped, I joined Instagram and have greatly enjoyed the huge stitchy community over there. I was awed and incredibly thankful for the support my Joyful Jester entry to the SFSNAD Stitch At Home Challenge brought 🤗 And I've been having a ton of fun experimenting with hand embroidery.

Hopefully 2019 will bring more stitchy time, for all of us! 😄


Best Wishes for A Very Happy Holidays, and a Stitchtacular New Year!

Tuesday, December 4, 2018

A Maple Leaf for a Canadian Traveler!


As Winter sets in and Christmas is coming just around the corner, I want to take a step back and bid a fond Farewell to Autumn! You may remember the Lolli & Grace Autumn Leaf SAL from October; if you do, this design will be very familiar 😊 My best friend loved the finished needlepainting project so much she almost took it home with her LOL

Although she's always generously supportive of everything I make, it's been a while since she so obviously fell in love with one of my projects. She mentioned it would make a nice bag - a tote, or a purse - and after some thought, I decided to stitch a "bag brooch".

She's not one for wearing pins or brooches on a shirt or coat, so I wanted a larger motif she could pin to any of the canvas messanger bags she usually carries. The pins make it removable, for when the Autumn season is over. She's also a globetrotter who loves to travel, and Canadians like ourselves often wear badges or pins with the Maple Leaf to find fellow explorers, so this colourful little brooch can also serve that purpose!

I hope it will be a fun reminder of home when she's off having adventures abroad ❤


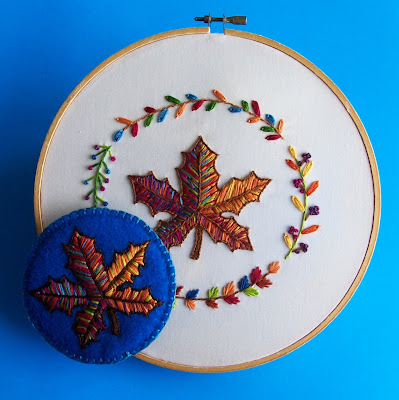
Here's the brooch in comparison with the original project! For the hoop, I enlarged the pattern slightly; for the brooch, I used the original Maple Leaf sizing. The colours and technique are the same. If you would like to stitch your own, the pattern, stitch guide and incredibly helpful video tutorials are all still available on the Lolli & Grace site, and you can find all the direct links in my project post.

This was my first time finishing an oversized embroidered brooch, and it was very much a trial-and-error process! I stitched my leaf on felt, just ordinary acrylic craft felt, in a pretty turquoise colour. Originally, I wanted to cut the border following the outline of the leaf, but I was rushed for time and went with a simple circle. In the end, I really like the extra colour, and the way the felt picks up those beautiful blues Anne chose that make this project so unique 🎨


I did baste a square of sew-on stabilizer to the back, for extra strength:


The brand is Pellon, but I'm not sure which type. It is very firm. I bought it off the bolt at my local craft shop. It did require a little extra strength to sew through it, but it made sure the felt didn't stretch (which was extra likely since I was stitching in hand without a hoop!) and it really helped to make sure the felt didn't pucker under the weight of all that thread painting. All the different colours result in quite a few layers of thread!

When I was finished stitching, I removed the basting threads. Since I was going for an outline finish at first, I spent some time cutting the stabilizer close to the stitching but in hindsight I would have just cut it to the circle shape, as it would have added some extra support to the backing. And would've been so much simpler 😄


The main problem with finishing an oversize brooch is making it stiff enough to stand on its own and keep its shape. Although I don't have any pictures of the process, what I did was cut the top of a clean plastic salad container - the kind you get from the deli - to shape. This type of plastic is clear and somewhat flexible. I did not want a thick plastic that might get brittle, and so be more likely to break.

I cut the plastic circle about 1/4 inch smaller than the felt, to give me room for my Blanket Stitch Edging. I punched four holes in the middle of the plastic with a hole punch. Then I cut a circle of polyester quilt backing, and sewed that to the plastic, tacking through the circles. This gave me a stiff insert with batting on one side.


For the back, I cut out a matching circle of felt, and sewed two pinbacks on either side of the middle. I used two because the brooch is oversize, and I wanted some extra security. To assemble, I put the insert batting side up - to cushion to the back of the stitches - and sandwiched it between the embroidery (right side up) and the backing circle of felt. Then I sewed the edges with blanket stitch.


I'm very happy to say that that recipient is very pleased with her bag brooch! I really like that the brooch is removeable and can be pinned to anything fabric. I hope the finish holds up with wear, but only time will tell 😊


✈ Do you have a traveler in your life? Have you ever stitched something for them? 🌍

Wednesday, November 7, 2018

Meet Annabelle, my Autumn Songbird!


Annabelle, the Autumn Songbird
Adapted from a Free Vintage Transfer (Vogart)
Tester for the Blue Washable Marker and Lazy Daisy Stitches

I have been in love with the vintage embroidery pattern that inspired this beautiful bird - whose name was chosen because Annabelle is Gaelic for "Joy" - for YEARs now:


Three Birds in a Tree
# 10007 / Animals & Insects / Vogart at Needlecrafter.com

Although it doesn't appear to have been updated since 2016, Needlecrafter is one of the best sites online to find free vintage embroidery transfers, and it is home to the pattern that I used for my first-ever embroidery, Bluebirds of Happiness.

I wanted a tester to try the Blue Washable Pen I recently used for Sammy the Squirrel. I was interested to see if having the full Lazy Daisy outline marked would help make my stitches rounder. When I'm using a permanent transfer method - lead pencil, fine-tipped Sharpie marker or iron-on pencil - I usually only put dots in place of the bottom and top tips on each petal.

This is because I find it difficult to make my stitches perfectly match the lovely even teardrops of the pattern designs. But when you have a lot of Lazy Daisy stitches close together, all those dots can be a little confusing, especially since I usually have French Knot dots marked in the middle of the flowers too. It's like playing Connect the Dots - and sometimes it's frustrating to figure out where everything goes 😂

Please click the image to enlarge and save at full resolution

So I decided to focus only on one bird; this is my variation! I made some changes: altering the branch, adding another tail feather, changing the beak and adding extra French Knots and scattered Detached (Single) Lazy Daisies in the body for some extra colour. I also added another leg, because only one didn't look quite right!

You may notice the colours look a little familiar. That's because I loved the colour palette from my Lolli & Grace Autumn Leaf SAL so much that I just had to use it again! I made some minor substitutions in the original colourway and I kept those for this project. If you'd like to stitch your own Autumn Songbird, here is the Colour & Stitch Key:

Please click the image to enlarge and save at full resolution

The Blue Washable Marker (mine is the Unique Brand, from Walmart, that I used for Sammy the Squirrel) worked like magic again! A quick dip in a plastic container of cold water and Abracadabra! Shazam! Bibbety-bobbity-boo!!! A beautiful, joyful Songbird!


One teeny tiny minor quibble: my fabric choice was not the best. I have seen this pretty and unusual mustard yellow colour everywhere this Autumn, and when I found some fabric on the bargain wall, the same type of linen I used for The Joyful Jester, I was thrilled! That project was felt applique, so I've never actually embroidered on this fabric before. The loose weave means that it's easy to overstretch, and although I tried very hard not to do so, I distorted the fabric. Significantly.

I was SO proud of my Satin Stitch in this project, especially the Tail Feathers:


Smooth, right? This was the first layer I intended to use as padding but it worked out so well that I kept it to the single layer. The leaves were Satin Stitched inside as well. Out of the hoop, unfortunately, that fabric distortion means that all my painstakingly-stitched Satin Stitch went wavy and wonky 🙄 So it has to be stretched in a hoop or a frame.

Lesson learned!


Thankfully, my other major achievement - the Bullion Knot feet - emerged relatively unscathed 😊 Those teeny tiny toes are so cute!


Verdict: The Blue Washable Marker wins again! I'm so impressed with this embroidery transfer method. It really did help take the guess work out of my Lazy Daisies, although again the linen was not a good fabric choice. The nubby texture means that it was harder to mark the fabric and I had to go over most of the lines twice. Also, because I couldn't mark smoothly on the textured surface, I couldn't really get the teardrop shape of the Lazy Daisy stitches and they ended up more like straight lines LOL!

I really love the flexibility this marker gives you - you can change elements, as I did with this project when I reshaped the beak, you can add or omit parts of the pattern. Not having to stick to the pattern lines gives you so much stitching freedom!

And my Lazy Daisy stitches do look a little rounder than normal, which is a definite plus since mine usually turn out kind of skinny. In all likelihood, this had nothing at all to do with the marker and just happened because I was paying extra attention to them, but I'll take all the help I can get 😄

I'm so pleased with how Annabelle turned out, and I think she's lovely. A little songbird to sing a happy, joyful tune on these golden late Autumn afternoons while the leaves fall, reminding us that Spring will come again once Winter has its turn 🍂🕊🍁

Monday, October 29, 2018

Pilot FriXion Tester: Vintage Pumpkin


Vintage Pumpkin
Test Piece for Pilot FriXion Pen Transfer Method

Following my success with using a blue Washable Marker to transfer an embroidery pattern, I decided to work up a small tester with another very popular transfer method I've never tried: The Pilot FriXion Pen!


The FriXion pens are not meant for use on fabric. They are ink pens that come with an eraser on the bottom end (and wow, do I ever wish these had been out when I was writing exams in school!). They are very popular among quilters but are controversial in the embroidery community. Mary Corbet of Needle N' Thread very succinctly sums up her reasons for not using these pens to transfer embroidery patterns.

Namely, the ink does not really disappear. It can leave "ghost lines" that usually re-emerge if the embroidery gets cold, which is something to keep in mind if you are sending your work through the mail. So this is not a flexible transfer method like the Washable Marker - you have to intend to cover most of your lines.


Last year, a good friend sent me a black Pilot FriXion pen to try. They come in several different types and sizes. Mine is the extra fine 0.7 ballpoint, and I love the way it writes! The line is clear but thin, and the ballpoint glides over the fabric. Like the Washable Pen, you need to be able to see through your fabric to trace your transfer.

Most articles on using FriXion pen for embroidery transfers say that you need to iron the ink out. Since I usually iron embroidery from the back (placing the front on a thick fluffy towel so the stitches aren't squashed), I was a little nervous about ironing on the front. Then, a few weeks ago on Instagram, a stitcher said she used a hair dryer. Genius!


So that's what I tried, and it worked a treat! I'm afraid there are no good Before-and-After shots, because I did stick very close to the pattern. A few little bits around the curly vines were all I had to go by, but one blast of heat and they vanished. Obviously, this is something I will have to experiment with a bit more, but I am optimistic that these pens would be a good method for quick, casual patterns.

I really like that the line is easily visible but that you do not need to wash the finished embroidery. And although the FriXion pens do not give you the flexibility of Washable Markers, they do give you a tiny bit of wiggle room versus a lead pencil (my usual method). You need to be sure of your design and stick close to the drawn lines but if you do have an "oops!" moment, you can blast it away with heat.

I am looking for a transfer method that gives fine, non-smudging, easily visible lines that are thin enough to be covered by outline stitches, and this pen seems fits that bill!


Project Details

◾ Vintage Pumpkin from online freebie, unfortunately no longer available
◾ 4" wooden embroidery hoop
◾ 100% quilting cotton, Ecru
◾ DMC Floss:
Pumpkin: 900 (Dark Burnt Orange), 6 strands, Stem Stitch
Leaves: 986 (Very Dark Forest Green), 4 strands, Split Stitch Outline, and Backstitched Veins
Curly Vines: 988 (Medium Forest Green), 2 strands, Stem Stitch


All in all, I'm very happy with how my little Pumpkin turned out! I'm having fun right now stitching up these little transfer method testers, and the next is a pretty little bird that will try out the Washable Marker on Lazy Daisy stitches 🌼


Have you used a Pilot FriXion pen to write on fabric? How did you find it?

Wednesday, October 24, 2018

Meet Sammy, the Vintage Squirrel 🐿


Sammy the Vintage Squirrel
from Vintage Embroidery Transfer
(from an online freebie that is no longer available)

This fun little squirrel was my first experience using a Washable Marker to transfer an embroidery pattern! My pen is the Unique brand, and I bought it at Walmart for less than $5 CA. DMC makes a popular one as well.


The blue is nice and bright and easy to see! It has a felt-pen like tip which gives a pretty thin line. Unfortunately, it doesn't really write like a pen. I found it more effective to use quick, short strokes - much like using a pencil or pen to transfer.


These types of Washable Markers are very popular for embroidery transfers because you don't have to worry if your lines don't quite match your stitching, which also gives you some flexibility. If you want to omit or change the shape of an element you can! This would be incredibly helpful with stitches like the Lazy Daisy. There's a great article by Cheryl Fall about using washable pens for embroidery transfers at Spruce Crafts.

For cross-stitchers, these have some use too. I have recently seen someone on Instagram (@moiraestitches; see her #StageCoachInTheWoods for progress) use one of these markers on Aida, to outline a monotone (single colour) pattern for easy stitching. I think this is a fantastic idea, and saves you from having to constantly consult a chart for simple designs or for large blocks of colour in more complex designs. You could also use them to mark the center of a design or to help mark borders for accuracy!

I followed the lines pretty closely, but I still had a tiny bit of blue showing:


Here's a close-up - the red arrows point to visible marker lines:


I have to admit that I was nervous to wash Sammy, especially with the black and white eye! But a quick dip in cold tap water (I used a sandwich container) and it was like magic: when the marker lines hit the water, they vanished! No scrubbing at all!


Presto, changeo! Abracadabra! Ta-DA! I'm totally impressed, and can't wait to try this marker again 😊

Project Details:
◾ Fabric is 100% quilting Cotton, light beige
◾ 4" vintage wooden hoop
◾ DMC Floss: 919 (Fur), 3833 (Ears), 310 (Nose and Eye), 001 (Eye highlight), 780 (Acorn) and 938 (Acorn Cap)

I used 3 strands of floss for most of the stitching. I used 2 strands of white for the teeth, and also for the white Eye Highlight, with 1 strand of black for Split Stitch to define the outside of the Eye. First, I tried stitching the Eye with all black and adding the highlight with a French Knot, but I didn't like the way the Knot stood out. So I took it back and made a tiny circle with Satin Stitch for the highlight, with a Fly Stitch border:


I like it a lot better! The other place I struggled was Sammy's tail. I wanted a floofy, fluffy, floomphy tail, and I considered using Turkey Stitch first. I worked some samples in the top left corner of the cloth. After a LOT of hemming and hawing, I eventually settled on doing the outside lines on the tail with 6 strands, using Stem Stitch:


It wasn't as fluffy as I wanted but it gave me a nice bit of extra lift:


Ultimately, I think a Turkey Work tail would have overwhelmed her. This was a super fun stitch and a successful experiment in transferring using a Washable Marker! I'm hoping to do another little tester using the Pilot Frixion Pen transfer method soon 👩‍🔬


🍁🍂 Sammy the Squirrel says Happy Autumn! 🍂🍁

Sunday, October 14, 2018

Lolli & Grace Free Autumn Leaf SAL


Lolli & Grace Autumn Leaf SAL, Free Pattern

Although the four day SAL, ran on Instagram with instructions on the Lolli & Grace website, is now over, the pattern and videos are still available for free:


Last month, I tried a new type of Needlepainting for the first time, in the amazing FREE Lolli & Grace Autumn Leaf Stitch Along (SAL) on Instagram! Anne, @lolliandgrace, the designer of colourful, cheerful and absolutely charming hand embroidery designs (see her Etsy shop for more), very kindly and generously put together this beautiful design and showed us how to stitch it with incredibly helpful video tutorials.

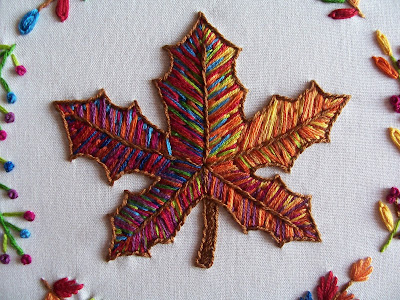
To me, the technique of Needlepainting usually brings to mind the exquisite details of silk Long and Short Stitch embroidery, usually worked with a single strand of thread with natural and subtle shading. This is a casual, relaxed, much chunkier version of Needlepainting, using four strands of thread at a time and a variety of high contrast colours (my absolutely favourite part of this design are the touches of bright blue!).

And it is FUN 😊


Honestly, I was really nervous about trying the colour blending in the center Maple Leaf. But thanks to Anne's encouragement, it was easier than I thought it would be and now I'm eager to try more Needlepainting! It's stitchy magic - you start adding the darker colours, in this case my red and brown, then layer the medium tones and finally add the lighter tones as highlights. I learned to stagger my stitches between long and short, but you don't pack them together in the rigidly long-short-long-short pattern you see in stitch dictionaries. It's very much instinctual, and I only started to enjoy it when I let go of the idea of perfection and just added colours where I felt they would work.


This was a little difficult at first, since the colours are not the traditional close tone shading, but once I had sorted them in my mind (a little arbitrarily) into my dark, medium and light colours it was a lot easier. I thought of it as: a bit of dark, lots of medium and a little light. The bright blue (806), for example, I thought of as a highlight, even thought it's a medium colour shade.

I wanted it to look like that beautiful golden late Autumn honeyed sunlight was shining on my Maple Leaf, so I deliberately kept the left side darker and added the brighter yellows and oranges on the right. As Anne said, you can go back and add a few stitches if there's any blank areas or you need more colour. I tried to add a few small groupings of two or three stitches with the same colour here and there to break up the stripe-y look.

I also really enjoyed learning the Pearly Leaf Stitch for the bottom branch!

Here's a slideshow, from floss toss to finish:


I did make some small changes here and there. I was so excited to start that I began pulling my DMC floss right away, so I made some colour substitutions for the shades I didn't have, which you can see in the first photo in the slideshow. They are:

Light Green: 581 substituted with 907
Medium Green: 3346 substituted with 905
Maroon: 815 substituted with 498 (red)
Tan: 167 substituted with 436
Gold: 3852 substituted with 728
Dark Blue: 3750 substituted with 824

The two most unique colours, other than the striking 806 Blue, are the Plum (3834) and Berry (915) which I was going to substitute with 333 and 718, respectively. But when I started stitching I realized that the original colours were more Autumnal and unlike anything else in the DMC collection. Here they are in progress on the left wreath branch:


French Knots are my Stitchy Nemesis, so I'm very proud of these nice plump berries!

For the Maple Leaf, I used Satin Stitch for the stem, rather than Outline Stitch, and I left the small veins out because when I tried to add them in they broke up the colour blending too much, especially at the tips. I also used Outline Stitch for the long veins because, as klutzy as I am, I was sure I would catch the long stitches on something 😂

I also added some Straight Stiches to the middle of the Lazy Daisy leaves for extra colour, and a few extra French Knots (gasp!) to the branch on the right. I do have a few little puckers in the fabric, since the Maple Leaf is stitched so heavily, but I'm optimistic that they will come out during finishing. I'm not sure what I'm going to make with it, probably not a hoop. A friend suggested a tote bag, which might be nice. For now, it will happily join the others in my project drawer.


The Lolli & Grace SAL was a fabulous, fun experience and I'm so glad I decided to jump in! To see other finishes, search the #lolligraceautumnSAL on Instagram. Not only was it awesome to learn new stitchy techniques but this SAL was an excellent way to find other stitchers to follow! What I really loved about this SAL is that although every stitcher used the same pattern, every Maple Leaf turned out completely different and it was so interesting and inspiring seeing how other people chose to Needlepaint 🎨

Have you ever tried Needlepainting? Would you like to?

Monday, August 13, 2018

The Joys of Spontaneous Stitching!!!

Please click on any photo to view it larger

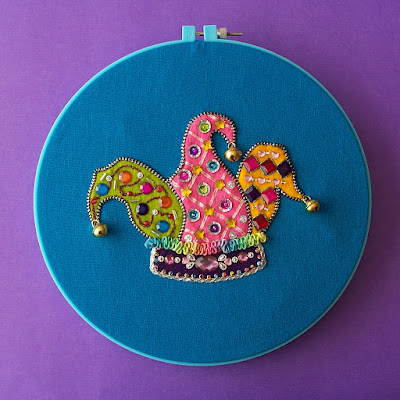
The Joyful Jester
Felt on Linen with Embellishments

I have an exciting project to share today! At the end of June, I discovered that The San Francisco School of Needlework & Design (SFSNAD) was hosting a Stitch At Home Challenge, free to anyone who wanted to enter and open Internationally! If you missed this challenge, worry not, for they will be offering more in the future 😊

Each challenge has a theme, and the theme for this round was Burlesque. Admittedly, at first, I wasn't all that interested as Burlesque brings to mind dancing girls with feather fans at best. However, when I looked through the Inspiration blog, I realized that the SFSNAD interpretation was much broader. As the blog says, in part:

"This Stitch-at-Home Challenge is intended to pull out the whimsical, the subversive, and the exaggerated parts of ourselves and our world. Throughout time, people have been responding to experiences that bump up against their sensibilities, that provoke a feeling of ridiculousness, frustration, or celebration. How do we reframe, exaggerate, or explode these feelings? Where do we find outrageous joy?"

I don't know if it's outrageous or not, but personally I find a great joy in stitching, which far surpasses the simple act of pulling a threaded needle through fabric. It is relaxing, absorbing, fascinating and endlessly surprising, and I wanted to capture some of that happiness in my project 😄 I wanted something colourful and cheerful 🎨🌈!

This image of Harlequin statuettes from the blog caught my eye:


Curious, I did a bit of Googling, and I found these delightful Harlequin illustrations from the Italian Commedia Dell'Arte, which according to the Metropolitan Museum, was " a theatrical form characterized by improvised dialogue and a cast of colorful stock characters that emerged in northern Italy in the fifteenth century and rapidly gained popularity throughout Europe." I loved the exuberant feathered costumes!


And those lead me to modern Venice Carnivale masks, which are bright and colourful:


Naturally, I wanted to make a wearable mask of my own! Something extravagant, with peacock feathers and lots of glittery bits. But as it is too early here for Hallowe'en I couldn't find a basic domino mask to use as a base and I didn't think felt would be stiff enough. I have always loved the figure of a Jester, and the idea of a merry joker, and so I decided to echo the outlandish cheer of the Harlequin costumes in my Jester's Cap.

Every challenge participant received a Kreinik Bag O' Bits to use in their stitching, courtesy of Kreinik, and I was so excited to finally be able to try out their metallic braids! I have been fortunate enough to inherit some stash of their Blending Filaments from my Stitchy Guru Mother, and while I love the shine of those, they are very fragile and need to be combined with a "carrier thread", normally some strands of DMC floss.


My bag had a good mix of colours. Most were short strands and not useable for any amount of stitching but there was a wonderful variety of textures and it was a great introduction to the wide range of products Kreinik manufacturers. It has definitely piqued my interest! There were three short two-inch lengths of the prettiest silver holographic flat ribbon that shone so brightly, and I'm going to search for that thread!


I had a lot of Big Ideas, but in the end I found a simple outline pattern I liked, a heraldic Jester's Cap from the Mistholme Pictorial Dictionary of Heraldy (which is well worth a browse if you're interested in old crests and the way they were designed):


And then I just went to town! I pulled out my collection of felt, and my Magical Tin of Embellishments. What's really interesting is that as long as I can remember, my Stitchy Guru Mother has keep a wonderful box of trimmings which comes out only for really special projects - Hallowe'en costumes, Christmas ornaments, dresses for special events - and has all kinds of pretty trims, crystals, rhinestones and sequins. I was thrilled to discover that I've FINALLY accumulated enough pretties to have one of my own, a hexagonal Quality Street chocolate tin full to the brim with sparkle and glitter ❤💎✨

There was no real rhyme or reason to the design, it was truly Spontaneous Stitching! I printed off the line drawing and cut it into four pattern pieces - three horns and the band. Then I cut those pieces out of felt (green, pink, yellow and purple). Then I spent an incredibly happy sunlit afternoon absorbed in playing with sparklies, spreading my supplies out on my Grandma's kitchen table and playing with the crystals until I got a design I liked. I glued the acrylic rhinestones on with Aleene's Fabric Fusion Glue.

Here's a Before-and-After shot, which shows the difference the trim makes! The pieced pattern is on the left, embellished with glued-on rhinestones, Kreinik threads, sequins and sead beads, and the fully embellished Cap is on the right, with the black-and-silver braid, silver picot trim, ruched ribbon band and jingle bells added:


Everything except the rhinestones was hand-stitched on, using Invisible Thread (Coats Transparent). This is very fine, and is excellent for adding seed beads!

I knew I wanted to echo the diamonds of the traditional Harlequin costume, so on the right side I glued square rhinestones at an angle to create diamonds of pink, red and purple. I outlined these in a turquoise Kreinik braid (I think it's a #8 braid) and added large silver e-beads. The center section has a Trellis of Couched iridescent Kreinik ribbon with layered sequin filling and the left horn has rhinestone "Polka Dots", with scattered silver bugle beads and Stem Stitched Kreinik braid, in a pink/purple mix.


The trims I added took the most time to sew on, but they added a lot of impact:


The local quilt store was once a craft store and they have a very small stock of odds and ends. That is where I found this fabulous silver-and-black braid, which is actually meant for Plastic Canvas. I outlined all three of the horns of the hat in this thread, Couching it to follow the shape of the pattern. I love it, and to me it feels Harlequin-like 😊

The background fabric, the pretty peacock blue, is a linen I found there too!

The other four trims are silver braids made by Tahl. After some auditioning, I went with the one at the top left, a pretty picot braid with diamond-patterned edges. I Couched this around the bottom of the hat band, and then I filled each little picot with a silver-lined sparkly seed bead in an alternating pattern of turquoise, yellow and red. Although it's a very small detail, the beads catch the light wonderfully in real life!

Here's my attempt to capture the sparkle, in the sunshine:


My favourite part is probably the rainbow Ruched Ribbon at the top of the band:


It took me several tries and many stabbed fingers, but eventually I - more or less - got the trick of ruching the ribbon, which is multi-coloured double-sided satin by Offrey. I used a simple zig-zag design shown in the tutorial for a flower on Nikki, In Stitches.

To make sure my stitches didn't show, I used Invisible Thread, which made the process slow going. The stitches vanished against the variegated colours when the ruching was complete BUT I couldn't clearly see the stitches as I was making them, which made it difficult to keep them even. I ended up marking dots along the sides for spacing with a purple Disappearing Marker. I would suggest practicing on a plain colour ribbon with matching sewing thread first! It is a great technique I'd like to try again.


The three jingle bells are ones I've saved from the collars of the Lindt Easter Bunnies! They are so pretty, and I always hoped to find a use for them. They sound very nice when rung too 😁 The Bunnies have become a family tradition in recent years. The bells would look lovely on Christmas ornaments too - any excuse to buy more chocolate 🍫


When I was a little kid, my Stitchy Guru Mother created a marvelous distraction device called The Glue Box. It was a plastic container filled to the brim with construction paper, crayons, markers, stickers, glitter glue, pipe-cleaners, pom-poms, popsicle sticks, beads and other cool crafty stuff. Many were the hours I passed in a creative blur, making one genius - to my mind, I'm sure - artwork after another to proudly be given to relatives as gifts or displayed on the fridge until the next "masterpiece" was concocted.

There was spontaneity in it, and joy. Truly outrageous, overwhelming, all-encompassing joy! As an adult, I don't often give myself free reign to just jump in and experiment with something, and I'm sure I'm not the only one. This was a challenge for me in many ways, but most importantly to my confidence. Especially early on, I nearly gave up on my Jester's Cap for good several times - I thought it was too juvenile, too hokey, too kitschy, too amateurish. How, I wondered, could I possibly submit this to the SFSNAD?

But as I persevered, something amazing happened! I remembered The Glue Box and the happiness of making something just for the sake of making something. To my surprise, I found a measure of real joy, and in these difficult days of loss and family illness, it is all the rarer. It's a true treasure to find, and I am extremely grateful. In the future, I hope to do some more Spontaneous Stitching, and I highly recommend trying it!

Thanks very much to The San Francisco School of Needlework & Design (SFSNAD) and Kreinik for hosting the Stitch At Home Challenge and for opening it up to International stitchers like myself! I really enjoyed trying new techniques (the felt applique and ribbon ruching), new materials (Kreinik metallic threads) and expanding my stitchy horizons!


Helpful Articles About Kreinik Metallic Threads:

💠 From the Kreinik blog: How to Read a Kreinik Thread Label
💠 Nordic Needle's Stitching Guide on Kreinik Metallics has a brief overview of the history of metallic threads and the Kreinik Company, as well as stitched samples;
💠 Peacock & Fig has a wonderful article that demonstrates the difference between the Blending Filament and the Braids in great stitched samples;
💠 The Cross Stitch Review Blog has very detailed overview of the Blending Filament;
💠 Ancora Crafts has an in-depth Glow In The Dark Thread comparison, in which most of the contenders are Kreinik, as does the Freudian Stitch blog.

Have you ever tried indulging your whims and Spontaneously Stitching? Would you?!