
 |
| Image courtesy of FreeDigitalPhotos.net / Bill Longshaw |
As I rather cryptically mentioned in my last post (thanks Karen!), I have been on a Great Backing Fabric Hunt - for my SAL Bookmark, I meant :) Sorry for being Miss Mysterious there, it was totally an accident! Anyway, we actually had sun yesterday (gasp!), so I spent an afternoon happily wandering through my local Fabricville.
Actually, I was a little disappointed in the quilting cottons this time, there was a lot of dark and dramatic batiks and some cutesy stuff (the little lobsters were adorable, I must admit) but not much in the way of pretty. It's prom season though, so there was lots of sparkly special occasion fabrics to gawk at! There's a lot of sequins this year ;)
Before I went, I stitched up a little snippet with all my colours on it as a reference to take with me! I've learned to do this through trial and error, and it really is handy :) I can't even tell you how many times I've thought I found the absolutely perfect fabric for a project, only to take it home and realize that I was completely off the mark.
It's so frustrating when that happens! So this little method helps reduce that chance. When I first had the "take along my threads" epiphany, I used to cut off a few strands of floss and tape them on a small piece of cardstock, but I've found that the colour of your stitching fabric can really affect the way that your threads look!
So this is what I do now:

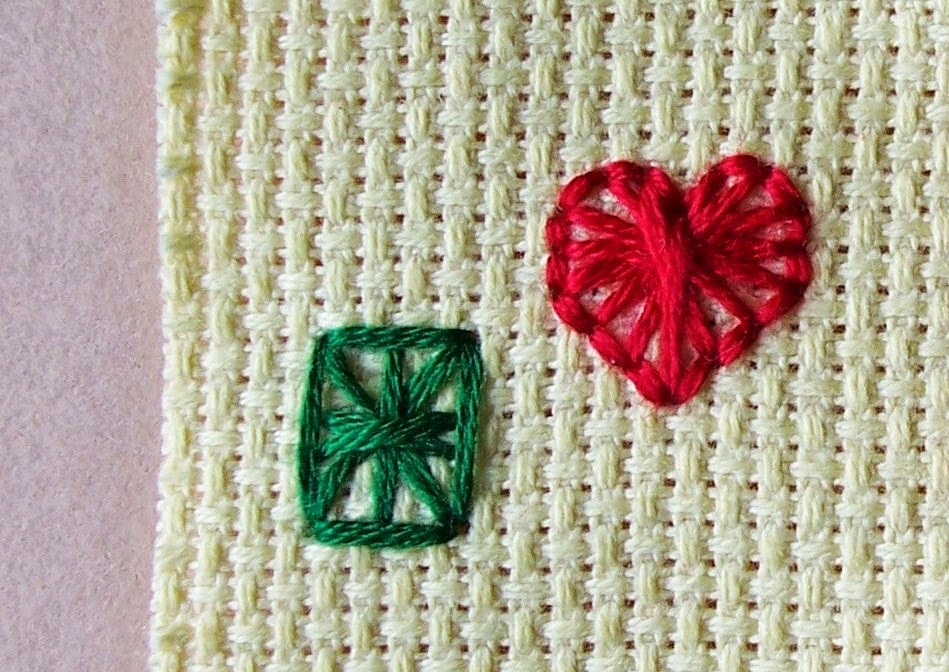
As you can see, I used the same snippet I stitched my practice Rhodes Heart on, which I cut a little big for this very purpose :) Then I simply stitched my other colours in. There was no design here - I like to use long stitches to show the floss colour better, and I just added some tacking stitches over the middle of these three:

I was in a hurry, stitching this literally right before I went out the door, so I didn't bother to smooth my threads and you can see the tangles, but perfection really doesn't matter here. That said, I kind of like the way these little stitches turned out!
When it came to the dark green, I stitched it on the other side near the Heart since those two colours are close together (the tulips!) in the design. I've also noticed that often neighbouring threads can affect how the other colour looks too! Sometimes they wash each other out, or - like in this case - they make each other stronger.
Since this little snippet is so small, it easily fits inside my purse and when I'm in the store, I lay it on my prospective fabrics to see how they match :)
Although there weren't that many firm choices for my colourway, I did end up with a trio of close matches and it took a little bit of deliberation before I was able to chose, but I was happy with my choice :) Honestly, I also took my Stitchy Guru Mother along, because fabric stores are her natural environment, LOL, and she has a great eye for colour too! It helps to have another pair of eyes along if at all possible.
All three fabrics were small floral prints. One was pink and green on white, but looked a little faded. The other was the same fabric I bought only with a green background, which would be more visible on the bookmark sides.
The fabric needn't match exactly, it's only going on the back after all and it's only a little bookmark!, but I wanted something to coordinate and blend in, and this is it:

There's no manufacturer on the fabric, or print name, it just says it's "Exclusive to Fabricland/Fabricville". Here's a close-up of the pretty vintage-looking print:

And here's the snippet, next to the selvedge (edge) print of the fabric colours:

Most fabrics sold by the meter have these little dots, which are references for the printer, somewhere along the edge. Rarely, I've seen squares. It's worth trying to look for them and get them included in your cut if possible. I was lucky, as this fabric had close repeats and this portion was near the bolt end. But I have seen fabrics with very long repeats so it doesn't hurt to check your fabric before you have it cut.
They are very useful when you're trying to match your colours! As you can see, most of the dots are a little lighter than my threads but close enough in tone to harmonize.
Another useful thing to look for - if the colour is outside the little shape guidelines, that means the fabric was printed wrong and it's an offprint - and therefore a second. There's nothing wrong with using offprints, as some of them are very close to the original or look interesting, but you shouldn't pay choice print prices for them!
While I was at the fabric store, I also looked at ribbon for my marker (like the one I made for my Blackwork Bookmark, which I *am* going to finish someday soon!) and found to my great surprise I discovered *this*:

Initially, I was hoping to find a pink, but the red was a perfect match :)

It's grosgrain, which is my favourite ribbon to work with because the edges don't fray and it looks the same from both sides. There was a similar colour I could have bought on a spool, but one of the advantages of buying ribbon by the meter is that you don't end up with tons left over! And it's less expensive, generally. This is a whole meter, I bought extra in case I make a mistake (hey, it's been know to happen, LOL).
And, as another wonderful gift from The Stitchy Karma Gods, when I was taking these pictures today I paused to rummage around in my big stash of wooden beads:

And found another perfect match (thank you, SKGs)! It's a good thing I didn't find pink ribbon after all! These are the same size as the ones I used in my last marker, and I love the chunky look. I was thinking about trying a tassel this time, but I think the ribbon works well with the cheerful simple colours and fabric I've chosen :)
So, very happily, I'm all set to start stitching! Normally, I usually stitch and *then* worry about finishing, so it's refreshing and a bit of a relief to have found all of my materials and decided on a finishing technique beforehand. I'm now greatly looking forward to starting in on my bookmark, hopefully tomorrow!
I'll try and take some pictures of the Marker assembly this time around too ;)
Before I go, I want to mention that Erica (of Erica's Stitches) has written a great post about her colour choices, and she's trying something entirely different: an Autumn colourway! Her colours are gorgeous, and I admire her sense of stitchy adventure :) She's also got some gorgeous white-and-yellow tulips blooming!
5 comments:
I love wondering around Fabricville and looking at all of the fabrics. It makes me wish I was a quilter! lol Maybe someday.... I love the fabric you picked out. It looks great with your fabric and threads and the ribbon will be a perfect match.
Ha, me too! There's so many beautiful quilting fabrics and patterns on the market now, it is very tempting ;) I'm so happy you like the fabric and trims!!! Do you have anything special in mind for your backing yet, or are you going to wait until your stitching's done?
There's a small but pretty collection of small florals that are fairly new in my store that you might be able to get at yours. There's a black with little coral and blue roses that is just gorgeous. I may have to go back for a bit of that, LOL :) Definitely worth a look next time you go :)
This is going to sound funny, but I have never really finished a bookmark before lol. I've always just frayed the edges and at the most stuck (glued) a piece of felt to the back. And I don't think I've ever ventured as far as to add a ribbon.
So, what am I going to do for the back? Well, I'm not sure at all. I'm assuming you sew the backing to the bookmark like you would with an ornament? With a piece of interfacing maybe to make it a bit stiffer? In any case, I'll go through my fabric odds and ends to see what I have that matches and go from there.
I think the backing fabric you chose goes really well with the colors. Looking foward to seeing your finished project.
Karen: That's not funny at all! I'm in much the same position; I don't have a ton of experience with bookmarks, so there's a steep learning curve here for me too :) I'll explain some more in my next post, but basically you've got it in one - that's exactly how I've finished bookmarks in the past!
I didn't use interfacing, and they were pretty stiff, but that's something I definitely want to try this time :) I'll address this in my next post, thanks so much for your great comment! Stay tuned ;)
Meari: Thank you very much :) I've got to get stitching, LOL!
Post a Comment