Wednesday, December 23, 2015

Season's Greetings!


May Your Holidays Be Merry And Bright :)

I'll be taking a little hiatus from the blog to spend some quality time with family and friends, but I'm very much looking forward to getting back into the Stitchy Swing of Things sometime in the New Year ;) 

Thanks so much for reading and supporting Eglantine Stitchery!

Wishing You and Yours A Wonderful Christmas 
And A Very Happy New Year in 2016!!!

Sunday, November 29, 2015

Autumn Leaves Applique & Ornaments


It's so hard to believe that the end of November is already upon us! And it's even more difficult to credit that Christmas is just around the corner - EEK!!! I try to get ready earlier every year, and yet somehow seem to fall further behind LOL ;)

This year, I decided to make something to bridge the gap between Hallowe'en and the Holidays, and I ended up with this little picture of falling leaves. It's a sort of surface applique technique that I've never tried before, and it was fun and quick to stitch!

I had been thinking about finding some leaf patterns online (there's a nice simple template here) and cutting them out of felt or fabric myself, but then I discovered these pre-cut felt Autumn Leaves at the local dollar store (20 pieces for $1.25!):


I've never used felt pre-cuts like this before, but they seem to be very popular for papercrafting, card-making and scrapbooking. There were three sizes in this pack, a large red maple leaf and then two smaller yellow and green maple shapes.


The large red leaves were nice and thick, but the green felt was very thin, and some of the pieces were misprinted with the lines running off the edges of the leaves. But that was okay, because I flipped them over and used them for the backs :)

So I started out making single-leaf ornaments first, which I also used for the three appliques in the frame. I used three strands of DMC 3371 (Black Brown) and a sharp embroidery needle and embellished the lines already printed on the leaves:


I did the main veins in sewing-style Stem Stitch and just used Straight Stitch for the side veins. Fly Stitch would also work well. I started with the bottom of the center vein, worked up to the top, then worked the right side - going up the center vein and adding the branch veins on the way back down - and then over and up the left side.

At first, I was trying to keep both sides of the leaf roughly symmetrical, but I soon realized that it was quicker and looked better if the stitches were a little sketchy!

Because the backing would cover it, I stitched all the way through the felt (which you can see in the last photo in the collage above). Although the stitching was simple and quick to do, I really like the dimension it gave to the leaves :)

Adding a second pre-cut leaf as a backing added nicely to that 3-D effect:


Although I tried using Blanket Stitch for the edges, it flattened out the sharp little dips in the leaf edge, so I settled on Whip Stitch instead. I spaced them randomly, following the contours of the edges - which were asymmetrical - again using three strands of DMC in the shade that matched the leaf most closely.


When I had my three appliques for the frame, and an additional red and yellow maple ornament, I tried a variation using two different leaf sizes/colours layered together. I really like the way these turned out, but since the backs of the ornaments were left showing, I had to do the stitching sewing-style into the top layer of the felt (instead of the regular "stab" style going all the way through), which turned out to be much more finicky and time-consuming. I think I took out more stitches than I put in LOL ;)

And finally, for the framed piece I used three of the single-leaf appliques:


I had this inexpensive 5 x 7 picture frame (another dollar store find!) leftover from another project that didn't work out, and I arranged the leaves in a floaty falling design. When I was happy with the placement, I sewed them onto some pretty aubergine cotton fabric with matching thread. I focused on attaching the centers firmly, and anchoring the bases on the points, leaving the tips free to curl up a little.

As you can see, this let the leaves stand off from the fabric:


Please excuse the fuzzies in this photo - they're from the felt!

Then I dug up some sparkly flat silver cording from my Stitchy Guru Mother's stash, and set about making "wind gusts" with it! I tried couching it first, but after some experimenting, I decided to stitch through the middle of the cord with the Quilter's friend, Invisible Thread (there's a short Craftsy article on the thread here).


Overall, I'm pretty happy with how this turned out! My red maple leaf and the center gusty curlique were a little too close to the edge once I mounted the fabric on some mat board and popped it in the frame, but it has been nice to see this reminder of Autumn on my bookcase this season :) The ornaments I've hung up above the frame on the living room wall with my little stitchy smalls, and they brighten up the room.

Although it's probably too late to find pre-cut felt leaves, this type of embroidery could easily be adapted to any shape or Season. In fact, I'm really hoping to find some pre-cut felt snowflakes and do a similar thing for Winter! Maybe with some sparkly silver metallic thread? And beads?! (Oooh...doesn't that sound nice?) Once you get the hang of it, it's quick and easy mostly mindless stitching - and it's very relaxing to take a break and do something simple like this every now and again.


Adieu Autumn! and Welcome Winter!

Although I'm unfortunately behind again in my stitchy blog visiting and reading, this is the time of year that a lot of us start to sum up the Stitching Year That Was and talk about our goals for the New Year. Well - my year was a bust LOL! I only made one entry into Jo's wonderful Gifted Gorgeousness SAL, and all my plans went awry.

But that's okay, because it leaves me a lot of things to try next year :) I would really like to give my Sampler of Stitches (SOS) a solid shot, although I'm still not entirely sure how to go about it. There's something to be said for just winging it and trying to figure it out as you go along, and that's where I am right now with everything ;)


Santa Claus is soon coming to town!

Usually this time of year, I'm stressed out already with a huge list of Christmas gift stitching projects - almost as long as Kris Kringle's there! - that I desperately want to catch up with - most of which are never even started let alone finished - but this year I'm doing something a little different for a change. I have a few projects I've meant to stitch up or final-finish off for myself and never got around to doing.

So I'm going to make those poor neglected stitcheries my priority this year! All the ones that have waited patiently to be finished off while I put them away time and again in favour of something else and  for lack of time. I wonder if there's a special place for them, like the Island of Misfit Toys in Rudolph the Red-Nosed Reindeer)?

If so, hopefully I can rescue a few during the next few weeks ;)


Can you believe no child wanted the Elephant with his cute pink polka dots?!

How about you? What are your (non-Super Secret Gifty) Holiday Stitching plans?

Wednesday, October 28, 2015

Happy Hallowe'en - Black Magic Doily!


Black Magic Doily

My special Hallowe'en Variation of the free vintage Hortensia Doily

NOTE: Unfortunately, the site where I found this pattern has been hacked, so I've decided not to post the link in case it is infected. If you'd like the pattern chart, please e-mail me - my address is in the sidebar, under the pretty postage stamps :)

This is the original pattern:


So, you might remember that around this time last year I finished and framed my very first Hallowe'en stitchery, Happy Hallowe'en Friends?


Well, I've been doing some more fine (thread) crochet lately, and I decided that the cute Ghost and Pumpkin looked a little lonely - so I made a spooky doily to keep them company :) Thanks to The Great Thrifty Karma Gods, I had a cool ball of black with silver metallic (size 10), and I ended up using nearly every bit of it. For the last few rounds, I was holding my breath and chanting "please let me make it" in my head over and over - and thankfully I did, with a scant few inches to spare LOL!

Here's a close-up of the little clusters in the center:


When I first thought about making a doily for Hallowe'en, the first thing that jumped to mind - naturally - was a spider's web! I've learned over the last few years that there are many different styles of crocheted lace, and I tend to like the chunkier Cluny and Irish styles. There are also a lot of fragile, spidery type doilies that are usually known as Cobweb Lace, but I wanted something more substantial.

Which was when I remembered a vintage motif I'd seen before. I thought it was - confusingly - called Cobweb Lace too, which it is; it's also known as Spiderweb Lace.


They key to this pattern style is the little square with the "spider" at the center, surrounded by lines of chain stitch "webs" :) It was often used in Edgings, and in combination with bunches of the pretty popular Pineapple motif for larger cloths.


The only change I made to the chart was to adjust the cluster groups between the "Spiderwebs"; the original called for 6 Clusters, but I downsized to 5 to save on thread. Serendipitously, this resulted in that neat pointed tip after I blocked the doily, rather than the loopy scallop of the original. It looks much more web-like this way, and I'm really happy with how the doily turned out :)


Amazingly, it's actually even sparklier in person! Unfortunately, the thrifted thread I used didn't have a label and I wasn't able to identify the brand. I've never seen that combination before, and the silver metallic is thicker than the more common white with silver that I've worked with before.


I also dug out the little Pumpkin Pincushion I crocheted back in 2013! Shortly after I wrote about it, I removed the pins and stored it away, not really sure what to do with it. I actually like it better this way, just as a display decoration. It's an Everlasting Pumpkin! I used to love real pumpkins, but I've never liked eating the seeds or pulp and it was such a waste to throw them away every year.

So here's my little Hallowe'en trio, spookily sweet and happily hanging out together:


I am a huge fan of Cute Hallowe'en, which seems to be getting rarer in the face of the much more common Horrific take on things. I love the treats, not the tricks LOL ;)

However you choose to celebrate All Hallows Eve, Happy Haunting!


Be Safe and Have Fun :)

Friday, September 11, 2015

A High-Flying End to Summer :)


I've always been a Disney girl, and Mary Poppins is one of my all-time favourite movies! I don't usually enjoy musicals, but the many catchy songs of this one have stayed with me over the years: "A Spoonful of Sugar", "Feed The Birds", "Chim Chim Cheree" and, of course, "Supercalifragilisticexpialidocious". During this project, it was the grand finale of "Let's Go Fly a Kite" that keep running around in my head ;)


Let's go fly a kite
Up to the highest height
Let's go fly a kite
And send it soaring
Up through the atmosphere
Up where the air is clear
Oh, let's go
Fly a kite!

(you can read the full lyrics here)

And you may see why I can't seem to get that uplifting ditty off of my mind lately:


This little trio of kites started off as a sort of test project. Thanks to The Great Stitchy Karma Gods, I recently thrifted an interesting book called the Anchor Complete Embroidery Course by Christina Marsh. Mine is the original hardcover edition published in the UK in 1998 by David & Charles (no longer in business).


When looking for some information on the author, I learned that it was re-published in 2003, in a paperback, as The Beginner's Guide to Freestyle Embroidery. Also, according to Marsh's Author Page on Amazon, she wrote six themed cross-stitch design collections. Unfortunately, other than that, information is scarce.

This is a great book for absolute beginners to embroidery! Unlike most books, which are usually either stitch dictionaries or project books, this is indeed a "course" that starts with the simplest stitches and gradually builds in complexity and skill level.

It starts with basics, with advice on choosing materials and how to thread a needle:


And extensive information about patterns - how to read them, how to transfer them, how to resize them - and also directions for learning to read from a chart, since there are a few simple but attractive counted projects worked on Aida cloth.

There are interesting ideas for simple finishing methods right at the start...


...and then comes the first Chapter, Just Five Stitches - Backstitch, French Knot, Lazy Daisy (Detached Chain Stitch), Satin Stitch and Blanket Stitch - which is a bit of an unusual selection. I would have put Stem Stitch in place of Satin and Chain Stitch in place of Blanket, but it works. This is the first project, easy and cute:


And then comes five Chapters, with six stitches each grouped by function (Stems and Outlines, Knots and Dots, Chains and Loops, Solid and Open Fillings and Borders and Bands), for a total of 30 stitches (35 counting the 5 foundational stitches).

All of the stitch diagrams are large, clear and super easy to follow:


Each chapter has several projects at different skill levels, and the projects only use those 6 section stitches, plus the 5 Foundation Stitches.

So this neat pincushion from Chapter 2 uses only Stem and Outline stitches:


However, the idea could easily be adapted to include other stitches :)

The final chapter - Mix and Match - shows some designs with stitches from several chapter "sets". These are not necessarily the largest in the book either. In fact, my favourite is this very small Holly design that is shown stitched with three different levels of complexity, from simple outline to advanced full filling:


It is worth noting that all the patterns are only one diagram with a medium thick black outline, which serves as the transfer you copy as well as the stitching guide:


Since most of the designs are on the smaller side, this works mostly okay, but for large projects like this gorgeous goldwork floral - which reminds me of pretty blue-and-white china - it might be a bit tricky! Keeping the glossy pages flat is hard.

Another of my favourite projects is this quirky and fun Fireworks Display cityscape:


One blogger actually put the Fireworks idea to a great use on a landscape quilt! The round white firecracker is made with an intriguing stitch called a Danish Knot, which I hadn't come across before now and am hoping to try soon :)

The "showpiece" project of the book is from the same Chapter, Knots and Dots(3):


Called the Medieval Strawberry Sampler, this is a colourful and open translation of historial crewelwork, which was stitched much more densely with wool.

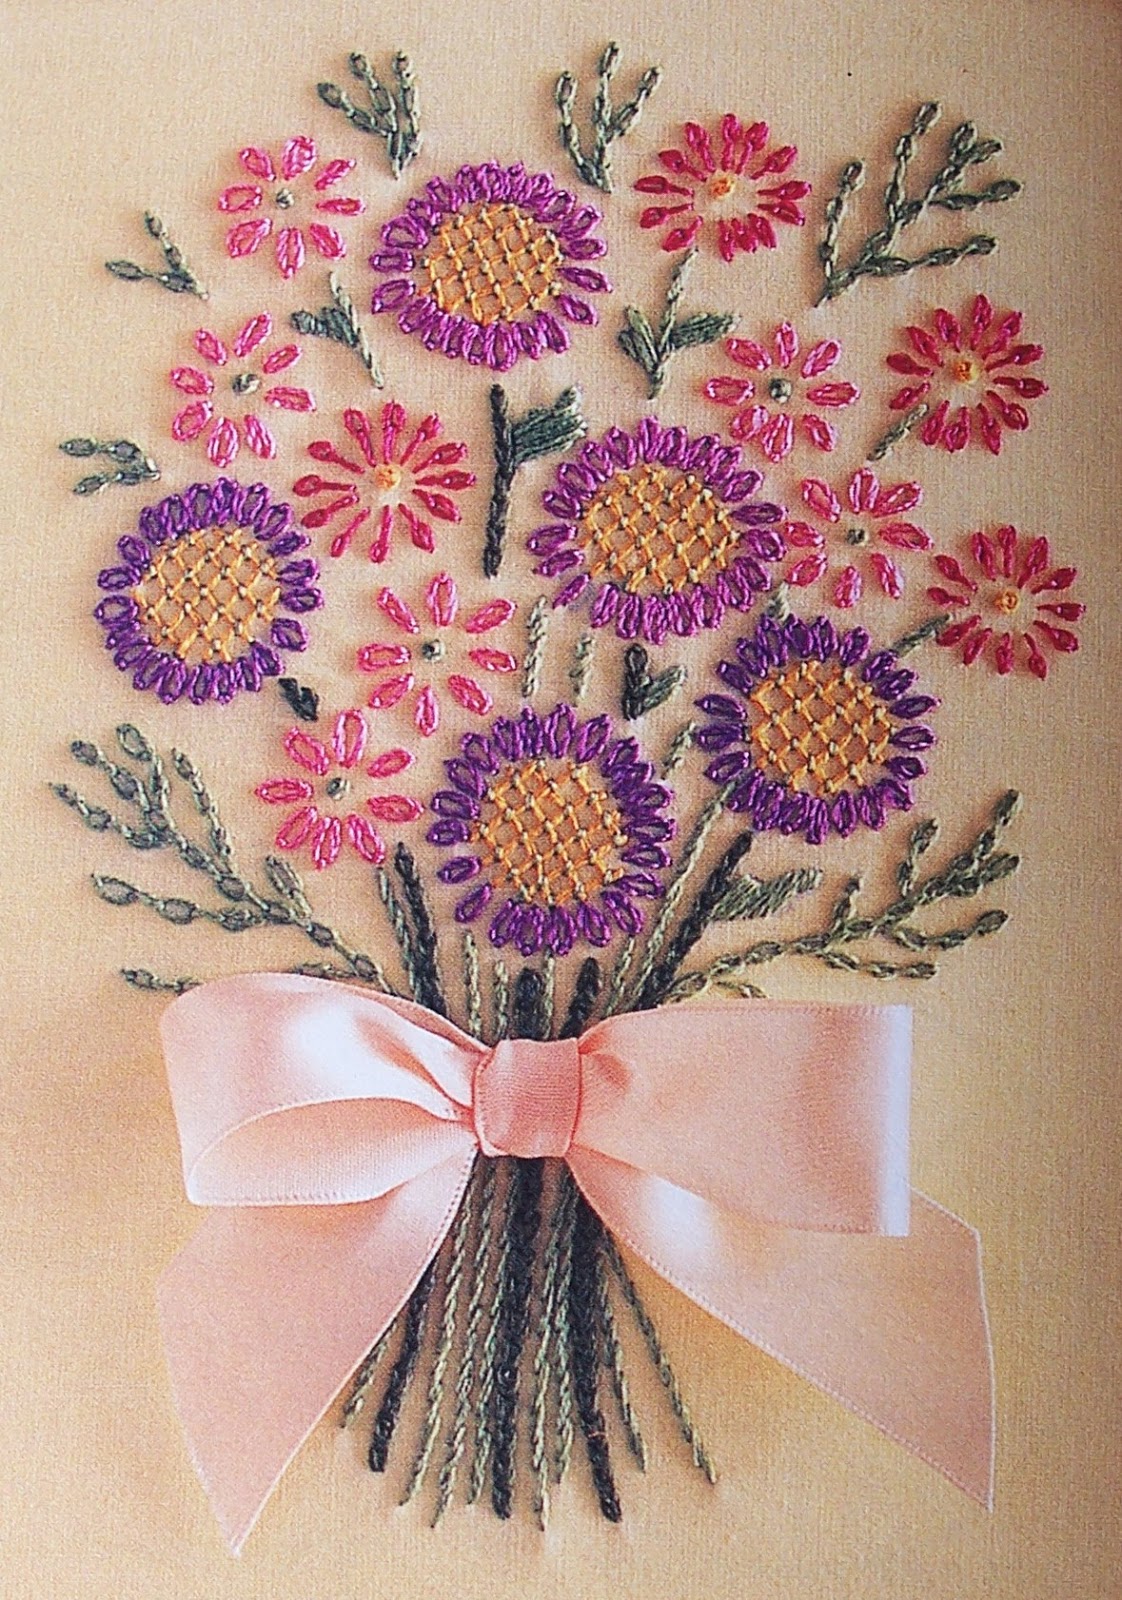
But my favourite project by far is this beautiful Summer Bouquet (Chapter 4):


I absolutely LOVE the pink ribbon tie! This project was the whole reason I bought the book and it was what I intended to stitch first - then I fell for the adorable kites:


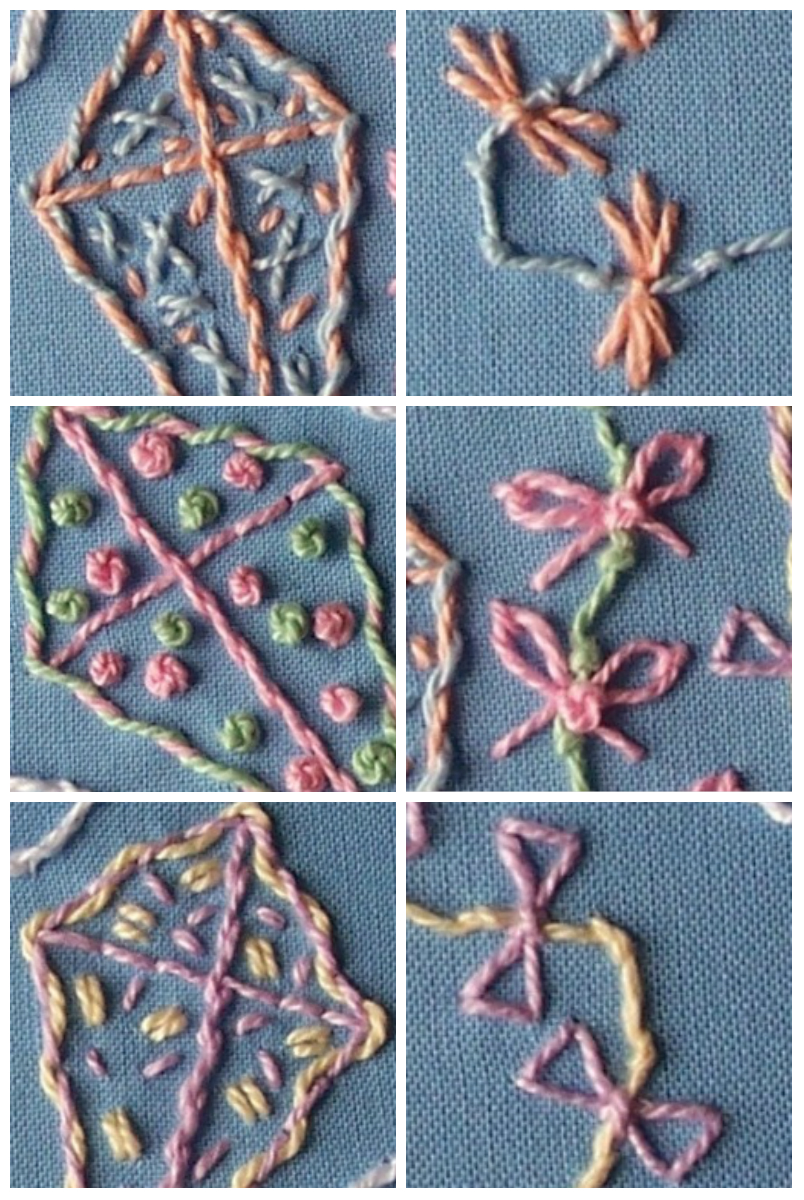
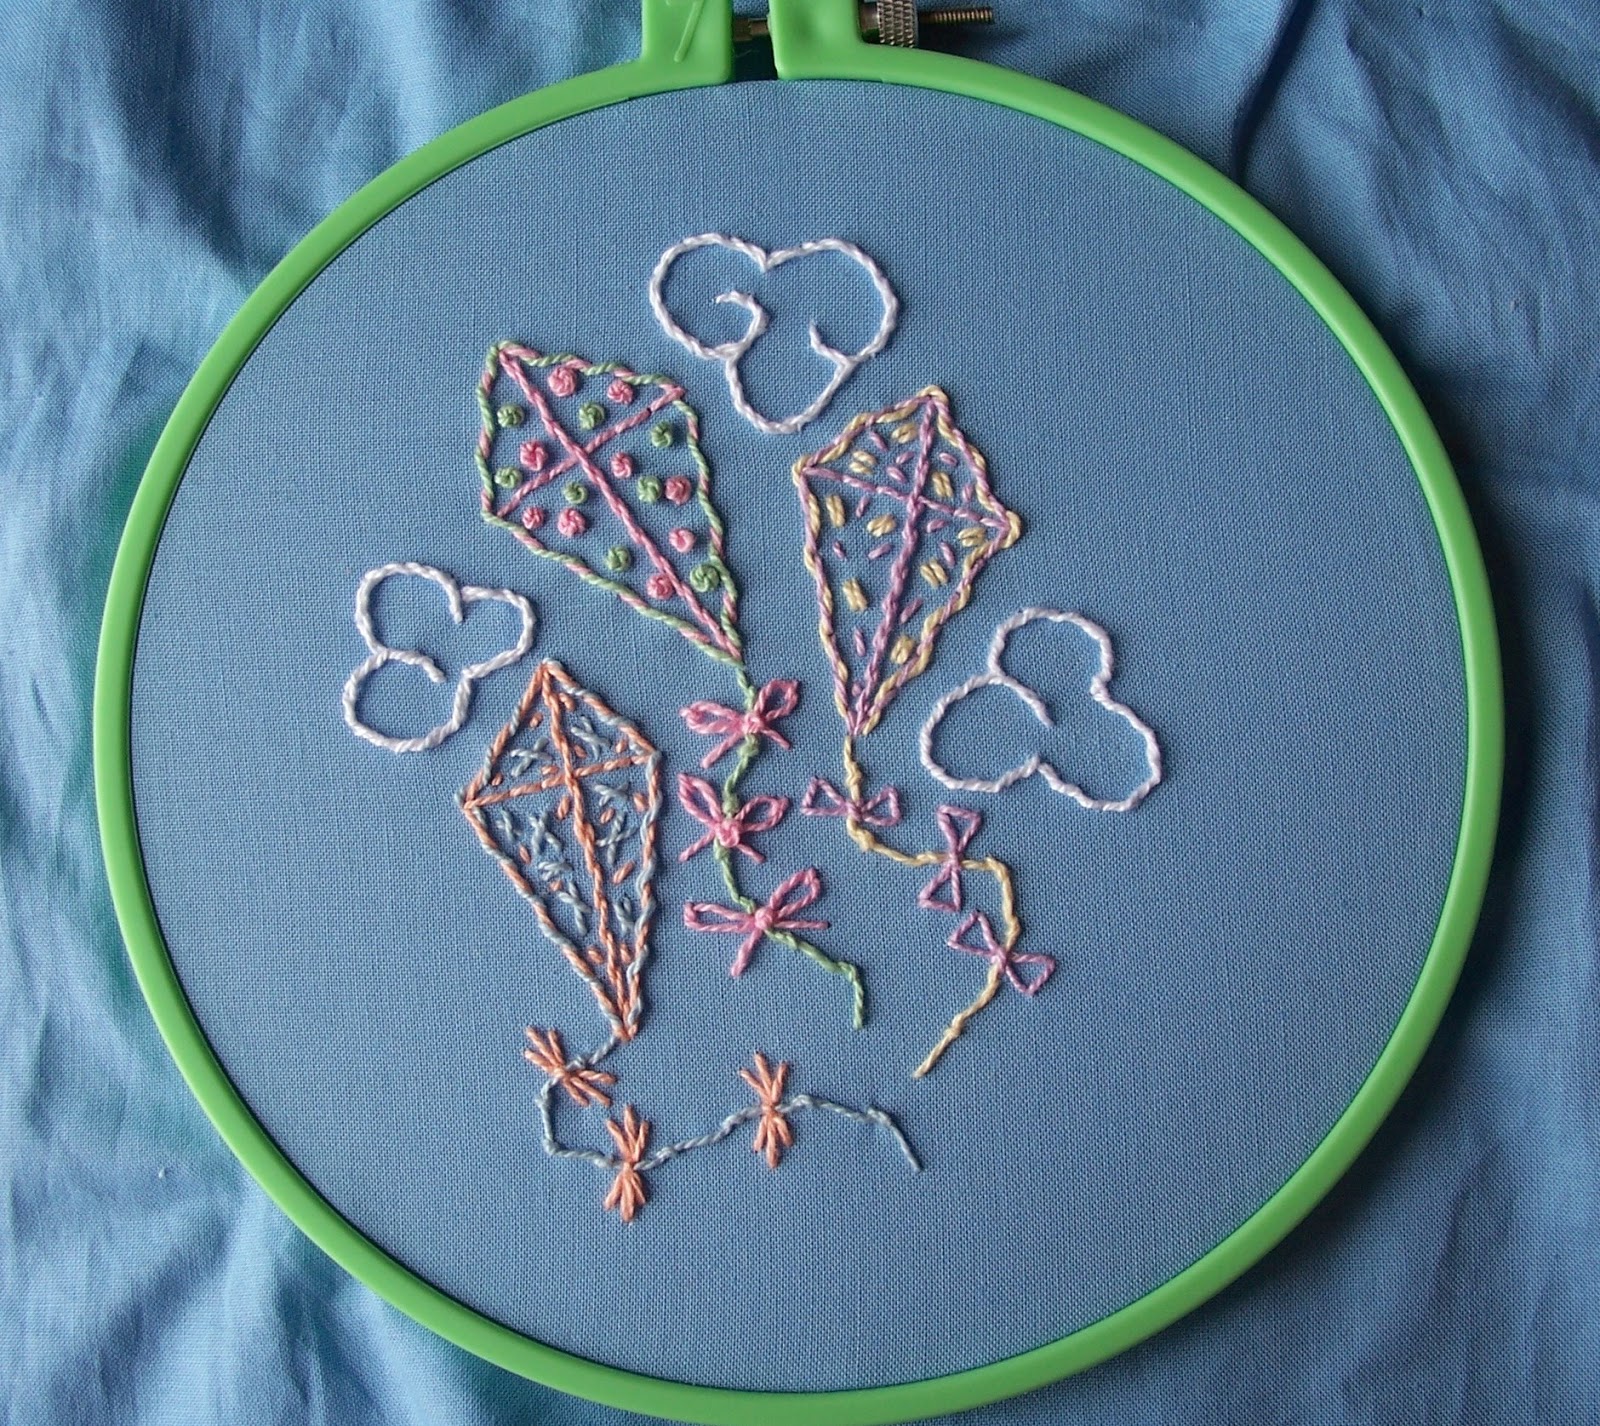
This trio of kites is called High Fliers and is Project 2 in Chapter 2. I stitched it pretty much as written, although I did make a few changes as I went along ;)


Instead of my usual iron-on transfer methods, this time I traced the design directly from the book! I used the white Nonce Marking Pencil, and it worked wonderfully - the lines are visible but subtle and they did not smudge or fade at all while stitching.


This pencil is designed for marking on dark fabrics, and although it is water soluble, I didn't see any need to wash the work since the embroidery covered the lines well.

The lead is not like an ordinary colouring pencil - it's slightly waxy, and it traced a pretty fine and clear line with only light pressure. It's a very convenient, inexpensive tool and I'm really looking forward to experimenting with it more!

The fabric is my favourite sky blue 100% cotton :)

I started stitching with the lovely DMC PC #8 I recently used for my Happy Bluebird:


However, the stitches were too skinny compared to the project design, which uses all six strands of Anchor floss in the needle at once. I needed something a bit chunkier, so I took out what I had stitched (I had already removed some in this photo).

I found it quicker to cut right through the loops, and use the needle to lift up the short pieces. Although this wastes thread, it does help reduce strain on the fabric:


Then I remembered the Prism craft threads I last used for my Floral Umbrella, which was fully embroidered. I was interested in seeing how these threads would work for simple outline stitching, so I chose some pretty pastels from the "Sweets" collection:


This particular thread isn't mercerized so it's more fragile than other craft threads on the market. This is what gives it the lovely vintage look, and it's like a thicker single-stranded version of the matte Flower Thread flosses that used to be on the market.

I'm happy to report that it works great for outline stitching - much better than it does for heavy embroidery like my Floral Umbrella! For beginners especially, I would consider this a specialty thread, akin to working with metallic flosses in cross-stitch.

Just like metallics, it helps to use shorter lengths and you need to trim the ends often as they are prone to fraying, which makes the thread more likely to knot and tangle.


I had tons of fun stitching these kites! But I did change the stitches up just a little ;) I used the recommended Stem Stitch and Backstitch, and learned the Coral Knot for the tails and Whipped Running Stitch from the chapter diagrams. Instead of Couching, I used Whipped Backstitch and I added some ties to the kite tails using Lazy Daisy (Detached Chain Stitch), French Knots, Straight Stitch and Cross Stitch.

And since the kites looked a little bare, I added some quick fillings with French Knot polka dots, Oblong Cross Stitch, Double Seed Stitch and Seed Stitch :)

Here's a close-up of the fillings and the kite tails:


The chunky texture of the thread gave the stitches a wonderful lofty lift:


Finally, I decided my trio of kites needed some company, so I added some whimsical floofy clouds with Whipped Backstitch! This gave me the sunny sky feeling I wanted.


I just free-handed the designs, and although I was worried at first that they were too wonky, I've come to like them :) Although I love the funky, folksy look of simple outline embroidery, I find it very difficult to step back and stop trying to "finish" it off into something more complex. The imperfections are all part of the charm, and while I know that, it's hard to put that into practice.


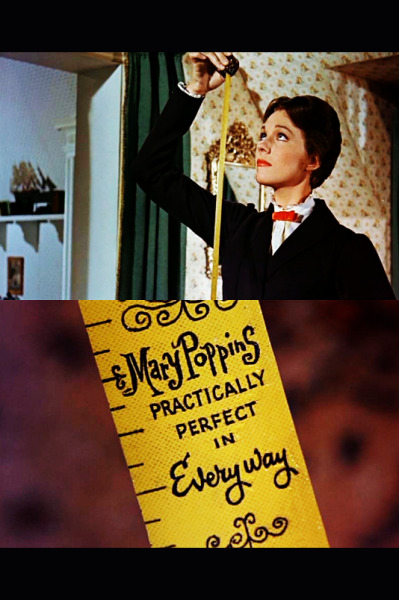
Following Mary Poppins, rather than thinking about these natural variations in stitching as "imperfect", I'm trying to think of them as "practically perfect" instead ;)

It's a struggle I think many stitchers who cross over from counted techniques to free-style embroidery must face! When you're used to stitches that are symmetrical and evenly spaced, it's an adjustment to have every stitch be slightly different, no matter how hard you try to keep them the same (which can be incredibly frustrating!).

But it is exactly this quality that makes embroidery so much fun to stitch, and I'm trying to let go and embrace the wonkiness :) All of the projects I've done to date have ended up being a surprise of sorts, because it's so easy to change up elements as you go, and I've had the best results when I don't try to plan things out much beyond the basic design beforehand and just "go with the flow" for the stitches themselves.

It's a totally different mindset, and I'm curious if others have this problem too?


Hopefully, your Summer is also coming to a happy end! As Autumn comes in, I'm letting my imagination soar with project ideas, although I can't quite bring myself to look ahead to Christmas yet as so many stitchers are doing. But that cute little Holly design from the book is calling out to me so I may change my mind soon :)

Saturday, August 15, 2015

Free - Berlin Woolwork Rose Medallion


Based on an Historical Embroidery Design by Sarah Bland

Download the FREE .PDF Pattern from my Dropbox: Rose Medallion

Please Note: You may see a screen asking you to create a Dropbox account, but you do NOT need to create an account to view and save the file; just click the grey "x" at the right top corner of the screen to go to the file. If you have any problems downloading, please let me know - my e-mail is in my sidebar :)

This lovely little rose is actually an old project from 2013! On one hand it's hard to believe that it's been so long since I made it, and on the other hand it's something I treasure so much that it sort of feels like it's been a part of my life forever ;)

It all started when I was searching through the wonderful online collections of the Victoria & Albert Museum (V&A), and came across this Berlin Woolwork pattern that is part of a larger personal project album designed by Sarah Bland (1810-1905):


Image used for non-commercial purposes © Victoria & Albert Museum, London

Isn't it amazing that a design drawn over 100 years ago still looks so vibrant today?!

I was very taken with the rose filling motif, and recharted my own version:


This was actually the first piece of Berlin Woolwork that I've recharted and stitched; the second was the Key and Ribbon I shared last year as part of the Stitch From Stash (SFS) Challenge - it's tiny because it's stitched over 1 on 28 count Evenweave:


As a matter of fact, I actually chose most of the colours for the Key from this project!

I wanted to keep the feel of the original octagonal medallion, and although at first I considered keeping the orange, yellow and turquoise at the corners, I eventually decided to add gold corners in the style of Victorian photo-albums as a frame:


Before Background Fill / After Background Fill

And then I filled in the background with solid white, which finally gave the rose the proper needlework look! Berlin Woolwork was worked with brightly coloured wools that contrasted so strongly we would consider them clashing on needlework canvas, and so the backgrounds were almost always fully stitched with patterns or solids.

So leaving the Aida cloth (14 count white, all cross-stitch with three strands of floss) unstitched made the work look unfinished. With that in mind, I also added a row of white outside the frame, so it would be filled edge-to-edge.

While I was stitching this project, I took lots of photos intending to make a step-by-step tutorial - unfortunately, most of them did not turn out, which is why I decided not to post about it. It wasn't until recently when I was talking to Karen about fine crochet and final-finishing that I remembered how much I loved this rose :)

But after some digging, I was able to find some photos of the process to share!

I made a basic Padded Ornament, just like I did in my Blackwork Snowflake Tutorial:


It was a total accident that I left my opening at the side instead of the top!

But I did something entirely different for the edging, and crocheted into the Aida blocks! I used size 10 South Maid crochet cotton in White and a 1.00 mm (size 10) hook. I worked a row of single crochet all around as a base and then added simple Shell Stitches for the trim and a little hanging loop at the top:


It was fun to work, and was the perfect finishing touch for the rose :) I backed the ornament with a scrap of the beautiful gold velveteen I used in my Floral Heart.


And that's it!! Out of all the many projects that I've made over the years, this sweet simple rose is one of my very favourites, and ever since I finished it, it's been hanging in my living room on a little brass picture frame hook and cheering me up everyday :)

If you stitch up a Berlin Woolwork Rose Medallion of your own, I'd love to see it!

Thanks very much to Karen, for her interest in this project, without which this post would very likely never have been written ;)