Showing posts with label Finishing. Show all posts

Friday, July 19, 2019

Beautiful Batiks: Fabric Inspiration


And now, for something a little different! Recently, a nearby small local quilt store had an information session about hand-dyed Batik Fabrics, from a company called TrendTex which is a wholesale distributor here in Canada for several fabric lines, including Hoffman Fabrics, which was the focus of the presentation.


This list of Magnum's iconic shirts is a fun read! The presenter opened with a shot of this shirt (the back of a man with dark hair wearing it), asking if we could recognize the shirt or the wearer. No one did, but it's in The Smithsonian Museum now!

Hoffman is the California company that is credited with bring Batik into the main stream via Hawaiian Shirts in the 1980s (worn by none other than the original Magnum P.I., Tom Selleck)! They sell traditional Bali Batiks and more contemporary Indah Batiks under the brand name Me + You. Interestingly, this line is also selling Solids made of Batik cotton, which are a great compliment to the busy traditional patterns.


The Goody Bag, which came with a small roll of Batik squares, a branded chocolate bar, a pen, a handy little tape measure and a lint roller

At first I was hesitant to attend, since I'm not a quilter (yet) and the event was directed at quilters, but one of the shop ladies encouraged me and I'm glad I did! For the grand sum of $5, I got a great goody bag with small squares of Batiks perfect for backing ornaments or small embroideries and an information session about the TrendTex company and the fabrics they carry. When we took our seats, we also filled out a small questionnaire (about how often you quilt, etc.) that doubled as a ticket to a prize drawing of fabulous fabric sets (charm squares, jelly rolls, quilt kits). Not surprisingly, I didn't win a thing LOL If mine was the only ticket in the drawing, I'd still lose 😂


These were the fabrics in my Goody Bag! The assortments were random.
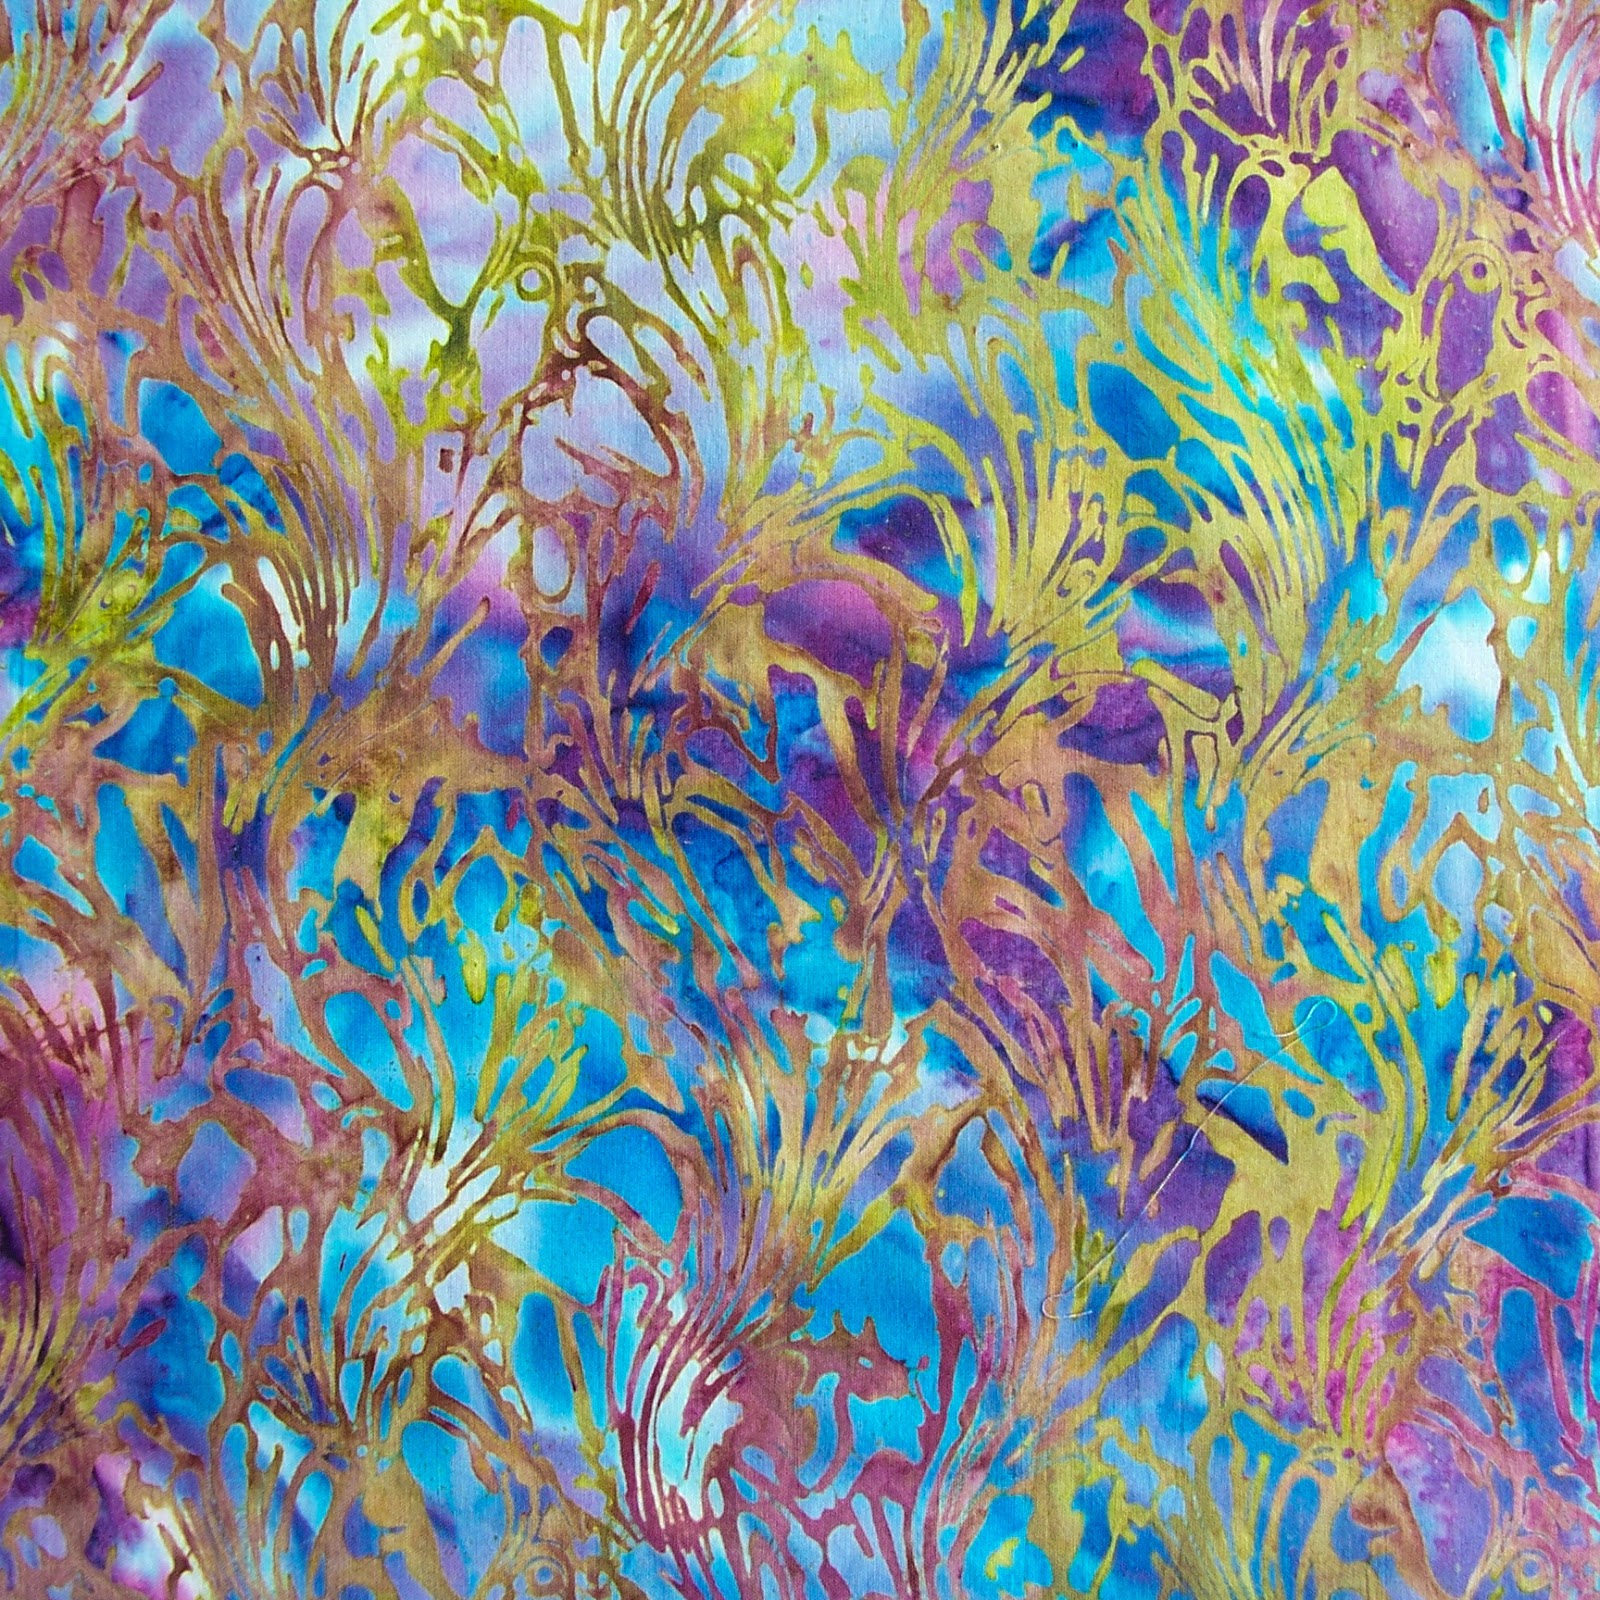
I particularly liked these indigo blue and turquoise combinations:


There were also discounts on Batiks cut off the bolt, but all of the fabrics I was really interested in - the vibrant rainbow hues - weren't available, unfortunately. There are so many different types of quilting fabrics, sewing notions and embroidery threads on the market these days that it can be overwhelming, especially when you live in a rural area like I do and have to order most of them online without being able to see them in person first. I wish there were more information sessions like this, just so we - as stitchy customers - could get a better idea of what we can buy! And where we can buy it 😊

Because TrendTex is a wholesale distributor, based in British Columbia, you can't buy fabric from them directly. However, if your quilt store is serviced by TrendTex, you can ask the owner(s) if they would be willing to order a specific item in for you; they may be happy to do so and you never know until you ask! The Batik section of the TrendTex website is fun to browse, just to get an idea of the patterns and colours available.

Some of my favourites are the rainbows:


And the foliage (leafy botanical) designs:


I have never used a Batik fabric, although I've often admired them at the quilt store! They are quite expensive, and the reason for this is that they are traditionally hand-dyed and hand-decorated, usually using a labour-intensive wax-resist dyeing technique.

The presentation included a YouTube video about traditional Batik making (Batik of Java: A Centuries Old Tradition by The Asian Art Museum), which shows intricate, beautiful fabrics I'd never seen the like of before:


I was a little disappointed that we didn't see a video about the methods that are used today for manufacturing Batik quilting fabrics. But when I got home, I discovered this documentary by Mr. Batik about modern methods of production:


And I was also able to find a video from Hoffman about their Batiks! There is no narration but it gives a great, quick overview of the dyeing process.


It is very interesting to contrast between the videos and see what has and hasn't changed with the creation of Batik fabrics over time. I found the making of the copper stamps ("cops") very interesting, and during the workshop, a vintage cop was handed around to us - it was incredibly heavy! Thee speed and accuracy of the printers with these heavy block stamps is amazing!!

While modern Batik is not the artform traditional Batik was, it still makes beautiful fabric where each bolt is different. Although it's important to note that there are ethical concerns about the working conditions in Batik factories, especially around the handling of toxic dyes and chemicals. We were told during the presentation that Hoffman Fabrics takes pride in its workers and provides the best possible conditions; even though the process looks primitive, the hot local conditions make heavy protective clothing very uncomfortable to wear.

For anyone wanting to read a little more about the history of Batik fabric, there is a quick overview here and a more detailed account at the Batik Guild.

I also discovered a video by American Patchwork & Quilting with seven tips for sewing with Batiks; although the video is for machine sewers, the tips are adaptable for hand sewers and embroiderers too!


Towards the end of the powerpoint presentation by the TrendTex representative, we were surprised with another roll of gift Batiks, slightly larger squares, again in random assortments. We were able to pick from several that the rep held out to our row, and again I missed the bright rainbow colours but I am very pleased with the pretty fabrics I did get, especially the chrysanthemum print:


Here's some close-ups:


The fabric on the bottom is much prettier in person, with very light blues and yellows:


I'm really looking forward to trying to stitch on these beautiful Batiks. One thing I learned from the information session that really surprised me is that the repeated dyeing in the wax-resist method makes the cotton fibres draw tightly together, and indeed Batik fabric has a smoother feel when compared to quilting cotton. The representative said that this makes hand-sewing with Batiks more difficult, so I'm glad to have smaller pieces of fabric like this to practice with.

Some more of my favourites - this one reminds me of sea kelp:


And I love the traditional Batik wax dots on this pretty colour mix:


And finally, my very favourite of them all - this lovely chrysanthemum print:


One thing I've noticed about Batiks is the beautiful, unusual colour combinations. A favourite Batik print would be an excellent jumping off point for developing a floss colour palette for a stitchy project! And the variegated nature makes them an attractive backing fabric, in my opinion, for stitchy patterns that use a lot of colour, or for when you can't match a single shade exactly. They are lively, colourful and powerful prints, even when used in small amounts!

What do you think of Batiks? Have your ever worked with them, or would you like to? And would you attend a fabric information session?


Saturday, January 12, 2019

A New Year Brings New SALs!


Happy 2019! I hope this is a spectacularly Stitchtacular Year for all of us 😊 Although I know I probably won't be able to blog regularly, due to continued illness in my family, I couldn't resist joining in with Jo's fun Gifted Gorgeousness (GG) SAL again this year:

https://serendipitousstitching.blogspot.com/p/gifted-gorgeousness-2019-sign-up-page.html

This is a relaxed SAL that posts every month on the 15th, and is meant to encourage us to use up stitchy supplies given as gifts. You can join in every month, or on an as-you-can basis (which I'm doing). The full rules are on the FAQ post on Serendipitous Stitching. I've participated in past GG SALs and it's a great way to meet new stitchers!

Jo also mentioned a great new SAL that is just starting. It's so new that it doesn't have a name yet, but Rachel at the Ten Hour Stitcher is starting a Fully Finished Off (FFO) SAL to encourage stitchers to make something - anything - with previously stitched projects.

As she says: "It saddens me that there are probably hundreds of completed cross stitches stored away in drawers and boxes when all that might be needed is a bit of encouragement or inspiration for their owners to dive in and have a go at fully-finishing some, even if it's only one or two."

This will also be a relaxed, join when-you-can sort of SAL (right up my alley!) and more details will be given around the 10th of February, as she is more accurately able to gauge stitcher interest. So if this sounds like something you'd like to join - and as an added incentive, each entry will count for a prize draw! - head over to her post and tell her you're interested. If this gets off the ground, I might try to jump in for a month or two. Although I don't have the majority of my unfinished stitching with me right now, I do have a few small projects that are waiting to be FFO! And, no doubt, I'll make more in need of finishing this year too 😄

Although I'm not a big believer in New Year's Resolutions, my Stitchy Goals for 2019 are to keep experimenting with hand embroidery and embellishment, and to stitch whatever takes my fancy LOL I'd also really like to update the blog too, as time permits.

EDITED: I totally forgot TAST! Take A Stitch Tuesday is a SAL that has been hosted by Sharon B at Pintangle for the last few years, for hand embroidery. It is meant to teach a new embroidery stitch each week, with an additional Beyond TAST level for those who want a challenge. There is a group TAST Flickr pool where you can see lots of stitchy goodness and which will give you a better idea of the SAL.


You can customize the SAL by working stitch samplers or doodle cloths, a big sampler, monthly small projects or one big project. Some people have made beautiful fabric books, with each page being variations on a stitch, such as this amazing example at Crafty Creek. Or you can use the stitches in projects you are already making. You can post every Tuesday with a single stitch, or post some Tuesdays with several stitches at once. It's a challenge I've greatly admired from afar for the last four or five years, and I hope I can dip in and out of that one too this year. I still have so many hand embroidery stitches to learn 💟

How about you? Any Stitchy Goals for 2019? And are you participating in any SALS this year? I'd love to hear all about your plans for this year!

Tuesday, December 4, 2018

A Maple Leaf for a Canadian Traveler!


As Winter sets in and Christmas is coming just around the corner, I want to take a step back and bid a fond Farewell to Autumn! You may remember the Lolli & Grace Autumn Leaf SAL from October; if you do, this design will be very familiar 😊 My best friend loved the finished needlepainting project so much she almost took it home with her LOL

Although she's always generously supportive of everything I make, it's been a while since she so obviously fell in love with one of my projects. She mentioned it would make a nice bag - a tote, or a purse - and after some thought, I decided to stitch a "bag brooch".

She's not one for wearing pins or brooches on a shirt or coat, so I wanted a larger motif she could pin to any of the canvas messanger bags she usually carries. The pins make it removable, for when the Autumn season is over. She's also a globetrotter who loves to travel, and Canadians like ourselves often wear badges or pins with the Maple Leaf to find fellow explorers, so this colourful little brooch can also serve that purpose!

I hope it will be a fun reminder of home when she's off having adventures abroad ❤


Here's the brooch in comparison with the original project! For the hoop, I enlarged the pattern slightly; for the brooch, I used the original Maple Leaf sizing. The colours and technique are the same. If you would like to stitch your own, the pattern, stitch guide and incredibly helpful video tutorials are all still available on the Lolli & Grace site, and you can find all the direct links in my project post.

This was my first time finishing an oversized embroidered brooch, and it was very much a trial-and-error process! I stitched my leaf on felt, just ordinary acrylic craft felt, in a pretty turquoise colour. Originally, I wanted to cut the border following the outline of the leaf, but I was rushed for time and went with a simple circle. In the end, I really like the extra colour, and the way the felt picks up those beautiful blues Anne chose that make this project so unique 🎨


I did baste a square of sew-on stabilizer to the back, for extra strength:


The brand is Pellon, but I'm not sure which type. It is very firm. I bought it off the bolt at my local craft shop. It did require a little extra strength to sew through it, but it made sure the felt didn't stretch (which was extra likely since I was stitching in hand without a hoop!) and it really helped to make sure the felt didn't pucker under the weight of all that thread painting. All the different colours result in quite a few layers of thread!

When I was finished stitching, I removed the basting threads. Since I was going for an outline finish at first, I spent some time cutting the stabilizer close to the stitching but in hindsight I would have just cut it to the circle shape, as it would have added some extra support to the backing. And would've been so much simpler 😄


The main problem with finishing an oversize brooch is making it stiff enough to stand on its own and keep its shape. Although I don't have any pictures of the process, what I did was cut the top of a clean plastic salad container - the kind you get from the deli - to shape. This type of plastic is clear and somewhat flexible. I did not want a thick plastic that might get brittle, and so be more likely to break.

I cut the plastic circle about 1/4 inch smaller than the felt, to give me room for my Blanket Stitch Edging. I punched four holes in the middle of the plastic with a hole punch. Then I cut a circle of polyester quilt backing, and sewed that to the plastic, tacking through the circles. This gave me a stiff insert with batting on one side.


For the back, I cut out a matching circle of felt, and sewed two pinbacks on either side of the middle. I used two because the brooch is oversize, and I wanted some extra security. To assemble, I put the insert batting side up - to cushion to the back of the stitches - and sandwiched it between the embroidery (right side up) and the backing circle of felt. Then I sewed the edges with blanket stitch.


I'm very happy to say that that recipient is very pleased with her bag brooch! I really like that the brooch is removeable and can be pinned to anything fabric. I hope the finish holds up with wear, but only time will tell 😊


✈ Do you have a traveler in your life? Have you ever stitched something for them? 🌍

Saturday, July 28, 2018

Finish: 🐝🌸 Bee Happy Brooch 🌸🐝


Love & Roses Vintage Brooch
Free Stamped Cross Stitch Kit
with Cross Stitcher magazine (UK), March 2018


I hope everyone is having a nice Summer, despite the heatwaves everywhere! It hasn't been that warm here compared to other places, but I'm not used to the heat and it's been challenging with temperatures of 30 degrees Celsius, plus Humidexes between 35-38 every day. Needless to say, I haven't been able to do much stitching!


This is Cross Stitcher, the UK magazine, from March 2018 which my Stitchy Guru Mother bought me as a little everyday cheer-up kind of gift, which are always fun to receive! The kit is the Love and Roses Vintage Brooch:


It is a Stamped Cross-Stitch motif with flowering branches, a bee, two ribbon roses and a little saying. My favourite part was that you could choose which phrase you wanted; the kit was shown with "Mum" but I chose the "Bee Happy" to go with the bee ❤🐝

For anyone who would rather stitch it regularly, a chart is included in the magazine.


The one thing that gave me trouble was the fabric. It is supposed to be "Shabby Chic", but to me too much fraying just looks plain shabby. So I added some iron-on interfacing (off the bolt from the local quilt store, Pellon brand) to the back of the piece and it really helped immensely, especially when it came to cutting out the little saying, the Made with Love piece for the back and trimming the edges. It cut down on the fabric puckering too, so I'd really recommend doing this before stitching your own kit, or anything like it!


Of course, I did make a few changes 😄 The thread given in the kit to stitch the bee was navy blue (?!), so I substituted DMC 3371 (Black Brown) for it. I also used 3 strands of floss instead of 2, to better cover the stamped blue lines, and I even had a little left over! I added a stitch to fill in the Lazy Daisy leaves, and the little blue French Knot flowers were on the chart, although not shown on the kit cover.


Finally, I switched the two white buttons out with two from my Grandma's button tin, a pink and a yellow and I'm very pleased with how they look! She's not sure where they came from, so there's no particular story attached, but I love that they have a family connection. I also added DMC 996 to attach the pinback and for the Buttonhole Stitch along the Made with Love tag on the back (3 strands) and the front edging (6 strands).


The motif was supposed to be stitched to the backing with Running Stitch, but the Buttonhole Stitch helped pull the fabric straight and covered up the cut edges, which frayed a little even with the added interfacing. I left the guidelines for the Running Stitch visible deliberately, as that turquoise matches the text on the labels and nothing else did. If I had thought about it, I would have worked the blue French Knot flowers in turquoise, but this didn't occur to me until after I had them stitched in!


My favourite part was the Ribbon Roses! Although the lengths of ribbon given could have been longer, this is such an easy and effective stitch and something I'd love to try more of in the future! All in all this was a fun little project, once I got past the frustration of the fabric, and I really enjoyed that it included some different stitchy techniques (Stamped Cross-Stitch, Embroidery and Ribbon Embroidery).


One thing I did learn - Stamped Cross-Stitch is not nearly as easy as I'd always thought it would be! My Grandma has a lovely cushion, four little birds for each of the Seasons, that she bought at a yard sale done in the technique. The work is even and fine except for a few wonky stitches, and those "mistakes" always bothered me.

Now I know that they are the norm, not the exception, and greatly respect how well the majority of the work was stitched! A lot of vintage kits were Stamped Cross-Stitch - dresser cloths, tea towels, doilies - and I always thought I'd like to try them. But it is extremely difficult getting both legs of the cross-stitch even, and fitting groups of cross-stitches together. I greatly prefer working on counted cloth, and it made me realize afresh what a miracle Aida cloth was when it was invented 😊💟

Have you ever try Stamped Cross-Stitch, or Ribbon Embroidery, or would you like to?

Wednesday, May 18, 2016

GG SAL: Silk Lovebirds Final Finish!


I'm so happy to report that I realized my goal from April's Gifted Gorgeousness SAL and final-finished my Silk Lovebirds off into this pretty diamond ornament for the merry month of May! Although I struggled a bit with the finishing process, I am very pleased with the result :)

For the full project details, please read my last GG post here. A quick summary:

~ Pattern from Cross Stitch & Country Crafts magazine, Sept/Oct 1990
~ Worked on gifted 14 count Aida in a pretty buttercream yellow
~ Stitched with gifted overdyed silk floss, the gorgeous Airlie (#95) by Dinky Dyes
~ Stitched using the Mirror Technique for Variegated Threads

Recently, I've been experimenting with ornament making methods! One of my long-standing stitchy ambitions is to get better at final-finishing so I'm pushing myself to try new things :) My usual go-to method is using a quilt batting insert with fabric backing and corded edging, such as I did with my Blackwork Snowflake.

Although in the past I greatly preferred store-bought cording, like the navy cording I used in that tutorial, I'm hand-twisting my own lately, which is harder to attach but has the great advantage of being a perfect colour-match to the stitching!

For this ornament, I used two squares of mat board and wrapped them each with a piece of quilt batting, which I hot-glued to the back of each mat board square.

I used a beautiful dusky blue 100% cotton for the backing fabric:


Then I laced each side around a mat board form, and sewed the two halves together. Because of the padding, and the stiffness of the mat board, both sides turned out to be rather thick and it was difficult to sew them together. I ended up using a curved upholstery needle for the first ladder stitch pass, stitching about 1/4 inch in from the edge, and then did a second pass close to the edge like usual.

The first pass brought both sides together loosely while the second pass tightened the seams and brought both sides together fully, giving me a more even surface for attaching the cording. Although this was more time consuming, it worked well!

Tanja Berlin of Berlin Embroidery Designs has a great photo tutorial showing how to lace work onto mat board, and there is a close-up look at lacing small squares here.

Vonna at The Twisted Stitcher calls this style of mat board finish a basic Flat Ornament and has a few interesting variations (the Layered Flat Ornament and the super cute Layered Felt Mounted Ornament) on her popular finishing blog.

Mary Corbet of Needle N' Thread finished a goldwork embroidery ornament much the same way back in 2008 and had the same troubles with extra thickness that I did! She greatly reduced the thickness by remaking the ornament with a thinner board.

This great tutorial, with a style similar to my ornament, suggests using comic book boards instead of mat board, as it is much thinner but still stiff and of archival acid-free quality, and that's something I'm definitely going to check out :)

You can see the thickness mostly at the corners, like this:


Thankfully, the cording mostly covers it and it's not really noticeable at all once the ornament is hanging up! I do like the nice, crisp corners that mat board makes.

I also added some small squares of batting in the middle of the ornament to fill in the lacing gaps and make sure the center was flat and even:


This photo also shows the cording join at the bottom left, right above the start of the tassel. That was the single most troublesome part of the finishing, sinking the end of the cording back into the ornament and making it look as seamless as possible.

You can definitely see the join, obviously, but it was the neatest I could make it (and I redid that part over a dozen times!). Eventually, I reached that dangerous point where I needed to stop fussing with it and let it be or take it apart altogether and start over, and I am glad that I decided to stop and take a step back.

I really find that when you're working closely with little details for a while that they can overwhelm you with dissatisfaction, but if you take a break and then look at that detail in larger context, it may not be nearly as big of a problem as you thought :)

Here is a close-up of the tassel, which is my favourite part:


I love tassels! As I mentioned, I made the cording by hand, and I also made a smaller corded hanging loop and the cording loop that was the basis for the tassel. In all, I used 6 full skeins of DMC 3803 - 3 skeins for the cording, 1 skein (split evenly) for the two cording loops, and 2 skeins for the tassel. I wanted both the cording and the tassel to be extra thick, and I really like the way it turned out :)

I tied the tassel with a bit of the silk floss I had left (amazingly - and sadly LOL - this project used nearly all of the 8 meter skein of Airlie silk!) and simply wrapped it around the tassel, securing it in the back with some stitches through the wrap:


I love the rainbow effect, and the sheen of the silk against the cotton floss!


Initially, I had planned to use a metallic gold cording, and I'm really glad that I went with a simple floss instead. When I first decided on floss, I was thinking of a light buttercream yellow to match the Aida but I couldn't find an exact match.

Although the burgundy 3803 is not actually used anywhere in the stitching, it's a darker match that is close to the deepest mauve in the overdyed silk and I think it really sets off the lighter colours and subtle tone shifts in the variegated thread.

My Stitchy Guru Mother has a rule for colour-matching a sewing thread to fabric - when in doubt, go with a darker thread instead of a lighter one - and I think it applies to choosing finishing trims like cording as well :)


What is your favourite way to final-finish stitchy ornaments? I'd love to know! If you're reading this post in your e-mail, please visit the blog to leave a comment :)


Gifted Gorgeousness is a monthly SAL hosted by Jo @ Serendipitous Stitching! It is a fun and relaxed way to thank those who have given us Stitchy Gifts and show off what we've made with those generous gifts. It's never to late to come and join us!

Saturday, August 15, 2015

Free - Berlin Woolwork Rose Medallion


Based on an Historical Embroidery Design by Sarah Bland

Download the FREE .PDF Pattern from my Dropbox: Rose Medallion

Please Note: You may see a screen asking you to create a Dropbox account, but you do NOT need to create an account to view and save the file; just click the grey "x" at the right top corner of the screen to go to the file. If you have any problems downloading, please let me know - my e-mail is in my sidebar :)

This lovely little rose is actually an old project from 2013! On one hand it's hard to believe that it's been so long since I made it, and on the other hand it's something I treasure so much that it sort of feels like it's been a part of my life forever ;)

It all started when I was searching through the wonderful online collections of the Victoria & Albert Museum (V&A), and came across this Berlin Woolwork pattern that is part of a larger personal project album designed by Sarah Bland (1810-1905):


Image used for non-commercial purposes © Victoria & Albert Museum, London

Isn't it amazing that a design drawn over 100 years ago still looks so vibrant today?!

I was very taken with the rose filling motif, and recharted my own version:


This was actually the first piece of Berlin Woolwork that I've recharted and stitched; the second was the Key and Ribbon I shared last year as part of the Stitch From Stash (SFS) Challenge - it's tiny because it's stitched over 1 on 28 count Evenweave:


As a matter of fact, I actually chose most of the colours for the Key from this project!

I wanted to keep the feel of the original octagonal medallion, and although at first I considered keeping the orange, yellow and turquoise at the corners, I eventually decided to add gold corners in the style of Victorian photo-albums as a frame:


Before Background Fill / After Background Fill

And then I filled in the background with solid white, which finally gave the rose the proper needlework look! Berlin Woolwork was worked with brightly coloured wools that contrasted so strongly we would consider them clashing on needlework canvas, and so the backgrounds were almost always fully stitched with patterns or solids.

So leaving the Aida cloth (14 count white, all cross-stitch with three strands of floss) unstitched made the work look unfinished. With that in mind, I also added a row of white outside the frame, so it would be filled edge-to-edge.

While I was stitching this project, I took lots of photos intending to make a step-by-step tutorial - unfortunately, most of them did not turn out, which is why I decided not to post about it. It wasn't until recently when I was talking to Karen about fine crochet and final-finishing that I remembered how much I loved this rose :)

But after some digging, I was able to find some photos of the process to share!

I made a basic Padded Ornament, just like I did in my Blackwork Snowflake Tutorial:


It was a total accident that I left my opening at the side instead of the top!

But I did something entirely different for the edging, and crocheted into the Aida blocks! I used size 10 South Maid crochet cotton in White and a 1.00 mm (size 10) hook. I worked a row of single crochet all around as a base and then added simple Shell Stitches for the trim and a little hanging loop at the top:


It was fun to work, and was the perfect finishing touch for the rose :) I backed the ornament with a scrap of the beautiful gold velveteen I used in my Floral Heart.


And that's it!! Out of all the many projects that I've made over the years, this sweet simple rose is one of my very favourites, and ever since I finished it, it's been hanging in my living room on a little brass picture frame hook and cheering me up everyday :)

If you stitch up a Berlin Woolwork Rose Medallion of your own, I'd love to see it!

Thanks very much to Karen, for her interest in this project, without which this post would very likely never have been written ;)