Showing posts with label Fine Crochet. Show all posts

Wednesday, October 28, 2015

Happy Hallowe'en - Black Magic Doily!


Black Magic Doily

My special Hallowe'en Variation of the free vintage Hortensia Doily

NOTE: Unfortunately, the site where I found this pattern has been hacked, so I've decided not to post the link in case it is infected. If you'd like the pattern chart, please e-mail me - my address is in the sidebar, under the pretty postage stamps :)

This is the original pattern:


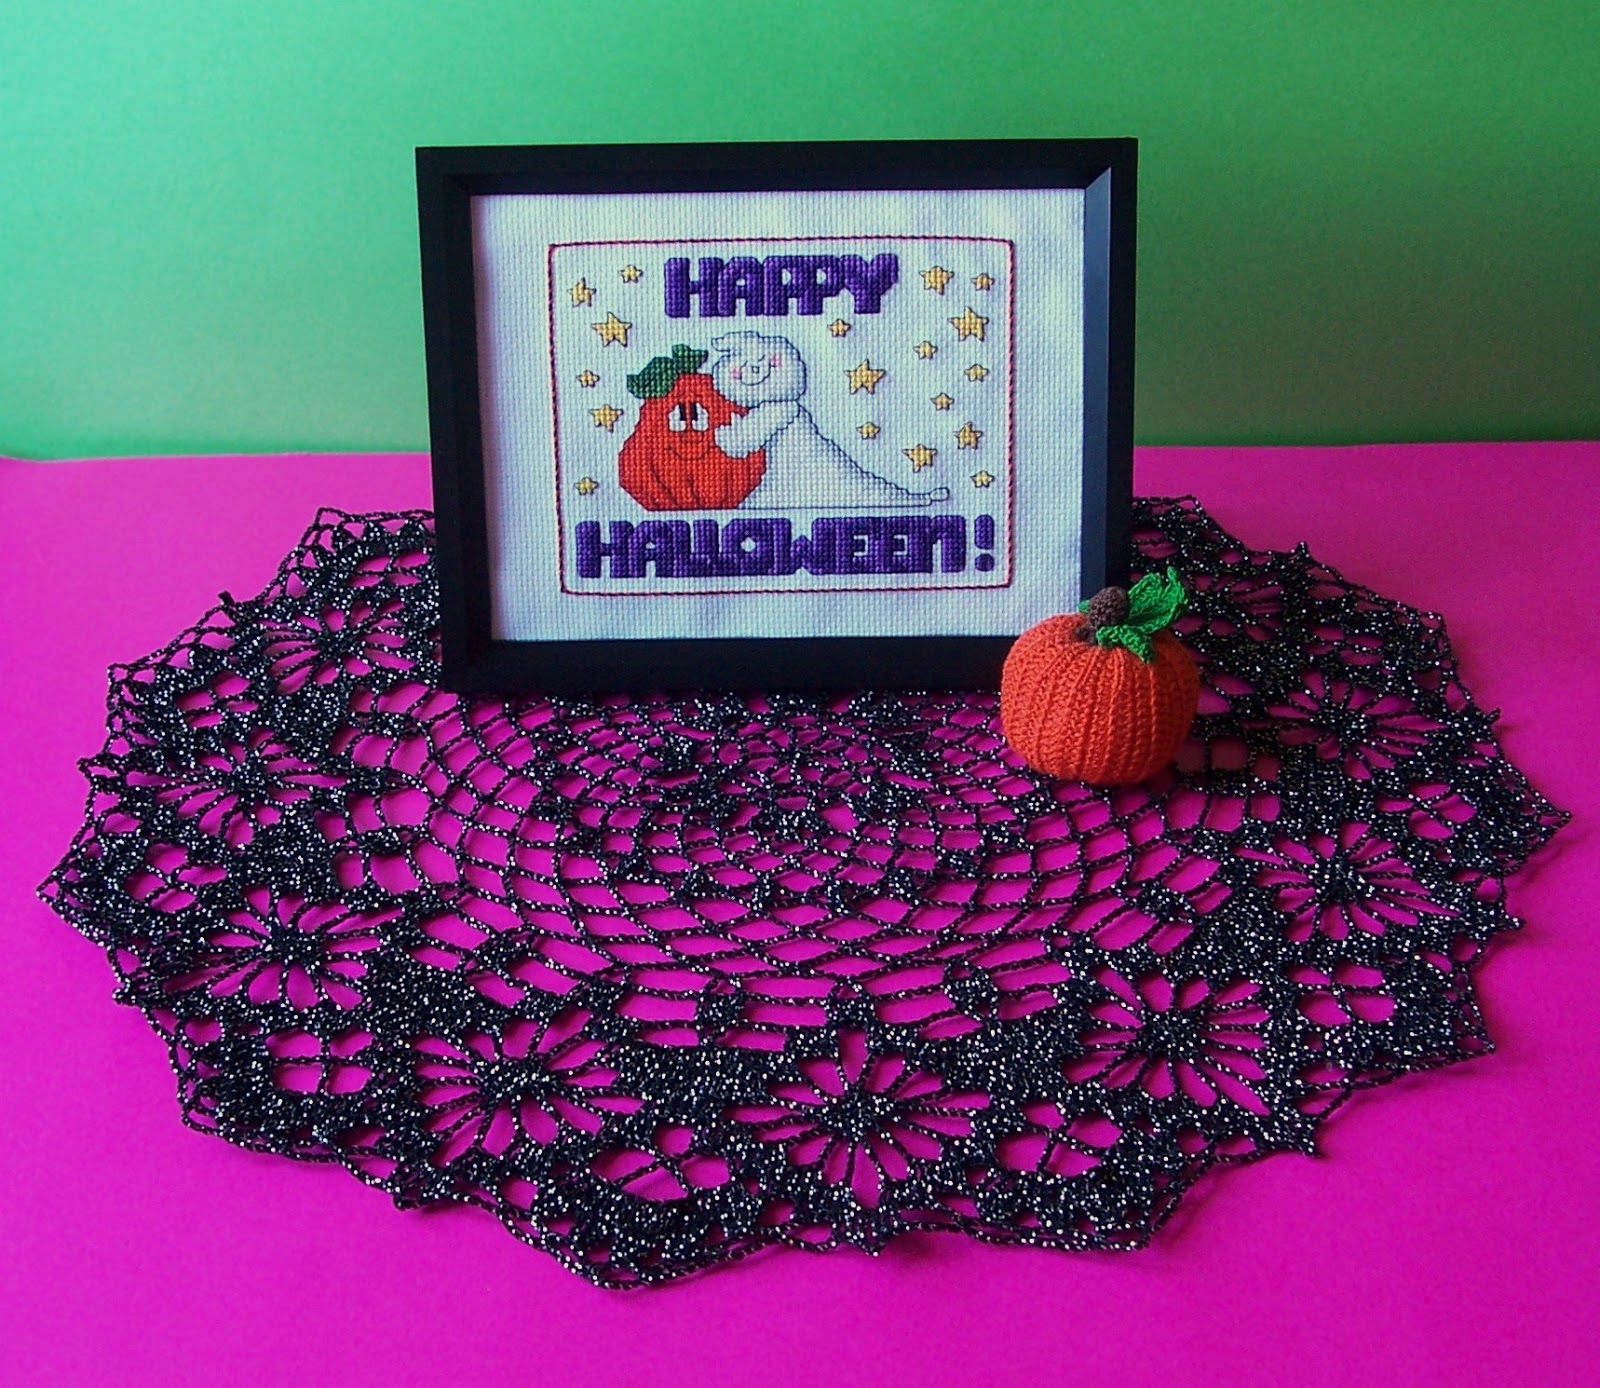
So, you might remember that around this time last year I finished and framed my very first Hallowe'en stitchery, Happy Hallowe'en Friends?


Well, I've been doing some more fine (thread) crochet lately, and I decided that the cute Ghost and Pumpkin looked a little lonely - so I made a spooky doily to keep them company :) Thanks to The Great Thrifty Karma Gods, I had a cool ball of black with silver metallic (size 10), and I ended up using nearly every bit of it. For the last few rounds, I was holding my breath and chanting "please let me make it" in my head over and over - and thankfully I did, with a scant few inches to spare LOL!

Here's a close-up of the little clusters in the center:


When I first thought about making a doily for Hallowe'en, the first thing that jumped to mind - naturally - was a spider's web! I've learned over the last few years that there are many different styles of crocheted lace, and I tend to like the chunkier Cluny and Irish styles. There are also a lot of fragile, spidery type doilies that are usually known as Cobweb Lace, but I wanted something more substantial.

Which was when I remembered a vintage motif I'd seen before. I thought it was - confusingly - called Cobweb Lace too, which it is; it's also known as Spiderweb Lace.


They key to this pattern style is the little square with the "spider" at the center, surrounded by lines of chain stitch "webs" :) It was often used in Edgings, and in combination with bunches of the pretty popular Pineapple motif for larger cloths.


The only change I made to the chart was to adjust the cluster groups between the "Spiderwebs"; the original called for 6 Clusters, but I downsized to 5 to save on thread. Serendipitously, this resulted in that neat pointed tip after I blocked the doily, rather than the loopy scallop of the original. It looks much more web-like this way, and I'm really happy with how the doily turned out :)


Amazingly, it's actually even sparklier in person! Unfortunately, the thrifted thread I used didn't have a label and I wasn't able to identify the brand. I've never seen that combination before, and the silver metallic is thicker than the more common white with silver that I've worked with before.


I also dug out the little Pumpkin Pincushion I crocheted back in 2013! Shortly after I wrote about it, I removed the pins and stored it away, not really sure what to do with it. I actually like it better this way, just as a display decoration. It's an Everlasting Pumpkin! I used to love real pumpkins, but I've never liked eating the seeds or pulp and it was such a waste to throw them away every year.

So here's my little Hallowe'en trio, spookily sweet and happily hanging out together:


I am a huge fan of Cute Hallowe'en, which seems to be getting rarer in the face of the much more common Horrific take on things. I love the treats, not the tricks LOL ;)

However you choose to celebrate All Hallows Eve, Happy Haunting!


Be Safe and Have Fun :)

Saturday, August 15, 2015

Free - Berlin Woolwork Rose Medallion


Based on an Historical Embroidery Design by Sarah Bland

Download the FREE .PDF Pattern from my Dropbox: Rose Medallion

Please Note: You may see a screen asking you to create a Dropbox account, but you do NOT need to create an account to view and save the file; just click the grey "x" at the right top corner of the screen to go to the file. If you have any problems downloading, please let me know - my e-mail is in my sidebar :)

This lovely little rose is actually an old project from 2013! On one hand it's hard to believe that it's been so long since I made it, and on the other hand it's something I treasure so much that it sort of feels like it's been a part of my life forever ;)

It all started when I was searching through the wonderful online collections of the Victoria & Albert Museum (V&A), and came across this Berlin Woolwork pattern that is part of a larger personal project album designed by Sarah Bland (1810-1905):


Image used for non-commercial purposes © Victoria & Albert Museum, London

Isn't it amazing that a design drawn over 100 years ago still looks so vibrant today?!

I was very taken with the rose filling motif, and recharted my own version:


This was actually the first piece of Berlin Woolwork that I've recharted and stitched; the second was the Key and Ribbon I shared last year as part of the Stitch From Stash (SFS) Challenge - it's tiny because it's stitched over 1 on 28 count Evenweave:


As a matter of fact, I actually chose most of the colours for the Key from this project!

I wanted to keep the feel of the original octagonal medallion, and although at first I considered keeping the orange, yellow and turquoise at the corners, I eventually decided to add gold corners in the style of Victorian photo-albums as a frame:


Before Background Fill / After Background Fill

And then I filled in the background with solid white, which finally gave the rose the proper needlework look! Berlin Woolwork was worked with brightly coloured wools that contrasted so strongly we would consider them clashing on needlework canvas, and so the backgrounds were almost always fully stitched with patterns or solids.

So leaving the Aida cloth (14 count white, all cross-stitch with three strands of floss) unstitched made the work look unfinished. With that in mind, I also added a row of white outside the frame, so it would be filled edge-to-edge.

While I was stitching this project, I took lots of photos intending to make a step-by-step tutorial - unfortunately, most of them did not turn out, which is why I decided not to post about it. It wasn't until recently when I was talking to Karen about fine crochet and final-finishing that I remembered how much I loved this rose :)

But after some digging, I was able to find some photos of the process to share!

I made a basic Padded Ornament, just like I did in my Blackwork Snowflake Tutorial:


It was a total accident that I left my opening at the side instead of the top!

But I did something entirely different for the edging, and crocheted into the Aida blocks! I used size 10 South Maid crochet cotton in White and a 1.00 mm (size 10) hook. I worked a row of single crochet all around as a base and then added simple Shell Stitches for the trim and a little hanging loop at the top:


It was fun to work, and was the perfect finishing touch for the rose :) I backed the ornament with a scrap of the beautiful gold velveteen I used in my Floral Heart.


And that's it!! Out of all the many projects that I've made over the years, this sweet simple rose is one of my very favourites, and ever since I finished it, it's been hanging in my living room on a little brass picture frame hook and cheering me up everyday :)

If you stitch up a Berlin Woolwork Rose Medallion of your own, I'd love to see it!

Thanks very much to Karen, for her interest in this project, without which this post would very likely never have been written ;)

Saturday, July 26, 2014

SFS #7 + A FC Forget-Me-Not Bouquet!


Wowzers, it's so unusually hot here this summer and I'm really feeling the heat! Don't get me wrong - I'm not complaining; I know a lot of people are loving this heatwave. But I usually stitch with everything spread out across my lap and piled up on every nearby available surface, so it's just been too much to manage for me. Thankfully, fine crochet has come to my rescue; it just needs a hook and some thread :)

Thanks to the wonderful comments on my last post about the Vintage Needle Arts Sampler, I have decided to make my own littler sampler of samples :) But instead of planning everything out right away I'm going to start making some things and hope they all come together at the end! This will be a great chance to use some of my most Special Stash, and to try some new techniques ;) Like this pretty fine crochet posy:


It's my own Variation on this lovely FREE Violets Pin by Maggie Petsch for Kreinik:


The original uses strands of the super sparkly Kreinik Blending Filament crocheted together with the cotton, which is an interesting idea and would be great for special occasions. It's a very adaptable pattern and is fairly easy to stitch, the tricky part was figuring out the assembly! It's also a little large for a brooch but cute as an ornament:


I really love the backing doily, the little loops were fun to do and add a lot of detail :) To make the Violets into Forget-Me-Nots, I just made the first round yellow and used a Magic Circle so the stitches would pull more tightly together. The Violets had four small petals and one large, so I made all five of mine the same size. I also shortened the stems a little so they wouldn't trail over the bottom edge, and added the little white crocheted bow in place of the ribbon, which took some finangling LOL!

The biggest change I made is actually one you can't really see. The flowers and stems were supposed to be stitched directly to the middle of the doily, but all the tacking and darning stitches from the coloured threads would show up on the white back. Since this will be an applique of sorts, the back won't be seen, but I wanted to see if the pattern would work as an ornament too. So I made a false front simply by repeating the first three rounds of the doily and stitched everything to that!

And as I was joining the two pieces, I noticed that the false front and doily back formed a little pocket, so I added a bit of fibrefill stuffing and the posy just came to life! All the flowers mounded up like a real bouquet, the stems flared out and the ribbon bow stood out more! You can see the effect more on the back here:


And from the side you can see how the flowers (I made seven in all) layer together:


I'm so pleased with how this turned out! I think it's a wonderful start to the Sampler of Samples (I really have to come up with a better name, but we'll call it that for now LOL). And it can easily be changed to other flowers; add a sixth petal and work them in pink and you have Cosmos, with white you'd have Daisies.


Forget-Me-Nots are a humble little flower and often overlooked, but I have always loved them for their cheerful look and the wonderful sentiment. They also seem to me to be very determined; we've been very fortunate to have a few growing wild on the lawn every year, and I've even seen them pop up in sidewalk cracks :)

My SFS Total for Month #7, July:

I'm happy to report that for only the second time ever (the first being March) my total is $0.00! That leaves the Monthly Budget of $25 free, adding up to the grand sum of $97.03 in my Bank. I'm hopeful that I'll hit the $100 saved mark next month, which will be encouraging to see even though it's all imaginary money LOL!

Wonderful News: Mel, the Host of Stitch From Stash (SFS), has just had her blog Epic Stitching chosen for a magazine feature and she's having a Great Giveaway for her Followers to celebrate!!! Congratulations Mel - well deserved :) (Disclosure - sharing the news does give me an extra entry, but I'd share the news anyway!)

UPDATE: The Giveaway has now been drawn :) Congratulations to the Winners!

Saturday, October 19, 2013

Fine Crochet: A Pumpkin Pincushion!


Hello, hello! Surprisingly, I spent my Thanksgiving weekend not on stitching, but on hooking up this cute little pumpkin :) This is my first attempt at "amigurumi", which is the very popular craft of crocheting or knitting stuffed toys. Most "ami" patterns are worked in regular yarn, but I recently thrifted this lovely orange crochet thread that was just perfect for a pumpkin! And so a pumpkin I did make :)

While searching online for patterns, I stumbled across Planet June, the wonderful site of amigurumi artist and author June Gilbank, who offers lots of tutorials and free patterns! I knew I was in the right place when I saw her amazing Discworld, inspired by one of my all-time favourite authors, Sir Terry Pratchett :) This is her Pumpkin:


And here is mine, without the pins:


For the pumpkin, I doubled the recommended stitches in the free pattern, and did the same for all but the very bottom of the stem where I made a few changes. The vines and the leaf are my own design :) I took some pictures as I went along, and I thought I'd share them for anyone else interested in the process! So this isn't a real tutorial but more of an inspiration for anyone else who would like to try making one:

Fine (Thread) Crochet "Pumpkin" Variation
From Free Pattern - "Pumpkin" - by June Gilbank of PlanetJune

Materials:
~ Crochet Thread #10 in Orange, Brown, and Green
~ Size 7 (1.50 mm) fine crochet hook
~ Polyester Fiberfill for stuffing
~ Darning Needle
~ Scissors

Pattern Adjustments:
June's pattern is very clear and easy to follow, and contains an explanation of all the US stitch terms at the start :) For the pumpkin, I just doubled all the given amounts and also doubled the size of the stitches. So I started with a chain of 32 (16 x 2), and substituted HDC for the SC and DC for the HDC. So on Row 1 which reads like this:

" sc in 2nd ch from hook, sc in next 2 ch, hdc in next 9 ch, sc in last 3 ch (15 st)"

I made the stitches double-high and also doubled the number of them, like this:

HDC in 2nd ch fr hook, HDC in next 5 ch, DC in next 18 ch, HDC in last 6 ch (30 st)

And so on for the rest of the rows until the end. I wrote these replacements right above the original ones on my printout of the pattern, so I wouldn't forget :)

The stitches are ribbed, meaning that they're worked in the back loops only, which gives it the lovely raised ridges! When you reach the end, you have a rectangle:


Which you then fold over and crochet up to close, which makes an open-ended tube:


For joining up the tube, the pattern recommends to "Sl st through both layers (Row 26 and the starting chain)". I found that this looked a little flat, so I only slip stitched through the back loops on Row 26 and the front loops of the starting chain to close.

Then it was time to draw the bottom of the tube together and stuff it!


I used WAY more polyfill then I thought I would need! It's got to be packed in firmly to round out nicely, otherwise you don't get that pumpkin shape :) Once I closed up the top, I followed June's instructions for shaping, just enough to get an indent at the top and bottom. Admittedly, at this point, it looks more like an orange!


And then it was time for the stem! This is worked in a spiral fashion (which was new to me!), and so you don't join the rounds. I did NOT double the stitch height here, but I doubled the stitch amount again. When I reached Round 6 (the base), I did 1 sc, a ch 3 picot and 1 sc in each of the five stitches around. This gave me sharper points.


I also poked a small bit of stuffing up inside the main part of the stem and then shaped the bottom of the stem slightly so that it tapered realistically:


When I was working with the stem, especially as I was shaping it, I kept thinking that I had stitched a tiny chocolate octopus who was missing three legs LOL!

This in the end of the PlanetJune pattern. I could have left my pumpkin here, but it was looking a little plain ;) June includes suggestions for turning it into a spooky Jack O' Lantern with felt features or a Cute (Kawaii) Pumpkin with eyes and a smile.

But I wanted a realistic looking pumpkin, so I decided to add some vines and a leaf :)


The vines came to me easily, I got them to look how I wanted on the first try. But the leaf, oh the leaf! It took me so many tries, and I honestly don't know what I did last going off, but it looked as good as it was going to get so I stopped fussing LOL :)

I joined the leaf and the vines to the pumpkin with the thread tails left on each one, darning through the bottom edge only so that all three are still moveable. I was going to fix them down, but decided I liked the look, especially the way the leaf curls up ;)


And that's it :) My pumpkin worked up in an afternoon, and I had a lot of fun making it! I stuck some sewing pins in for the photos but it will probably end up holding some of the darning needles I use for crochet work. Or it may end up holding nothing at all and just looking pretty, since it looks very cheerful as an Autumnal decoration too!


This is the first time I've shown crochet here at ES, and this is *not* the introductory post to my Fine Crochet work I've long been promising. That's still in the works, but I couldn't resist sharing my first amigurumi today :) What do you think?!

Sunday, August 18, 2013

Site Update: Free Patterns & Resources

Just a really quick post to let you know that I've re-designed my Free Patterns page to include Embroidery and Fine Crochet and have expanded the Resources section to include all three crafts too! I really apologize for the delay in updating these pages - I didn't notice until just last week that the pattern links were mostly out of date!

I really don't want to have this happen again, so I've also added the date of the latest link addition and the date of the last link check to both pages so you can be sure that the information is current :) I'm hoping to add to both lists as I find new sites!

If you have any links for either section that you'd like to share, feel free to post them in the comments or send me an e-mail (my address is in the sidebar, under the pretty postage stamps). Hopefully you'll find something new and interesting to read ;)

P.S. If I've messed up any of the links or otherwise goofed, please let me know!