Showing posts with label Sewing Notions. Show all posts

Wednesday, November 7, 2018

Meet Annabelle, my Autumn Songbird!


Annabelle, the Autumn Songbird
Adapted from a Free Vintage Transfer (Vogart)
Tester for the Blue Washable Marker and Lazy Daisy Stitches

I have been in love with the vintage embroidery pattern that inspired this beautiful bird - whose name was chosen because Annabelle is Gaelic for "Joy" - for YEARs now:


Three Birds in a Tree
# 10007 / Animals & Insects / Vogart at Needlecrafter.com

Although it doesn't appear to have been updated since 2016, Needlecrafter is one of the best sites online to find free vintage embroidery transfers, and it is home to the pattern that I used for my first-ever embroidery, Bluebirds of Happiness.

I wanted a tester to try the Blue Washable Pen I recently used for Sammy the Squirrel. I was interested to see if having the full Lazy Daisy outline marked would help make my stitches rounder. When I'm using a permanent transfer method - lead pencil, fine-tipped Sharpie marker or iron-on pencil - I usually only put dots in place of the bottom and top tips on each petal.

This is because I find it difficult to make my stitches perfectly match the lovely even teardrops of the pattern designs. But when you have a lot of Lazy Daisy stitches close together, all those dots can be a little confusing, especially since I usually have French Knot dots marked in the middle of the flowers too. It's like playing Connect the Dots - and sometimes it's frustrating to figure out where everything goes 😂

Please click the image to enlarge and save at full resolution

So I decided to focus only on one bird; this is my variation! I made some changes: altering the branch, adding another tail feather, changing the beak and adding extra French Knots and scattered Detached (Single) Lazy Daisies in the body for some extra colour. I also added another leg, because only one didn't look quite right!

You may notice the colours look a little familiar. That's because I loved the colour palette from my Lolli & Grace Autumn Leaf SAL so much that I just had to use it again! I made some minor substitutions in the original colourway and I kept those for this project. If you'd like to stitch your own Autumn Songbird, here is the Colour & Stitch Key:

Please click the image to enlarge and save at full resolution

The Blue Washable Marker (mine is the Unique Brand, from Walmart, that I used for Sammy the Squirrel) worked like magic again! A quick dip in a plastic container of cold water and Abracadabra! Shazam! Bibbety-bobbity-boo!!! A beautiful, joyful Songbird!


One teeny tiny minor quibble: my fabric choice was not the best. I have seen this pretty and unusual mustard yellow colour everywhere this Autumn, and when I found some fabric on the bargain wall, the same type of linen I used for The Joyful Jester, I was thrilled! That project was felt applique, so I've never actually embroidered on this fabric before. The loose weave means that it's easy to overstretch, and although I tried very hard not to do so, I distorted the fabric. Significantly.

I was SO proud of my Satin Stitch in this project, especially the Tail Feathers:


Smooth, right? This was the first layer I intended to use as padding but it worked out so well that I kept it to the single layer. The leaves were Satin Stitched inside as well. Out of the hoop, unfortunately, that fabric distortion means that all my painstakingly-stitched Satin Stitch went wavy and wonky 🙄 So it has to be stretched in a hoop or a frame.

Lesson learned!


Thankfully, my other major achievement - the Bullion Knot feet - emerged relatively unscathed 😊 Those teeny tiny toes are so cute!


Verdict: The Blue Washable Marker wins again! I'm so impressed with this embroidery transfer method. It really did help take the guess work out of my Lazy Daisies, although again the linen was not a good fabric choice. The nubby texture means that it was harder to mark the fabric and I had to go over most of the lines twice. Also, because I couldn't mark smoothly on the textured surface, I couldn't really get the teardrop shape of the Lazy Daisy stitches and they ended up more like straight lines LOL!

I really love the flexibility this marker gives you - you can change elements, as I did with this project when I reshaped the beak, you can add or omit parts of the pattern. Not having to stick to the pattern lines gives you so much stitching freedom!

And my Lazy Daisy stitches do look a little rounder than normal, which is a definite plus since mine usually turn out kind of skinny. In all likelihood, this had nothing at all to do with the marker and just happened because I was paying extra attention to them, but I'll take all the help I can get 😄

I'm so pleased with how Annabelle turned out, and I think she's lovely. A little songbird to sing a happy, joyful tune on these golden late Autumn afternoons while the leaves fall, reminding us that Spring will come again once Winter has its turn 🍂🕊🍁

Monday, October 29, 2018

Pilot FriXion Tester: Vintage Pumpkin


Vintage Pumpkin
Test Piece for Pilot FriXion Pen Transfer Method

Following my success with using a blue Washable Marker to transfer an embroidery pattern, I decided to work up a small tester with another very popular transfer method I've never tried: The Pilot FriXion Pen!


The FriXion pens are not meant for use on fabric. They are ink pens that come with an eraser on the bottom end (and wow, do I ever wish these had been out when I was writing exams in school!). They are very popular among quilters but are controversial in the embroidery community. Mary Corbet of Needle N' Thread very succinctly sums up her reasons for not using these pens to transfer embroidery patterns.

Namely, the ink does not really disappear. It can leave "ghost lines" that usually re-emerge if the embroidery gets cold, which is something to keep in mind if you are sending your work through the mail. So this is not a flexible transfer method like the Washable Marker - you have to intend to cover most of your lines.


Last year, a good friend sent me a black Pilot FriXion pen to try. They come in several different types and sizes. Mine is the extra fine 0.7 ballpoint, and I love the way it writes! The line is clear but thin, and the ballpoint glides over the fabric. Like the Washable Pen, you need to be able to see through your fabric to trace your transfer.

Most articles on using FriXion pen for embroidery transfers say that you need to iron the ink out. Since I usually iron embroidery from the back (placing the front on a thick fluffy towel so the stitches aren't squashed), I was a little nervous about ironing on the front. Then, a few weeks ago on Instagram, a stitcher said she used a hair dryer. Genius!


So that's what I tried, and it worked a treat! I'm afraid there are no good Before-and-After shots, because I did stick very close to the pattern. A few little bits around the curly vines were all I had to go by, but one blast of heat and they vanished. Obviously, this is something I will have to experiment with a bit more, but I am optimistic that these pens would be a good method for quick, casual patterns.

I really like that the line is easily visible but that you do not need to wash the finished embroidery. And although the FriXion pens do not give you the flexibility of Washable Markers, they do give you a tiny bit of wiggle room versus a lead pencil (my usual method). You need to be sure of your design and stick close to the drawn lines but if you do have an "oops!" moment, you can blast it away with heat.

I am looking for a transfer method that gives fine, non-smudging, easily visible lines that are thin enough to be covered by outline stitches, and this pen seems fits that bill!


Project Details

◾ Vintage Pumpkin from online freebie, unfortunately no longer available
◾ 4" wooden embroidery hoop
◾ 100% quilting cotton, Ecru
◾ DMC Floss:
Pumpkin: 900 (Dark Burnt Orange), 6 strands, Stem Stitch
Leaves: 986 (Very Dark Forest Green), 4 strands, Split Stitch Outline, and Backstitched Veins
Curly Vines: 988 (Medium Forest Green), 2 strands, Stem Stitch


All in all, I'm very happy with how my little Pumpkin turned out! I'm having fun right now stitching up these little transfer method testers, and the next is a pretty little bird that will try out the Washable Marker on Lazy Daisy stitches 🌼


Have you used a Pilot FriXion pen to write on fabric? How did you find it?

Wednesday, October 24, 2018

Meet Sammy, the Vintage Squirrel 🐿


Sammy the Vintage Squirrel
from Vintage Embroidery Transfer
(from an online freebie that is no longer available)

This fun little squirrel was my first experience using a Washable Marker to transfer an embroidery pattern! My pen is the Unique brand, and I bought it at Walmart for less than $5 CA. DMC makes a popular one as well.


The blue is nice and bright and easy to see! It has a felt-pen like tip which gives a pretty thin line. Unfortunately, it doesn't really write like a pen. I found it more effective to use quick, short strokes - much like using a pencil or pen to transfer.


These types of Washable Markers are very popular for embroidery transfers because you don't have to worry if your lines don't quite match your stitching, which also gives you some flexibility. If you want to omit or change the shape of an element you can! This would be incredibly helpful with stitches like the Lazy Daisy. There's a great article by Cheryl Fall about using washable pens for embroidery transfers at Spruce Crafts.

For cross-stitchers, these have some use too. I have recently seen someone on Instagram (@moiraestitches; see her #StageCoachInTheWoods for progress) use one of these markers on Aida, to outline a monotone (single colour) pattern for easy stitching. I think this is a fantastic idea, and saves you from having to constantly consult a chart for simple designs or for large blocks of colour in more complex designs. You could also use them to mark the center of a design or to help mark borders for accuracy!

I followed the lines pretty closely, but I still had a tiny bit of blue showing:


Here's a close-up - the red arrows point to visible marker lines:


I have to admit that I was nervous to wash Sammy, especially with the black and white eye! But a quick dip in cold tap water (I used a sandwich container) and it was like magic: when the marker lines hit the water, they vanished! No scrubbing at all!


Presto, changeo! Abracadabra! Ta-DA! I'm totally impressed, and can't wait to try this marker again 😊

Project Details:
◾ Fabric is 100% quilting Cotton, light beige
◾ 4" vintage wooden hoop
◾ DMC Floss: 919 (Fur), 3833 (Ears), 310 (Nose and Eye), 001 (Eye highlight), 780 (Acorn) and 938 (Acorn Cap)

I used 3 strands of floss for most of the stitching. I used 2 strands of white for the teeth, and also for the white Eye Highlight, with 1 strand of black for Split Stitch to define the outside of the Eye. First, I tried stitching the Eye with all black and adding the highlight with a French Knot, but I didn't like the way the Knot stood out. So I took it back and made a tiny circle with Satin Stitch for the highlight, with a Fly Stitch border:


I like it a lot better! The other place I struggled was Sammy's tail. I wanted a floofy, fluffy, floomphy tail, and I considered using Turkey Stitch first. I worked some samples in the top left corner of the cloth. After a LOT of hemming and hawing, I eventually settled on doing the outside lines on the tail with 6 strands, using Stem Stitch:


It wasn't as fluffy as I wanted but it gave me a nice bit of extra lift:


Ultimately, I think a Turkey Work tail would have overwhelmed her. This was a super fun stitch and a successful experiment in transferring using a Washable Marker! I'm hoping to do another little tester using the Pilot Frixion Pen transfer method soon 👩‍🔬


🍁🍂 Sammy the Squirrel says Happy Autumn! 🍂🍁

Saturday, October 19, 2013

Fine Crochet: A Pumpkin Pincushion!


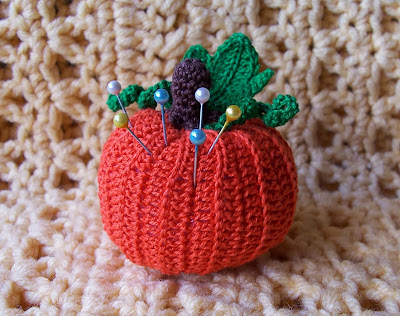
Hello, hello! Surprisingly, I spent my Thanksgiving weekend not on stitching, but on hooking up this cute little pumpkin :) This is my first attempt at "amigurumi", which is the very popular craft of crocheting or knitting stuffed toys. Most "ami" patterns are worked in regular yarn, but I recently thrifted this lovely orange crochet thread that was just perfect for a pumpkin! And so a pumpkin I did make :)

While searching online for patterns, I stumbled across Planet June, the wonderful site of amigurumi artist and author June Gilbank, who offers lots of tutorials and free patterns! I knew I was in the right place when I saw her amazing Discworld, inspired by one of my all-time favourite authors, Sir Terry Pratchett :) This is her Pumpkin:


And here is mine, without the pins:


For the pumpkin, I doubled the recommended stitches in the free pattern, and did the same for all but the very bottom of the stem where I made a few changes. The vines and the leaf are my own design :) I took some pictures as I went along, and I thought I'd share them for anyone else interested in the process! So this isn't a real tutorial but more of an inspiration for anyone else who would like to try making one:

Fine (Thread) Crochet "Pumpkin" Variation
From Free Pattern - "Pumpkin" - by June Gilbank of PlanetJune

Materials:
~ Crochet Thread #10 in Orange, Brown, and Green
~ Size 7 (1.50 mm) fine crochet hook
~ Polyester Fiberfill for stuffing
~ Darning Needle
~ Scissors

Pattern Adjustments:
June's pattern is very clear and easy to follow, and contains an explanation of all the US stitch terms at the start :) For the pumpkin, I just doubled all the given amounts and also doubled the size of the stitches. So I started with a chain of 32 (16 x 2), and substituted HDC for the SC and DC for the HDC. So on Row 1 which reads like this:

" sc in 2nd ch from hook, sc in next 2 ch, hdc in next 9 ch, sc in last 3 ch (15 st)"

I made the stitches double-high and also doubled the number of them, like this:

HDC in 2nd ch fr hook, HDC in next 5 ch, DC in next 18 ch, HDC in last 6 ch (30 st)

And so on for the rest of the rows until the end. I wrote these replacements right above the original ones on my printout of the pattern, so I wouldn't forget :)

The stitches are ribbed, meaning that they're worked in the back loops only, which gives it the lovely raised ridges! When you reach the end, you have a rectangle:


Which you then fold over and crochet up to close, which makes an open-ended tube:


For joining up the tube, the pattern recommends to "Sl st through both layers (Row 26 and the starting chain)". I found that this looked a little flat, so I only slip stitched through the back loops on Row 26 and the front loops of the starting chain to close.

Then it was time to draw the bottom of the tube together and stuff it!


I used WAY more polyfill then I thought I would need! It's got to be packed in firmly to round out nicely, otherwise you don't get that pumpkin shape :) Once I closed up the top, I followed June's instructions for shaping, just enough to get an indent at the top and bottom. Admittedly, at this point, it looks more like an orange!


And then it was time for the stem! This is worked in a spiral fashion (which was new to me!), and so you don't join the rounds. I did NOT double the stitch height here, but I doubled the stitch amount again. When I reached Round 6 (the base), I did 1 sc, a ch 3 picot and 1 sc in each of the five stitches around. This gave me sharper points.


I also poked a small bit of stuffing up inside the main part of the stem and then shaped the bottom of the stem slightly so that it tapered realistically:


When I was working with the stem, especially as I was shaping it, I kept thinking that I had stitched a tiny chocolate octopus who was missing three legs LOL!

This in the end of the PlanetJune pattern. I could have left my pumpkin here, but it was looking a little plain ;) June includes suggestions for turning it into a spooky Jack O' Lantern with felt features or a Cute (Kawaii) Pumpkin with eyes and a smile.

But I wanted a realistic looking pumpkin, so I decided to add some vines and a leaf :)


The vines came to me easily, I got them to look how I wanted on the first try. But the leaf, oh the leaf! It took me so many tries, and I honestly don't know what I did last going off, but it looked as good as it was going to get so I stopped fussing LOL :)

I joined the leaf and the vines to the pumpkin with the thread tails left on each one, darning through the bottom edge only so that all three are still moveable. I was going to fix them down, but decided I liked the look, especially the way the leaf curls up ;)


And that's it :) My pumpkin worked up in an afternoon, and I had a lot of fun making it! I stuck some sewing pins in for the photos but it will probably end up holding some of the darning needles I use for crochet work. Or it may end up holding nothing at all and just looking pretty, since it looks very cheerful as an Autumnal decoration too!


This is the first time I've shown crochet here at ES, and this is *not* the introductory post to my Fine Crochet work I've long been promising. That's still in the works, but I couldn't resist sharing my first amigurumi today :) What do you think?!

Saturday, August 6, 2011

A Most Miraculous Thimble!


I have a stitchy confession to make: I simply must wear a thimble while stitching :)

It's very funny to find myself saying this now, as when I first started cross-stitching, many many moons ago, I actively resisted the thimble. And the hoop! I wanted to work in hand, and I wanted to work with nothing on my hands. But that didn't last too long after my very first project. I think I was ten or twelve when I did my first stitchery, and the truth is that hands that small (even though mine have always been on the large side, lol) are easily frustrated by simple things like trying to grip a hoop. It takes a ton of practice, but once you get the hang of it, you never go back!

My Stitchy Guru Mother, who taught me to cross-stitch, is of the opinion that the thimble is a necessary tool for any stitcher, and therefore one must spend the time and energy required to get used to the thimble from the very beginning - in other words, you should wear a thimble, whether you want to or not, right from the very start. Before it's too late, and you've worked so long without one that you just cannot make yourself get used to wearing one. And she was right (naturally, lol). Although it feels so alien and weird  to have this thing on your middle finger while you're stitching, if you make an effort to wear it, it eventually starts to feel natural. I'm so comfortable with mine these days that I sometimes forget to take it off!

But that was not always the case. Unfortunately, I have a bad reaction to the base metals used to make regular thimbles. I'm one of those people who can't wear base metal jewellery, because it turns my skin green. Greenish-black, actually. Believe me, this was a most terrible disappointment when I was younger and mood rings came back in fashion :) And so, metal thimbles became the bane of my existence, a necessary evil to put up with. When I was doing the occasional project, I didn't mind too much - I'd get a green finger, sure, but it would fade a few days after I'd finished the stitching. However, when I started working larger pieces, it didn't fade at all.

Nope. In fact, the green turned black, and only got blacker the longer I worked! And no matter how frequently I washed my hands, I couldn't get rid of the colour or the unpleasant metallic smell that persisted in clinging to my poor middle finger. And to the sides of my fore finger and ring finger, wherever the thimble chanced to touch!

I tried to work around this various ways, most of which I can't even remember now. I used to put coats of clear nail polish on the inside and let it dry, a sort of varnish that worked as a barrier against the tarnish, until it wore off with use and I had to re-lacquer the thimble. Unfortunately, this added a semi-permanent strong acetone smell on top of the metallic odor! But this was my main means of dealing with it, as the various little cloth and leather linings and other inventions failed to work out.

My metal sensitivity gradually got worse, and I started turning the needles, as well. If I took pains to use a new needle and a new thimble, on average I would have them completely ruined about two hours into a serious stitching session. Not only was this expensive, but it was terribly inconvenient. It took the joy right out of stitching for me. I scoured the market for alternatives, both locally and via a few mail-order catalogues, and found nothing to suit. I tried different thimble styles - the plastic seamstress thimbles, the leather quilter's thimbles, and the brass ring thimbles - all to no avail! I tried using a wooden thimble for a while; it was meant to be painted decoratively, and was hard on the skin, but at least it didn't turn my finger black!

There were a lot of different factors that went into my long hiatus from cross-stitching, but this bit of not being able to find a comfortable and useful thimble, or needles I didn't turn, was definitely a contributor. For a short time, I did try to work without a thimble. It took only a few painful needles-jabbed-under-the-fingernail mishaps to cure me of going "au naturel" :) Years passed, with no stitching.

And then, one night while browsing through the craft department at Walmart, I was blessed by The Stitchy Karma Gods and happened upon these most wonderful things:


These are the Unique Flexible Thimbles made by Canadian notions giant H. A. Kidd and Company (they do not sell directly to the general public, but distribute so widely to stores that chances are, if you are in Canada, and seeking to purchase any type of sewing notion, it will be made by this company)! They come only in the three pack, with one each of Small, Medium and Large. When I first started buying them, I had thought they were colour-coded by size, but that turned out not to be the case. The colours are completely random, and there is now a vibrant lime green mixed in with the white, orange and blue. They retail for $2.00 to $3.00, depending on the store. I have no idea what they're made of - some type of plastic, obviously. The package just states: "Soft, pliable, lightweight thimbles are comfortable and fit most finger sizes" and I found that to be true. You can bend them. You can twist them. You can drop them and step on them and squish them (multiple times, in fact!).

They are very lightweight and extraordinarily comfortable to wear, and completely changed my stitching life, inspiring me to seriously pick up my needle again. And I haven't put it down since :) Although you can't see it well in the picture, all the sizes are printed with little raised flower designs over the side ribbing, and one flower in the center of the top. The top of the thimble is rigid, and if you chance to jab it hard with your tapestry needle, the needle will bounce back and the plastic reseals itself.

I had found my Perfect Cross-Stitch Thimble!!! All was well with my stitchy life!

This was several years ago. Several years I spent in cross-stitching bliss.

And then I had to go and try embroidery *rolls eyes*.

Turns out that the sharp embroidery needles, with their lethally pointy ends, do not do so well with plastic thimbles. Indeed, as I painfully learned from experience, they can pierce right through plastic and stab right on under one's fingernail. Le ouch!

So, having had this occur towards the beginning of stitching Bluebirds, I then was forced to go thimble-less, and had lots of holes in my fingers to show for it when I was finished. I had managed to maim myself so badly with some of them that I had to put the work down and leave it for a while, lest I bleed all over my pretty sky blue fabric. I expected this to be a temporary problem, as I really didn't expect that I could embroider my first design, and so wasn't anticipating moving on to a second.

But a funny thing happened. I found out I quite liked embroidery. And that I may, in fact, might want to stitch some more of it in the near future. Now what was I to do?

Fortunately, The Stitchy Karma Gods looked kindly upon me, again! Perhaps for finally having the courage to best my long-time Stitchy Foe, the French knot. Perhaps they approve of Bluebirds of Happiness. Perhaps they were bored that day.

For whatever fateful reason, I went to Michaels one night, in search of a certain item for another project. An item I had saved a coupon for. An item which, it turned out, they did not have. Wandering dejectedly down random aisles, I chanced to look up and find myself in the Quilting section, a place a rarely bother to go. And, lo!:


My Perfect Embroidery Thimble appeared! It is the Clover Protect and Grip Thimble. Clover is a US company that retails widely, including overseas. The retail price on the website is in US dollars; I paid nearly $15.00 Canadian for mine (which is where my unexpectedly freed-up coupon came in handy!).

The Clover Website for the product states: "Protect and Grip Thimbles offer the perfect combination of soft, elastic material with the safety of a metal thimble cap. The scallop design offers breathability, keeping your finger cool. Its excellent elasticity helps the thimble form naturally to your fingertip for a light fit. Safe and smart, the ridged and dimpled metal cap holds the needle tip in place and pushes needles in safely. This new thimble provides comfort and lightness."

Oh, at first, I was a tad bit dubious, I admit. For one thing, I probably could do with the Large, but as they only had the Small and this Medium (and it's pink! PINK!; the Large, sadly, is yellow), Medium it was. The fit is snug, but not uncomfortable. The silicone sleeve is full under the cap - there is no place where the metal touches skin, which is wonderful! I had thought, at first glance, that the metal cap might make the rest of the thimble top heavy, but the silicon used for this thimble is much thicker than the plastic in my Perfect Cross-Stitch Thimble, and is ridged vertically, instead of horizontally, which means that it "hugs" the finger and so doesn't fall off.

When I found my thimble, I had embroidered every element on Bluebirds but the centers of the flowers, and was half-way through doing the flowers and leaves on my Bluebirds test piece, trying to figure out what kind of centers I wanted to put in. This thimble made everything so much easier, and I firmly believe that it is part of what made my conquering of the French knot possible - once I had the thread looped, I gave the needle one firm tap with the top of my thimble and the needle slid through the fabric perfectly, bringing the thread neatly together in the French knot stitch!

In the past, I struggled with trying to pull the needle through in the middle of the stitch, and I think that's part of why I had so much trouble. So I am officially giving all the credit of my French knot success to my Perfect Embroidery Thimble, and my Perfect Embroidery Hoop, which was different than my usual wooden ones and which I will talk about in detail in another post, as this one is getting rather long :)

Oh, and the needles? Well, I still have trouble with them, although I've found that using gold-plated tapestry needles slows the tarnishing significantly. Embroidery needles, which as far as I know do not come in gold-plated form, are going to be problematic. But that's another quandry for another time! ;)

May The Stitchy Karma Gods smile upon you, whatever your stitching needs, today!

I wasn't going to post about this issue, to be honest, as it's a little unpleasant, but having found these products has revolutionized my stitchy life, seriously, and I figure that I can't be the only one with base metal sensitivities. Hopefully, these products (or ones similiar to them), will benefit you as much as they have me!