Showing posts with label Specialty Materials. Show all posts

Friday, January 3, 2020

๐Ÿงต A Needlepoint Round Robin! ๐Ÿงต


Happy New Year ๐ŸŽ‰ Hope you had a wonderful Christmas and that 2020 brings lots of lovely stitching your way ๐Ÿ˜Š I had a fun stitchy adventure over the Holidays! My friend Shannan of Bobbin and Fred told me a about the #passthecanvas project hosted by Dish on Instagram (@dishingstitches) a few months ago and I was so excited to join in!

Dish is sending her beautiful funky geometric needlepoint canvas to stitchers around the world, like a round robin, and we each stitch five blocks in a week before sending it to the next stop! Happily, I received the canvas on December 30th, and I really enjoyed working on it in the quiet of the post-Christmas rush - it's now on it's way from snowy Newfoundland & Labrador ❄ to sunny Florida ๐Ÿ๐ŸŠ

It has been many - MANY - years since I last tried needlepoint! When I was a teenager, I made a sampler out of my Stitchy Guru Mother's leftover supplies from her own bargello adventures in the 1970s. I used her vintage stitch guides to make an add-as-you-go mix of stitch blocks. I remember working on it all one Summer - it was my first and last experience trying to stitch outdoors ๐Ÿ˜‚ The wind liked to play with my threads, all the bright colours attracted flies and creepy crawlies, the sun was in my eyes - it was awful! And the edges of the canvas, even covered with masking tape, were so sharp that I took to wearing a pair of neon pink and black leg warmers on my arms to protect them from scratches, and they were way too hot, which added to the misery ๐Ÿคฃ


That sampler is still in a tote box, waiting to be made into a cushion. I always meant to try more needlepoint, but I had trouble finding the supplies. So although I was super excited to add my block to the travelling canvas, when I first opened it, I was a little intimidated too. I had no idea what threads or stitches to use!


Here's the canvas as I received it! There are so many beautiful blocks, in all kinds of threads - velvets, braids, wools, metallics, and cottons. The stitch texture is fabulous, I wish you could run your fingers over the blocks and feel the stitches for yourself!

The package came with the canvas, a white storage bag (I just used the Ziploc the canvas was in), a little blue book to record your name, stitches used and materials used (which was so helpful and inspiring to read, especially the little messages to other stitchers!), and a cute little pocket stitch guide that was SUPER HELPFUL:


It's hard to tell from this photo, but it's a tiny book! With my favourite lay-flat coil binding. Small enough to slip in a project bag, and packed full of stitch diagrams:


I had so much fun flipping through this little guide and wondering what stitches I could try! Here are my five blocks, with a bit about stitching them:


Like most of the other stitchers, I chose my colours based on the printed blocks on the canvas. I started with the center block, using a leftover black Kreinik braid from the Bag O' Bits I received for the SFSNAD Challenge. I taught myself Norwich Stitch from the stitch guide (although I modified to fit the smaller space).


I absolutely LOVE this stitch, and it's one I will try again! It results in a wonderful woven effect ๐Ÿ˜ It looks complex, but is surprisingly quick and easy to do as long as you pay careful attention to the order of the stitches. Using a non-divisible thread like the braid makes the woven effect stand out and makes it easier to lay the stitches.


Then I added the teal block. I knew I wanted lots of sparkle, but I didn't have many thicker threads suitable to needlepoint canvas on hand. I had intended to buy some DMC perle (pearl) cotton for this project, once I knew which blocks/colours I was stitching, but it being the Holidays, the local quilt shop that carries it was closed and I didn't have time to order anything online.

So I improvised! For this block, I used DMC 3812 (nine strands) with Gutermann Metallic Blending Filament in #235 (4 strands) and did a slanted Satin Stitch.


The small blue block was next. This was my first time using the new DMC Etoile thread in C798 (a gift from my friend Karen!). It is very different than regular floss, it is fluffy and spreads easily, giving it great coverage! I used 9 strands, and it worked great on this canvas. I intended to make Smyrna Cross Stitches, but I liked the base Cross Stitches so much I left them - I love the filigree look, where the canvas peeks through! I added a Woven Cross Stitch in the corner where both stripes meet.

And now for the BLING:


This is, without a doubt, my favourite block ๐Ÿ˜† You know how I love glitter!


This magnificent beauty is Needlecraft Craft Cord, meant for needlepoint and plastic canvas! It has a white base with a rainbow of pastel metallics woven in, in shades of teal, pink and gold. It is #55026, Rainbow White Frizette.


It came in a small bag of stitchy supplies from a thrift store that I bought several years ago, and I have been looking for a way to use it ever since! I was so disappointed when I realized it was too thick to go through the canvas easily. I put it aside, but in the end I decided I really wanted to make it work. So I laid it on top of the canvas, weaving it together at the corner (inspired by the Norwich stitch) and then worked Padded Brick stitch over top, with DMC 957 (six strands). It's a little wonky, and definitely quirky - so much so that I debated taking it out for a while - but it's super sparkly and love it ✨


And for my last block, I ended up going entirely off script. It was spontaneously stitched (seems to be my new stitchy theme lately, and I'm really loving this approach)! I wanted something softer after the bling block, so I used DMC 964 (9 strands) to stitch what I think is Smyrna Star, On Point, with Compensation Stitch edging (aka Make It Up As You Go Along Stitch) ๐Ÿ˜‚ It's not quite what I had in mind when I started stitching, but I do like the fun zig-zag bumpy texture and the pretty seafoam green colour.


And finally, I stitched my initials next to Shannan's (hers are in blue, to the left of mine, and her blocks are on the lower left of mine) using the same pink from the bling block. It is amazing to be part of project with stitchers I don't know from all over the world, but it is also really cool to stitch on the same project with a stitchy friend I do know, which is why I chose to stitch my blocks next to the ones Shannan did ๐Ÿค— I did tent stitch first like all the other stitchers but then couldn't resist making them Cross Stitches ๐Ÿ˜


And here is the canvas, ready to pass on to the next stitcher! I'm so glad that I had to chance to participate in #passthecanvas, and it's inspired me to try more needlepoint in the future ❤๐Ÿงต And if you have any online suppliers you'd recommend, I'd love to hear about them! I've been looking for Canadian shops, but haven't had much luck so far in finding blank needlepoint canvas; most offerings are tent stitch kits, or painted.

Have you participated in a crafty round robin project, or would you like to?


Monday, August 13, 2018

The Joys of Spontaneous Stitching!!!

Please click on any photo to view it larger

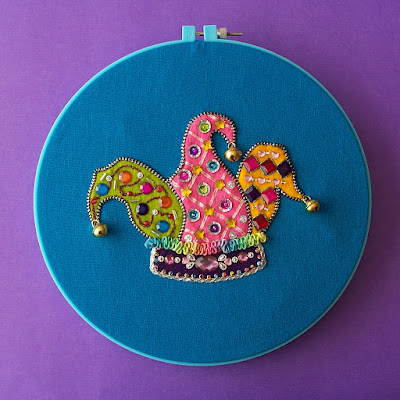
The Joyful Jester
Felt on Linen with Embellishments

I have an exciting project to share today! At the end of June, I discovered that The San Francisco School of Needlework & Design (SFSNAD) was hosting a Stitch At Home Challenge, free to anyone who wanted to enter and open Internationally! If you missed this challenge, worry not, for they will be offering more in the future ๐Ÿ˜Š

Each challenge has a theme, and the theme for this round was Burlesque. Admittedly, at first, I wasn't all that interested as Burlesque brings to mind dancing girls with feather fans at best. However, when I looked through the Inspiration blog, I realized that the SFSNAD interpretation was much broader. As the blog says, in part:

"This Stitch-at-Home Challenge is intended to pull out the whimsical, the subversive, and the exaggerated parts of ourselves and our world. Throughout time, people have been responding to experiences that bump up against their sensibilities, that provoke a feeling of ridiculousness, frustration, or celebration. How do we reframe, exaggerate, or explode these feelings? Where do we find outrageous joy?"

I don't know if it's outrageous or not, but personally I find a great joy in stitching, which far surpasses the simple act of pulling a threaded needle through fabric. It is relaxing, absorbing, fascinating and endlessly surprising, and I wanted to capture some of that happiness in my project ๐Ÿ˜„ I wanted something colourful and cheerful ๐ŸŽจ๐ŸŒˆ!

This image of Harlequin statuettes from the blog caught my eye:


Curious, I did a bit of Googling, and I found these delightful Harlequin illustrations from the Italian Commedia Dell'Arte, which according to the Metropolitan Museum, was " a theatrical form characterized by improvised dialogue and a cast of colorful stock characters that emerged in northern Italy in the fifteenth century and rapidly gained popularity throughout Europe." I loved the exuberant feathered costumes!


And those lead me to modern Venice Carnivale masks, which are bright and colourful:


Naturally, I wanted to make a wearable mask of my own! Something extravagant, with peacock feathers and lots of glittery bits. But as it is too early here for Hallowe'en I couldn't find a basic domino mask to use as a base and I didn't think felt would be stiff enough. I have always loved the figure of a Jester, and the idea of a merry joker, and so I decided to echo the outlandish cheer of the Harlequin costumes in my Jester's Cap.

Every challenge participant received a Kreinik Bag O' Bits to use in their stitching, courtesy of Kreinik, and I was so excited to finally be able to try out their metallic braids! I have been fortunate enough to inherit some stash of their Blending Filaments from my Stitchy Guru Mother, and while I love the shine of those, they are very fragile and need to be combined with a "carrier thread", normally some strands of DMC floss.


My bag had a good mix of colours. Most were short strands and not useable for any amount of stitching but there was a wonderful variety of textures and it was a great introduction to the wide range of products Kreinik manufacturers. It has definitely piqued my interest! There were three short two-inch lengths of the prettiest silver holographic flat ribbon that shone so brightly, and I'm going to search for that thread!


I had a lot of Big Ideas, but in the end I found a simple outline pattern I liked, a heraldic Jester's Cap from the Mistholme Pictorial Dictionary of Heraldy (which is well worth a browse if you're interested in old crests and the way they were designed):


And then I just went to town! I pulled out my collection of felt, and my Magical Tin of Embellishments. What's really interesting is that as long as I can remember, my Stitchy Guru Mother has keep a wonderful box of trimmings which comes out only for really special projects - Hallowe'en costumes, Christmas ornaments, dresses for special events - and has all kinds of pretty trims, crystals, rhinestones and sequins. I was thrilled to discover that I've FINALLY accumulated enough pretties to have one of my own, a hexagonal Quality Street chocolate tin full to the brim with sparkle and glitter ❤๐Ÿ’Ž✨

There was no real rhyme or reason to the design, it was truly Spontaneous Stitching! I printed off the line drawing and cut it into four pattern pieces - three horns and the band. Then I cut those pieces out of felt (green, pink, yellow and purple). Then I spent an incredibly happy sunlit afternoon absorbed in playing with sparklies, spreading my supplies out on my Grandma's kitchen table and playing with the crystals until I got a design I liked. I glued the acrylic rhinestones on with Aleene's Fabric Fusion Glue.

Here's a Before-and-After shot, which shows the difference the trim makes! The pieced pattern is on the left, embellished with glued-on rhinestones, Kreinik threads, sequins and sead beads, and the fully embellished Cap is on the right, with the black-and-silver braid, silver picot trim, ruched ribbon band and jingle bells added:


Everything except the rhinestones was hand-stitched on, using Invisible Thread (Coats Transparent). This is very fine, and is excellent for adding seed beads!

I knew I wanted to echo the diamonds of the traditional Harlequin costume, so on the right side I glued square rhinestones at an angle to create diamonds of pink, red and purple. I outlined these in a turquoise Kreinik braid (I think it's a #8 braid) and added large silver e-beads. The center section has a Trellis of Couched iridescent Kreinik ribbon with layered sequin filling and the left horn has rhinestone "Polka Dots", with scattered silver bugle beads and Stem Stitched Kreinik braid, in a pink/purple mix.


The trims I added took the most time to sew on, but they added a lot of impact:


The local quilt store was once a craft store and they have a very small stock of odds and ends. That is where I found this fabulous silver-and-black braid, which is actually meant for Plastic Canvas. I outlined all three of the horns of the hat in this thread, Couching it to follow the shape of the pattern. I love it, and to me it feels Harlequin-like ๐Ÿ˜Š

The background fabric, the pretty peacock blue, is a linen I found there too!

The other four trims are silver braids made by Tahl. After some auditioning, I went with the one at the top left, a pretty picot braid with diamond-patterned edges. I Couched this around the bottom of the hat band, and then I filled each little picot with a silver-lined sparkly seed bead in an alternating pattern of turquoise, yellow and red. Although it's a very small detail, the beads catch the light wonderfully in real life!

Here's my attempt to capture the sparkle, in the sunshine:


My favourite part is probably the rainbow Ruched Ribbon at the top of the band:


It took me several tries and many stabbed fingers, but eventually I - more or less - got the trick of ruching the ribbon, which is multi-coloured double-sided satin by Offrey. I used a simple zig-zag design shown in the tutorial for a flower on Nikki, In Stitches.

To make sure my stitches didn't show, I used Invisible Thread, which made the process slow going. The stitches vanished against the variegated colours when the ruching was complete BUT I couldn't clearly see the stitches as I was making them, which made it difficult to keep them even. I ended up marking dots along the sides for spacing with a purple Disappearing Marker. I would suggest practicing on a plain colour ribbon with matching sewing thread first! It is a great technique I'd like to try again.


The three jingle bells are ones I've saved from the collars of the Lindt Easter Bunnies! They are so pretty, and I always hoped to find a use for them. They sound very nice when rung too ๐Ÿ˜ The Bunnies have become a family tradition in recent years. The bells would look lovely on Christmas ornaments too - any excuse to buy more chocolate ๐Ÿซ


When I was a little kid, my Stitchy Guru Mother created a marvelous distraction device called The Glue Box. It was a plastic container filled to the brim with construction paper, crayons, markers, stickers, glitter glue, pipe-cleaners, pom-poms, popsicle sticks, beads and other cool crafty stuff. Many were the hours I passed in a creative blur, making one genius - to my mind, I'm sure - artwork after another to proudly be given to relatives as gifts or displayed on the fridge until the next "masterpiece" was concocted.

There was spontaneity in it, and joy. Truly outrageous, overwhelming, all-encompassing joy! As an adult, I don't often give myself free reign to just jump in and experiment with something, and I'm sure I'm not the only one. This was a challenge for me in many ways, but most importantly to my confidence. Especially early on, I nearly gave up on my Jester's Cap for good several times - I thought it was too juvenile, too hokey, too kitschy, too amateurish. How, I wondered, could I possibly submit this to the SFSNAD?

But as I persevered, something amazing happened! I remembered The Glue Box and the happiness of making something just for the sake of making something. To my surprise, I found a measure of real joy, and in these difficult days of loss and family illness, it is all the rarer. It's a true treasure to find, and I am extremely grateful. In the future, I hope to do some more Spontaneous Stitching, and I highly recommend trying it!

Thanks very much to The San Francisco School of Needlework & Design (SFSNAD) and Kreinik for hosting the Stitch At Home Challenge and for opening it up to International stitchers like myself! I really enjoyed trying new techniques (the felt applique and ribbon ruching), new materials (Kreinik metallic threads) and expanding my stitchy horizons!


Helpful Articles About Kreinik Metallic Threads:

๐Ÿ’  From the Kreinik blog: How to Read a Kreinik Thread Label
๐Ÿ’  Nordic Needle's Stitching Guide on Kreinik Metallics has a brief overview of the history of metallic threads and the Kreinik Company, as well as stitched samples;
๐Ÿ’  Peacock & Fig has a wonderful article that demonstrates the difference between the Blending Filament and the Braids in great stitched samples;
๐Ÿ’  The Cross Stitch Review Blog has very detailed overview of the Blending Filament;
๐Ÿ’  Ancora Crafts has an in-depth Glow In The Dark Thread comparison, in which most of the contenders are Kreinik, as does the Freudian Stitch blog.

Have you ever tried indulging your whims and Spontaneously Stitching? Would you?!

Wednesday, May 18, 2016

GG SAL: Silk Lovebirds Final Finish!


I'm so happy to report that I realized my goal from April's Gifted Gorgeousness SAL and final-finished my Silk Lovebirds off into this pretty diamond ornament for the merry month of May! Although I struggled a bit with the finishing process, I am very pleased with the result :)

For the full project details, please read my last GG post here. A quick summary:

~ Pattern from Cross Stitch & Country Crafts magazine, Sept/Oct 1990
~ Worked on gifted 14 count Aida in a pretty buttercream yellow
~ Stitched with gifted overdyed silk floss, the gorgeous Airlie (#95) by Dinky Dyes
~ Stitched using the Mirror Technique for Variegated Threads

Recently, I've been experimenting with ornament making methods! One of my long-standing stitchy ambitions is to get better at final-finishing so I'm pushing myself to try new things :) My usual go-to method is using a quilt batting insert with fabric backing and corded edging, such as I did with my Blackwork Snowflake.

Although in the past I greatly preferred store-bought cording, like the navy cording I used in that tutorial, I'm hand-twisting my own lately, which is harder to attach but has the great advantage of being a perfect colour-match to the stitching!

For this ornament, I used two squares of mat board and wrapped them each with a piece of quilt batting, which I hot-glued to the back of each mat board square.

I used a beautiful dusky blue 100% cotton for the backing fabric:


Then I laced each side around a mat board form, and sewed the two halves together. Because of the padding, and the stiffness of the mat board, both sides turned out to be rather thick and it was difficult to sew them together. I ended up using a curved upholstery needle for the first ladder stitch pass, stitching about 1/4 inch in from the edge, and then did a second pass close to the edge like usual.

The first pass brought both sides together loosely while the second pass tightened the seams and brought both sides together fully, giving me a more even surface for attaching the cording. Although this was more time consuming, it worked well!

Tanja Berlin of Berlin Embroidery Designs has a great photo tutorial showing how to lace work onto mat board, and there is a close-up look at lacing small squares here.

Vonna at The Twisted Stitcher calls this style of mat board finish a basic Flat Ornament and has a few interesting variations (the Layered Flat Ornament and the super cute Layered Felt Mounted Ornament) on her popular finishing blog.

Mary Corbet of Needle N' Thread finished a goldwork embroidery ornament much the same way back in 2008 and had the same troubles with extra thickness that I did! She greatly reduced the thickness by remaking the ornament with a thinner board.

This great tutorial, with a style similar to my ornament, suggests using comic book boards instead of mat board, as it is much thinner but still stiff and of archival acid-free quality, and that's something I'm definitely going to check out :)

You can see the thickness mostly at the corners, like this:


Thankfully, the cording mostly covers it and it's not really noticeable at all once the ornament is hanging up! I do like the nice, crisp corners that mat board makes.

I also added some small squares of batting in the middle of the ornament to fill in the lacing gaps and make sure the center was flat and even:


This photo also shows the cording join at the bottom left, right above the start of the tassel. That was the single most troublesome part of the finishing, sinking the end of the cording back into the ornament and making it look as seamless as possible.

You can definitely see the join, obviously, but it was the neatest I could make it (and I redid that part over a dozen times!). Eventually, I reached that dangerous point where I needed to stop fussing with it and let it be or take it apart altogether and start over, and I am glad that I decided to stop and take a step back.

I really find that when you're working closely with little details for a while that they can overwhelm you with dissatisfaction, but if you take a break and then look at that detail in larger context, it may not be nearly as big of a problem as you thought :)

Here is a close-up of the tassel, which is my favourite part:


I love tassels! As I mentioned, I made the cording by hand, and I also made a smaller corded hanging loop and the cording loop that was the basis for the tassel. In all, I used 6 full skeins of DMC 3803 - 3 skeins for the cording, 1 skein (split evenly) for the two cording loops, and 2 skeins for the tassel. I wanted both the cording and the tassel to be extra thick, and I really like the way it turned out :)

I tied the tassel with a bit of the silk floss I had left (amazingly - and sadly LOL - this project used nearly all of the 8 meter skein of Airlie silk!) and simply wrapped it around the tassel, securing it in the back with some stitches through the wrap:


I love the rainbow effect, and the sheen of the silk against the cotton floss!


Initially, I had planned to use a metallic gold cording, and I'm really glad that I went with a simple floss instead. When I first decided on floss, I was thinking of a light buttercream yellow to match the Aida but I couldn't find an exact match.

Although the burgundy 3803 is not actually used anywhere in the stitching, it's a darker match that is close to the deepest mauve in the overdyed silk and I think it really sets off the lighter colours and subtle tone shifts in the variegated thread.

My Stitchy Guru Mother has a rule for colour-matching a sewing thread to fabric - when in doubt, go with a darker thread instead of a lighter one - and I think it applies to choosing finishing trims like cording as well :)


What is your favourite way to final-finish stitchy ornaments? I'd love to know! If you're reading this post in your e-mail, please visit the blog to leave a comment :)


Gifted Gorgeousness is a monthly SAL hosted by Jo @ Serendipitous Stitching! It is a fun and relaxed way to thank those who have given us Stitchy Gifts and show off what we've made with those generous gifts. It's never to late to come and join us!

Thursday, May 5, 2016

Please Vote For Me in the UT Contest!


MOST WONDERFUL NEWS!!!

I made it to the Top 5 in the Hand Embroidery Category of the Urban Threads Coloring Contest! You probably already know Urban Threads (UT) as the designers of amazingly cool machine and hand embroidery patterns, and may remember their last Coloring Contest held 2013 with the Create theme.

Although I'm fairly new to embroidery, and this is my first time doing an embellished piece like this, when I saw the theme of this contest design - which is "Art is Craft" - I was very inspired by the sentiment and decided to try a version of my own. 

I deliberately chose to use more "crafty supplies" - craft thread, buttons, beads and sequins - to enhance the message. All of them were inexpensive, and pretty common.

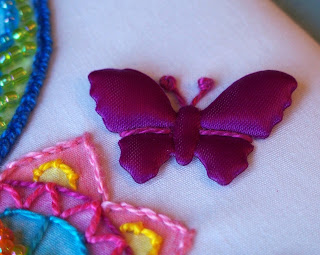
The two satin butterfly appliques and the fanciful peacock-inspired Feather were added to symbolize Creativity, and the idea of "Letting your imagination soar!"

The coloring method I used was Crayon Tinting (learned from this tutorial with a very cute pair of pears on the UT site), and the outline was entirely hand-stitched using a variety of stitches, and heavily embellished with beads and sparkle :)

There are two categories in the contest, the first is Machine Embroidery which has 10 Finalists and Hand Embroidery, my category, which has 5 Finalists. I'm so thrilled to be considered as a Finalist, and I would really love to win the amazing prize pack. 

Please - pretty pretty please! - consider visiting the contest and voting, as there is so much talent on display and all the interpretations are very different!

To see all the entries and to vote, please visit this page:

Voting is open to everyone and takes only seconds - and you do not need to sign-up or enter any personal information! The winners will be chosen entirely by popular vote, so I'd really appreciate your help :)

Voting closes May 10 at Noon, Central Time

As a stitcher, I always enjoy learning more about the maker's creative process and reading about how a project develops! So I'd like to share some more information about my entry, including materials and stitches. First, here's some detailed photos:


Here's a view from the side to show the dimension the beads add to the design


Here is a close-up of the fanciful Feather, filled with beads and sequins and an acrylic heart gem, which is super sparkly! This ended up being one of my favourite parts :)


And this is a collage showing my stitching progress, from Crayon Tinting to Stitching to the start of Beading to the Final Embellishment. I learned so much along the way!

This project has been a marvelous experience for me, and it wasn't easy. I had to totally rethink my approach several times. I started off with the idea to invert the design colors and stitch a white outline on black fabric, and color it with sequins, but that didn't work out. It's so hard to transfer an embroidery design onto dark fabric!


So by necessity I needed a light fabric to trace the design on, which finally lead me to using a basic white polycotton. Because it was a little thin, after tracing I backed it with iron-on interfacing from Pellon. This made it sturdy enough to stitch on!


After pondering many different ideas on how to add color, and nearly giving up all together a few times, I remembered Crayon Tinting and looked up some tutorials online. In addition to the UT tutorial, which was my main inspiration, I found some others at Wild OliveLittle Dear TracksPimp Stitch and A Girl In Paradise. All the tutorials say that you should use light pressure, so you can build up the color, and short strokes to keep it even, and there is an interesting video showing this here.

There is also an alternate White Background or Foundation method developed by Crabapple Hill Studio for quilts with embroidered blocks, which is illustrated in photo tutorials at Blueberry Backroads and Sew Mod. A video for this is here.

Both methods use a hot, dry iron to set the wax, which then seeps into the cloth. It is semi-permanent, and so Crayon Tinting is not recommended for washable items.


Here are some testers I made: White Background at top, Just Color at bottom


After Ironing: White Background on left, Just Color on right

As you can see, I found that the White Background method did not work for me. The white wax seemed to saturate the fabric, making it difficult to color over and leaving streaks, and when it was ironed, the coloured wax bled badly outside the lines and made the fabric very stiff. It also faded the color and made it look blotchy.

So I recommend coloring directly on the fabric, though coverage will depend on the materials you are using so doing quick testers like these might be a good idea. The one thing everyone seems to agree upon is the superiority of Crayola Crayons.


So I dug out my trusty old 64-pack tin; I was gifted this new in 1993! I collect tins, and I've always loved this one. It's been years since I've done anything with crayons, but the smell of the wax immediately took me back to my childhood :)


After some scribbles on scrap fabric, I chose some colors to match my thread:


I used Loops & Threads Craft Thread (the Michaels Brand), which is like a coarse version of Perle (Pearl) Cotton. I loved the fun, bright, vibrant colours and they were easy to work with with! In the end, I didn't use the Lavender in the photo above but added a Dark Green J. P. Coats Craft Thread, so I used 12 different colours in all.


The seedbeads I used to outline the letters - which was done by mostly by Couching - are inexpensive large "E" glass beads, with a pretty transparent AB (Aurora Borealis) finish. As you can see, I actually bought them at the dollar store :) I used all of the colors (7 total) except the gold at the bottom right.


I really love the extra dimension these beads added, and the way the variations in the AB coating shimmer with different tones of color, and they seem to glow in the sun! They are so sparkly in real life that the photos don't really do them justice.


Close-Up of Buttonhole Wheel (Yellow) Flower Center

Hand Embroidery Stitches Used Include:
1. Back Stitch
2.  Stem Stitch
3. Long Stitch
4. French Knots
5. Blanket Stitch
6. Buttonhole Wheel
7. Detached Fly Stitch
8. Chain Stitch
9. Heavy Chain Stitch (used on the Feather outline, learned for this project)
10. Scalloped Buttonhole Picot Trim (also learned from this project, variation of this trim by Mary Corbet worked over Back Stitch instead of Chain Stitch)
11. Cross-Stitch (used to sew on the buttons)
12. Couching (the majority of the beading)


Close-up of Scalloped Buttonhole Picot Trim Flower Petals

Finally, after the stitching and beading was finished, and I had filled in the fanciful Feather with sequins secured with smaller coordinating seedbeads and bugle beads, I added some embellishments. I used three colors of basic shirt buttons as accents. 

Then, a serendipitous thing happened: while sifting through the tin where I keep my sequins and fancy trims, a little bag of puffy satin butterfly appliques fell out! And I suddenly remembered buying these appliques many years ago when I was about eight years on, a trip to Florida to visit my Grandparents. 

Butterflies have always symbolized creativity to me, and when two of the appliques just happened to match perfectly, I just couldn't resist adding them!


To sew them on, I used coordinating Craft Thread and took Long Stitches over the wing joins and then made antennae using Long Stitches and French Knots! I hope they bring me a little luck in the Contest :)

So there you have it! My Craft Is Art embroidery from start to finish. Overall, the best thing about this project is that once it got going, it was FUN. Working with the bright colors of the crayons and the chunky threads all brought me back to the many very happy hours I spent coloring and crafting when I was a child ;)

I know Adult Coloring is a huge trend right now, and I even bought a book to try, but I don't think it's for me. But this method of "coloring" embroidery with threads and embellishments is something I can get behind, and I may try it again in the future!


Please consider voting for me!
I would greatly appreciate your support :)

If you have any questions about my entry, feel free to ask away in the comments! What do you think about Crayon Tinted Embroidery - would you try it?